
Owner manual


© 2007 American Honda Motor Co., Inc. - All Rights Reserved. AII 36587 (0705) 15 of 17
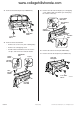
53. Remove the vehicle grommet from the left
C-pillar.
54. Insert the rear camera harness through the
grommet, and route the rear camera harness
through the vehicle grommet opening. Seat the
grommet into the grommet hole.
55. Using electrical tape, secure the grommet to the
rear camera harness, and pay attention to the
angle of the grommet.
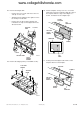
56. Inside the passenger’s compartment turn down the
rear panel insulator. Pull the rear camera harness
out from the hole in the C-pillar, and remove the
tape and wire from the rear camera harness.
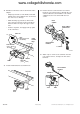
59. Route the rear camera subharness forward along
the vehicle harness, and secure the subharness
to the vehicle harness with five wire ties.
57. Remove the lock from the 6-pin connector. Plug
the rear camera harness terminals into the 6-pin
connector as shown. Reinstall the lock.
58. Get the rear camera subharness. Plug the rear
camera subharness 6-pin connector into the rear
camera harness 6-pin connector, and secure the
connected 6-pin connectors to the vehicle
connectors with two wire ties.
4709071
K
VEHICLE
GROMMET
GROMMET
VEHICLE
GROMMET
OPENING
REAR
CAMERA
HARNESS
BED BULKHEAD
REAR
CAMERA
HARNESS
WIRE
LEFT C-PILLAR
4712012K
FRONT
VEHICLE PANEL
OPENING
REAR CAMERA
HARNESS
6 TERMINALS
TAPE
6-PIN
CONNECTOR
6-PIN
CONNECTOR
Red/
Red
6-PIN
CONNECTOR
Black/
Black
Brown
Blue/
Black
White/
White
Yellow/
Yellow
WIRE
LOCK
Harness side
view
4712031
K
FRONT
VEHICLE
HARNESS
VEHICLE
CONNECTOR
REAR CAMERA
HARNESS
6-PIN
CONNECTOR
REAR CAMERA
SUBHARNESS
WIRE TIES
REAR CAMERA
SUBHARNESS
6-PIN
CONNECTOR
WIRE TIE
2 WIRE
TIES
4709080
K
TAPE
GROMMET
REAR
CAMERA
HARNESS
VEHICLE
GROMMET
OPENING
UP
DOWN
C-PILLAR
GROMMET
www.collegehillshonda.com