Non-Programmable Thermostat RTH111 Series Owner’s Manual Read and save these instructions. For help please visit yourhome.honeywell.com Identify System Type This thermostat is compatible with the following systems: • • • • • • Gas, oil or electric furnace Central air conditioner Hot water system with or without pump Millivolt system Central heating and cooling system Heat pump without auxiliary/backup heat Do you need assistance? We are here to help.
ATTENTION: MERCURY RECYCLING NOTICE Hg N O M E R C U RY N O B OT E MERCURIO This product does not contain mercury. However, this product may replace a product that contains mercury. Mercury and products containing mercury should not be discarded in household trash. For more information on how and where to properly recycle a thermostat containing mercury in the United States, please refer to the Thermostat Recycling Corporation at www.thermostat-recycle.org.
Table of contents Installation Appendices Troubleshooting...................................12 Limited warranty..................................13 Installation.............................................3 Advanced Installation............................8 About your new thermostat Controls and Home screen quick reference....................................10 Compressor protection........................11 Replace batteries................................
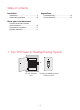
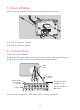
2 Remove Old Thermostat Remove old thermostat but leave wallplate with wires attached. If you have an older thermostat with a sealed mercury tube, turn to page 2 for proper disposal instructions. Do not remove wallplate yet Terminal designation C C MCR33823 3 Label Wires with Tags Label the wires using the supplied wire labels as you disconnect them. Wire Labels C C Terminal designation M28100 4 Separate Wallplate from New Thermostat Remove wallplate from the new thermostat and mount onto wall.
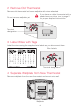
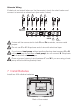
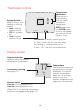
Mount Wallplate Mount the new wallplate using the included screws and anchors. W/ Aux Not Used M32714 Drill 3/16-in. holes for drywall Drill 3/32-in. holes for plaster 6 Connect Wires Simply match wire labels. If labels do not match letters on the thermostat, check “Alternate Wiring” on page 6 and connect to terminal as shown (see notes, below). WIRE HOLE G INSERT WIRES AND TIGHTEN SCREWS SCREW R Y W W LABELED WIRES Remove metal jumper if you have both R and Rc wires.
Alternate Wiring If labels do not match letters on the thermostat, check the chart below and connect to terminal as shown here (see notes, below). 4 B O G Y 4 W NOT R USED Rc M32734 If wires will be connected to both R and Rc terminals, remove metal jumper. Do not use C or X. Wrap bare end of wire with electrical tape. If you have a heat pump without auxiliary/backup heat connect O or B, not both. If you do not have a heat pump, do not connect B. Wrap bare end of wire with electrical tape.
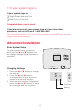
8 Set fan operation switch Move the switch to the proper setting: RTHXXXX Gas or Oil: For gas or oil heating systems, leave the fan operation switch in this factory-set position (for systems that control the fan in a call for heat). GAS OR OIL ELECTRIC OR HEAT PUMP Electric or Heat Pump: Change the switch to this setting for heat pump or electric heat systems. (This setting is for systems that allow the thermostat to control the fan in a call for heat, if a fan wire is connected to the G terminal.
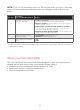
11 If your system type is... If your system type is: q Single Stage Heat and Cool q Heat Only or Cool Only Congratulations, you’re done! If you are not sure of your system type or if you have other questions, call us toll-free at 1-800-468-1502. This thermostat works on 24 volt or 750 mV systems. It will NOT work on multistage conventional systems. Advanced Installation Enter System Setup To enter system setup, press and hold both the s and t buttons until the display changes (approximately 5 seconds).
NOTE: If you do not press any button for 60 seconds while you are in the setup menu, the thermostat automatically saves any changes made and exits the menu. Function Description Press the s or t button to Setting 5 select your heating system and optimize its operation 5 Gas or oil furnace: Use this setting if you have a standard gas or oil furnace that is less than 90% efficient. 6 Electric furnace: Use this setting if you have any type of electric heating system.
Thermostat controls System Switch is used to control your heating or cooling system. • Heat: Heating system control. • Off: All systems off. • Cool: Cooling system control. Temperature adjustment Press the up or down buttons until you reach the desired temperature. Fan Auto On Heat Off Cool M32761 NOTE: Make sure the SYSTEM switch is set to the system you want to control (Heat or Cool). Fan Switch is used to control your fan. In “Auto” mode, the fan runs only when the heating or cooling system is on.
Built-in compressor protection This feature helps prevent damage to the compressor in your air conditioning or heat pump system. Set Damage can occur if the compressor is restarted too soon after shutdown. This feature forces the compressor to wait 5 minutes before restarting. 77 Cool On M32769 During the wait time, the display will flash the message Cool On (or Heat On if you have a heat pump). When the safe wait time has elapsed, the message stops flashing and the compressor turns on.
Troubleshooting If you have difficulty with your thermostat, please try the following suggestions. Most problems can be corrected quickly and easily. Display is blank • • • • Check circuit breaker and reset if necessary. Make sure power switch at heating & cooling system is on. Make sure furnace door is closed securely. Make sure fresh AAA alkaline batteries are correctly installed. Heating or cooling system does not respond • Set system switch to Heat.
1-year limited warranty Honeywell warrants this product, excluding battery, to be free from defects in the workmanship or materials, under normal use and service, for a period of one (1) year from the date of purchase by the consumer. If at any time during the warranty period the product is determined to be defective or malfunctions, Honeywell shall repair or replace it (at Honeywell’s option).
Automation and Control Solutions Honeywell International Inc. 1985 Douglas Drive North Golden Valley, MN 55422 yourhome.honeywell.com ® U.S. Registered Trademark. © 2015 Honeywell International Inc. 33-00136ES—01 M.S. 08-15 Printed in U.S.A.
Termostato No Programable RTH111 Serie Manual del propietario Lea y guarde estas instrucciones. Para obtener ayuda, visite yourhome.honeywell.
ATENCIÓN: AVISO PARA EL RECICLAJE DEL MERCURIO Hg N O M E R C U RY N O B OT E MERCURIO Este producto no contiene mercurio. Sin embargo, este producto puede reemplazar uno que contenga mercurio. El mercurio y los productos que contengan mercurio no se deben desechar con los desperdicios domésticos. Para más información sobre cómo y dónde reciclar adecuadamente un termostato que contenga mercurio en los Estados Unidos, consulte con Thermostat Recycling Corporation en www.thermostat-recycle.org.
Índice Instalación Apéndices Localización y solución de problemas......................................12 Garantía limitada.................................13 Instalación.............................................3 Guía de instalación avanzada...............8 Acerca de su nuevo termostato Referencia rápida de los controles y la pantalla de inicio..........................10 Protección del compresor...................11 Reemplazo de la batería.....................
2 Remueva su viejo termostato Retire el termostato existente pero deje la placa de montaje con los cables adheridos. Si el termostato existente tiene un tubo de mercurio No retirar la placa sellado, vaya a la página 2 para obtener instrucciones mural todavía sobre cómo desecharlo adecuadamente. Designación de los terminales C C 3 Identifique los cables MCR33823 Identifique los cables a medida que los desconecta, utilizando las etiquetas que se suministran.
5 Coloque la placa de montaje Monte la nueva placa de montaje utilizando los tornillos y anclajes que se suministran. W/ Aux Not Used M32714 Taladre agujeros de 3/32 in. (2,4 mm) en yeso Taladre agujeros de 3/16 in. (4,8 mm) en paneles de yeso 6 Conecte los cables Simplemente haga corresponder las etiquetas de los cables. Si las etiquetas no corresponden con las letras del termostato, revise “Conexión alternativa” en la página 6 y conecte al terminal como se indica (refiérase a las notas que siguen).
Conexión alternativa Si las etiquetas no corresponden con las letras del termostato, revise la tabla que sigue y conecte al terminal como se indica aquí (refiérase a las notas que siguen). 4 4 No Conecte B O G Y W NOT R USED Rc MS32734 Si los cables se conectarán a los terminales R y Rc, retire el puente metálico. No utilice C o X. Envuelva los extremos pelados del cable con cinta aislante. Si tiene una bomba de calor sin calefacción auxiliar/de reserva conecte O o B, no ambos.
8 Configure el interruptor de funcionamiento del ventilador RTHXXXX Mueva el interruptor a la configuración adecuada: Gas o aceite: para los sistemas de calefacción de gas o aceite, deje el interruptor del ventilador en esta posición configurada de fábrica (para sistemas que controlan el ventilador en una orden de calefacción). GAS OR OIL ELECTRIC OR HEAT PUMP GAS OR OIL Eléctrico o bomba de calor: cambie el interruptor a esta configuración para sistemas de bomba de calor o de calefacción eléctrica.
11 Si su tipo de sistema es... Si su tipo de sistema es: q Calor y frío de una sola etapa q Calefacción únicamente o Refrigeración únicamente ¡Felicitaciones, ya está listo! Si no está seguro del tipo de sistema que tiene o si tiene otras preguntas, llámenos gratis al 1-800-468-1502. Este termostato funciona con sistemas de 24 voltios o 750 mV. NO funcionará con sistemas convencionales de etapas múltiples ni con sistemas de 120/240 voltios.
NOTA: Si no se presiona ningún botón durante 60 segundos mientras esté abierto el menú de configuración, el termostato salvaguarda los cambios automáticamente y sale del menú. Descripción Presione el botón Función s o t para Configuración 5 elegir su sistema de 5 Sistema de calefacción de gas o aceite: utilice esta configuración calefacción y optimizar su si tiene un sistema de calefacción estándar de gas o aceite cuyo funcionamiento rendimiento sea inferior al 90%.
Controles del termostato Ajuste de la temperatura El interruptor del SYSTEM (sistema) se utiliza para controlar el sistema de calefacción o refrigeración. • “Heat” (calor): Controla el sistema de calefacción. • “Off” (apagado): Apaga todos los sistemas. • “Cool” (frío): Controla el sistema de refrigeración. Presione los botones de desplazamiento hacia arriba o hacia abajo hasta que llegue a la temperatura deseada.
Protección del compresor incorporada Esta función ayuda a prevenir el daño del compresor en su acondicionador de aire o en su sistema de bomba de calor. Set El compresor puede dañarse si se vuelve a iniciar inmediatamente después de ser apagado. Esta característica hace que el compresor demore unos minutos antes de volver a iniciarse. 77 Cool On M32769 Durante el tiempo de espera, la pantalla mostrará el mensaje “Cool On” (o “Heat On” si tiene una bomba de calor).
Localización y solución de problemas Si tiene dificultades con el termostato, intente seguir las sugerencias que se indican a continuación. La mayoría de los problemas pueden corregirse rápida y fácilmente. La pantalla está vacía • • • • El sistema de calefacción o refrigeración no responde • • • Controle el interruptor de circuito y, si es necesario, reinícielo. Asegúrese de que el interruptor de energía del sistema de calefacción y refrigeración esté encendido.
Garantía limitada de 1 año Honeywell garantiza este producto, a excepción de la batería, por el término de un (1) año contra cualquier defecto de fabricación o de los materiales, a partir de la fecha de compra por parte del consumidor. Si en cualquier momento durante el período de garantía se verifica que el producto tiene un defecto o que funciona mal, Honeywell lo reparará o reemplazará (a elección de Honeywell).
Automatización y control desenlace Honeywell International Inc. 1985 Douglas Drive North Golden Valley, MN 55422 yourhome.honeywell.com ® Marca Registrada en los E.U.A © 2015 Honeywell International Inc. 33-00136ES—01 M.S. 08-15 Impreso en EE. UU.