
Operation Manual


USiNG yOUR CLEaNER
CLEaNER MaiNTENaNCE
Turn the cleaner on by sliding the ON/OFF switch forwards to one of the following settings: [5]
• FLOOR : ideal for hard floor surfaces. Normal power without power brush rotation. [B2]
• CARPET: ideal for carpets and rugs. Normal power with agitator. [B3]
• TURBO: press Turbo button for full power on either floor or carpet mode. The Agitator will rotate at maximum speed. [C]
DISPLAY LED*
This cleaner is equipped with a LED display. When the product is on, the display will report the following information:
BATTERY LEVEL INDICATOR*:
• 4 bars = 100% charge
• 3 bars = 75% charge
• 2 bars = 50% charge
• 1 bar = 25% charge
When the batteries are empty the last battery level indicator will ash for 20 seconds before the product switches o automatically.
TURBO: when the Turbo mode is activated on the ergonomic handle, the Turbo icon will light in blue.
CHARGE INDICATOR: When the product is charging, the battery icon will ash every 2 seconds. When fully charged, the icon will
stop ashing and remain lit while the charger is plugged in. The icon will switch o when the cleaner is in use.
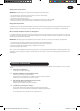
Emptying the Dust Container
1. Press the dust container release button and pull the dustbin forwards to remove it from the main body of the cleaner. [6]
2. Hold the unit over a bin and push the bin empty slider to empty the dust container. [7]
3. Return the dust container to the cleaner main body. [8].
Cleaning the Filters
1. Press the dust container release button and pull the dust bin forwards to remove it from the main body of the cleaner. [6]
2. Pull the lter and shroud assembly from the dust bin using the grips on the lter frame. [9]
3. Twist the lter anticlockwise to remove it from the shroud. [9]
4. Wash the lter in lukewarm water and leave to dry for 24 hours. Once thoroughly dry reassemble to the shroud and dustbin.
[10]
5. If required, wash the dustbin in lukewarm water. Ensure it is fully dry before returning to the main body of the cleaner. [13]
6. Return the dust container to the cleaner main body. [8].
Note: Do not use hot water or detergents when cleaning the lters. In the unlikely event of the lters becoming damaged, t a
genuine Hoover replacement. Do not try and use the product without a lter tted.
Important: For optimum performance, always keep your lter clean. We recommend that the lter should be washed once a month.
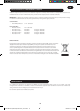
PREPaRiNG yOUR CLEaNER
4
* Certain Models Only
GB
1. Line up the ergonomic handle to the main body of the cleaner and x in position with the supplied locking screw. [2]
2. Line up the nozzle with the main body and rmly push into the neck until it locks into place. [3]
3. Plug charger into the DC socket. For rst use, charge your cleaner for 24 hours. [4]
4. The charge indicator will ash when charging.
Note: To remove the nozzle press the nozzle release button and pull away from the main body.
Note: Use only the charger supplied with your cleaner to recharge.
Important: When charging the cleaner the On/O switch must be in the OFF position.
It is normal for the charger to become warm to the touch when charging.
If the operating times reduces after repeated use let the cleaner run until it stops then recharge for 24 hours, repeat this monthly
for best results.
Unplug the charger in the event of prolonged absence (holidays, etc.). Recharge product again before us as batteries may self
discharge over increased periods of storage.
AthenManual-UpdateSeptember2012_union.indd 4 13/09/2012 11.12.05