Instruction Book HND 7515 DISHWASHER
CONTENTS Safety advice Setting up, installation Water softener unit Loading the salt Adjusting the upper basket Loading the dishes Information for test laboratories Loading the detergent Types of detergent Loading the rinse aid Cleaning the filters Some practical hints Routine cleaning and maintenance Description of the control panel Technical data Programme selection and special functions Programme guide Identifying minor faults Your guarantee pag. pag. pag. pag. pag. pag. pag. pag. pag. pag. pag. pag.
SAFETY INSTRUCTIONS WARNING ! Knives and other utensils with sharp points must be loaded in the basket with their points down or placed in a horizontal position. There are certain basic safety rules which are valid for any domestic appliance. Installation Daily use ■ Make sure that the plug fitted to the machine is compatible with the power supply socket.
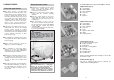
Water connection ■ The hose can be hooked over the side of the sink, but it must not be immersed in water, in order to prevent water from being syphoned back to the machine when this is in operation (fig. 4Y). Connecting the outlet hose IMPORTANT The appliance must be connected to the water mains using new hose-sets. The old hose-sets should not be reused. 1 ■ The outlet hose should disharge into a standpipe, making sure that there are no kinks (fig. 4).
INSTALLATION IN FITTED KITCHENS Underneath existing work top (when fitting beneath a work top) Fitting between existing cabinets ■ In most modern fitted kitchens there is only one single work top under which cabinets and electrical appliances are fitted. In this case remove the work top of the dishwasher by unscrewing the screws under the rear edge of the top (fig. 6a).
LOADING THE SALT IMPORTANT (Only for first start up) When the appliance is used for the first time, after completely filling the salt container, it is necessary to add water until the container overflows. ■ On the bottom of the machine there is a container for the salt for regenerating the softener. ■ It is important to use only a salt that is specifically designed for dishwasher.
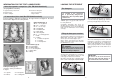
LOADING DISHES Using the lower basket ■ Saucepans, oven dishes, tureens, salad bowls, lids, serving dishes, dinner plates, soup plates and ladles can be loaded on the lower basket. Using the upper basket ■ The upper basket is provided with mobile racks hooked to the sides of the basket which can be regulated in two positions: upright and lowered. In the lowered position the racks may be used for tea and coffee cups, kitchen knives and ladles. Glasses with stems may be safely hung on the ends of the racks.
INFORMATION FOR THE TEST LABORATORIES LOADING THE DETERGENT General programme comparison (Ref. EN 50242 Standards) The detergent (see programmes selection) 1. Upper basket position: low 2. Normal load 3. Shine setting: 6 4. Amount of detergent: - 9,5 g for pre-wash; - 28 g for wash. 15 international place load (Ref. EN 50242 Standards) Correct loading is indicated, in fig. 5 for the upper basket, in fig. 6 for the lower basket and in fig. 7 for the cutlery basket.
■ the effectiveness of detergents containing the built in water softener/salt depends on the hardness of your water supply. Check that the hardness of your water supply is within the effective range given on the detergent packaging. TYPES OF DETERGENT Detergent tablets Detergent tablets of different manufacturers dissolve at different speeds, for this reason, during short programmes, some detergent tablets may be not fully effective, because they are not completely dissolved.
CLEANING THE FILTERS PRATICAL HINTS The filter system (fig.A “4”) consists of: 1 a central container that traps the larger particles; a flat gauze that continuously filters the wash water; ■ Before placing the dishes in the dishwasher, remove any remaining food (bones, shells, pieces of meat or vegetables, coffee grounds, skin of fruit, cigarette ash, tooth picks etc. to avoid blocking the filters, water outlet and washing arm nozzles.
CLEANING AND MAINTENANCE 1 1b DESCRIPTION OF THE CONTROL PANEL N O HI L M A BCD E ■ To clean the dishwasher outside, do not use solvents (degreasing action) neither abrasives, but only a cloth soaked with water. ■ The dishwasher does not require special maintenance, because the tank is self-cleaning. ■ Regularly wipe the door gasket with a damp cloth to remove any food remains or rinse aid.
■ To start the programme, press the selected programme button again to confirm. The programme starts automatically, the relevant indicator light will stop flashing and remain on and the cycle length will appear on the display. PROGRAMME SELECTION AND SPECIAL FUNCTIONS (Use in conjunction with programme guide) If the previously described operations were performed with the door open, the programme will not start until the door is closed.
"DELAY START" button Alarm mute for the PROGRAMME END Dishwasher start time can be set with this button, delaying start from 1 to 23 hours. Proceed as follows to set a delayed start: ■ Press the "DELAY START" button ("00" will appear on the display). ■ Press the button again to increase the delay in hours (each time the button is pressed the delay is increased by 1 hour to a maximum of 23). The dishwasher is able to signal a series of faults in the display.
PROGRAMME GUIDE A Universal 65°C (“RECOMMENDED” PROGRAMME) Once a day - for normal soiled pans and any other items that have been left all day for washing. Intensive 75°C Once a day - for heavily soiled pans and any other items that have been left all day for washing. Suitable for heavily soiled items that are to be washed straight after a meal (Max 8 place load). - WASHING CLASS A- Wash 59’ 70°C Eco 45°C Energy Saving Programme suitable for normal soiled items. Using detergents with enzyme.
IDENTIFYING MINOR FAULTS FAULT Should the dishwasher fail to operate, before contacting the Service Centre, make the following checks: CAUSE See causes for no.
Hoover guarantees all parts of this product for 5 years from the date of purchase. During that time Hoover will replace or repair all defective parts free of charge, except for parts subject to fair wear and tear such as belts. The call out fee and labour costs are chargeable after the first 12 months.
HOOVER SERVICE FOR YOUR LOCAL ENGINEER PLEASE CALL OUR NATIONAL NUMBER 08705-400600 EIRE 01 8301666 06.05 - 41020425 - www.graficaestampa.