EN
Thank-you for choosing a Hoover washing machine. We are proud to always offer new, innovative and technologically advanced products, with a complete range of home appliances to ensure true assistance in your daily routine. This appliance is marked according to the European directive 2012/19/EU on Waste Electrical and Electronic Equipment (WEEE). WEEE contains both polluting substances (which can cause negative consequences for the environment) and basic components (which can be re-used).
Children shall not play with the appliance. Cleaning and user maintenance shall not be made by children without supervision. 1. GENERAL SAFETY RULES l This appliances is intended to be used in household and similar applications such as: - Staff kitchen areas in shops, offices and other working environments; - Farm houses; - By clients in hotels, motels and other residential type environments; - Bed and breakfast type environments.
l In the event of fault and/or malfunction, turn off the washing machine, close the water faucet and do not tamper with the appliance. Immediately contact the Customer Service Centre and only use original spare parts. Failure to observe these instruction may jeopardise appliance safety. refer to the manufacturer website. Safety instructions l Before cleaning or maintaining the washing machine, unplug the appliance and turn off the water faucet. l Make sure the electrical system is grounded.
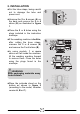
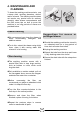
2. INSTALLATION l Cut the tube straps, being careful 1 not to damage the tube and power cord. A B A B l Unscrew the 2 or 4 screws (A) on the back and remove the 2 or 4 shims (B) as illustrated in figure 1. B B A A l Close the 2 or 4 holes using the plugs included in the instruction envelope. l If the washing machine is built-in, 2 after cutting the hose straps, unscrew the 3 or 4 screws (A) and remove the 3 or 4 shims (B).
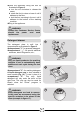
Hydraulic connections EN 3 l Connect the water tube to the faucet, only using the drain tube supplied with the washing machine (fig. 3). DO NOT OPEN THE FAUCET. l Some models may include one or more of the following features: 4 l HOT&COLD (fig. 4): water mains connection settings with hot and cold water for higher energy savings. Connect the grey tube to the cold water faucet and the red one to the hot water faucet.
l Level the appliance using the feet as 8 illustrated in figure 8: a. turn the nut clockwise to release the screw; b. rotate the foot to raise or lower it until it adheres to the floor; c. lock the foot, screwing in the nut, until it adheres to the bottom of the washing machine. l Plug in the appliance. A B WARNING: contact the Customer Service Centre should the power cord need replacement.
Is a hot wash required? 3. PRACTICAL TIPS dried in stains in water before washing to reduce the necessity of a hot wash programme. Save up to 50% energy by using a 60°C wash programme. WARNING: when sorting laundry, make sure: Following is a quick guide with tips and recommendations on detergent use at the various temperatures. In any case, always read the instructions on the detergent for correct use and doses.
4. MAINTENANCE AND CLEANING To clean the washing machine exterior, use a damp cloth, avoiding abrasives, alcohol and/or solvents. The washing machine does not require any special care for ordinary cleaning: clean drawer compartments and the filter; some tips on how to move the machine or on long periods of disuse are provided below. Drawer cleaning l We recommend you clean the drawer to avoid accumulating additive residue.
This washing machine automatically adapts the level of the water to the type and quantity of washing. This system gives a decrease in energy consumption and a sensible reduction in washing times. 6. CONTROLS AND PROGRAMS EN 5. QUICK USER GUIDE } Program selection A l Turn on the washing machine and select the required program. P l Adjust the washing temperature if necessary and press the required "option" buttons. washing.
If a program is not selected within 30 seconds, the appliance will automatically turn off. Waiting for the selection of the program the display is off. WARNING: Don’t touch the display (and the Touch Control) while inserting the plug because the machines calibrates the systems during the first seconds: touching the display, the machine couldn’t work property. In this case, remove the plug and repeat the operation.
SPIN SPEED button l By pressing this button, it is possible to reduce the maximum speed, and if you wish, the spin cycle can be cancelled. Close the door BEFORE selecting the button START/PAUSE. spin speed cancelled. l Press to start the selected cycle. l To reactivate the spin cycle press the button until you reach the spin speed you would like to set. When the START/PAUSE button has been pressed, the appliance can take few seconds before it starts working.
l To delay the start use the following procedure: PREWASH button l This option allows you to make a prewash - Set the required programme. - Press the button once to activate it (h00 appears on the display) and then press it again to set a 1 hour delay (h01 appears on the display). The pre-set delay increases by 1 hour each time the button is pressed, until h24 appears on the display, at which point pressing the button again will reset the delay start to zero.
If you accidently select a memorized program, simply turn the program knob to select another one. This function allows you to save the settings of your two favourite personalised programmes, including the temperature, spin speed and soil level, so you can recall them quickly. How to memorize a programme for the first time: 1) Select the programme options you want. 2) Press the FAVOURITES button, choosing either M1 or M2. You should choose M1 if this is the first programme you have saved.
2) SPIN SPEED Digital Display The display’s indicator system allows you to be constantly informed about the status of the machine. This show the spin speed of the selected programme that can be changed or omitted by the relevant button. spin speed cancelled. 1 15 6 10 12 5 3) WASH TEMPERATURE This show the washing temperature of the selected programme that can be changed (where allowed) by the relevant button. 3 2 7 7 13 14 7 8 7 9 11 7 4 cold wash.
11) FAVOURITES The indicator lights show the options that can be selected by the relevant buttons. The indicator light show that the memory function is working. 8) Wi-Fi (some models only) l In the models with the Wi-Fi option, the icon indicates that the Wi-Fi system is working. l For all other information in the Wi-Fi system, there is a specific manual inside the machine. 9) DELAY START This flashes when delay start has been set.
Table of programmes 2 TEMP.°C kg* (MAX.) PROGRAM Recommended Max. 1 DETERGENT 2 1 All In One 20°C 6 6,5 7 8 20° 20° All Baby 60°C 6 6,5 7 8 60° 60° All In One 59 Min. 9 10 11 12 40° 40° Drain & Spin - - - - - - Rinse - - - - - - Wool & Silk 2 2 2 2,5 30° 30° Delicates 2,5 2,5 2,5 3 40° 40° 1) 4,5 5 5,5 6 40° 60° ( ) ** 1) 9 10 11 12 40° 90° ( ) Rapid 30 Min. 2,5 2,5 2,5 3 30° 30° Rapid 14 Min.
( ) Please read these notes: * Maximum load capacity of dry clothes, according to the model used (see control panel). (Only for models with liquid detergent compartment) When only a limited number of articles have stains which require treatment with liquid bleaching agents, preliminary removal of stain can be carried out in the washing machine. Pour the bleach into the liquid bleach container, inserted into the compartment marked "2" in the detergent drawer, and set the special programme RINSE.
Programmes selection To clean different types of fabrics and various levels of dirt, the washing machine has specific programs to meet every need of washing (see table of programmes). ALL IN ONE technology This washing machine is equipped with an innovative system with an high pressure jet that sprays a mixture of water and detergent directly into the load.
Rapid 30 Min. A complete washing cycle (wash, rinse and spin). This programme is particularly suited to slightly dirty cottons and mixed fabrics. EN This program is suitable to clean normally soiled cotton laundry and it is the most efficient program in terms of combined energy and water consumptions for washing cotton laundry. With this programme it is recommended to use only 20% of the detergent normally used to avoid waste. Rapid 14 Min. A complete washing cycle (wash, rinse and spin).
7. CUSTOMER SERVICE CENTRE AND WARRANTY If you believe the washing machine is not working correctly, consult the quick guide provided below with some practical tips on how to fix the most common problems. Problem Possible causes and practical solutions The washing machine does not work/start Make sure it is correctly plugged in. Make sure power is on. Check whether the required program was correctly selected and to have correctly started the machine.
Warranty The product is guaranteed under the terms and conditions stated on the certificate included with the product. The warranty certificate must be duly filled in and stored, so as to be shown to the Authorised Hoover Service Centre in case of need. - cloudier rinse drain water: This effect is tied to the suspended zeolites which do not have negative effects on rinse efficiency.
- DXT/DWT - A (9÷12) - 15.