= _ HOOVER #"'ENGLISH _ESPANOL ._ -_ pp. 1-14 ,._ pag. 16-24 TM www.hoover.
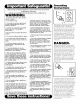
Grounding Instructions When using an electrical appliance, always follow basic precautions. including the following: READ ALL INSTRUCTIONS BEFORE USING APPLIANCE. B WARNING: To reduce the risk of fire. electric shock, or injury: • Use indoors only. • Use only on surfaces moistened by the cleaning process. Do not immerse product. • Connect to a p roperlygrounded outlet only. See ' Grounding Instructions'. • Do not clean over floor electrical outlets.
F To contact us: • www.hoover.com • 1-800-944-9200 dealer locator - automated Important safeguards ........ 2 Carton contents ............. 3 Cleaner description .......... 4 Deep cleaner basics .......... 5 Filling the tank ............ 5 Emptying the recovery tank . 6 Attaching the hose ......... 7 Selecting & attaching tool... 7 Draining & storing hose .... 8 Cleaning carpet .......... 10-11 Cleaning upholste_ T ..... 11-12 Basic steps for cleaning ...... 13 Warranty ..................
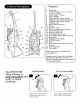
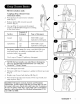
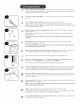
1. 2. 14 16 9 13 21_ 18 3. 4. 5. 6. 7. 8. Hand grip Solution trigger: press to release cleaning solution Clean Surge TM button Upper handle Upper handle release button Solution tank cap/measuring cup Solution tank release button Solution tank 9. 10. Brush Nozzle 11. 12. 13. Recovery Recovery Powered 14. 15. 16. 17. Recovery tank cap Stair/upholstery nozzle Cord hooks (tool caddy Hose door 18. 19. 20. Handle ON/OFF Hose 21. 22. Cord hooks (tool cleaner) Hose connector 23.
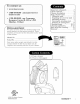
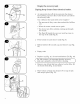
Fill the solution Unplug tank deep electrical cleaner from outlet. / Press tank / Release remove / Use cap (Fig. 5) to measure the amount of HOOVER detergent to the chart below: button (A) and (Fig. 3) remove solution latches (B) on tank cap and (Fig. 4) Amount proper according of Surface detergent Type Carpet two HOOVER caps Upholstery one HOOVER cap Upholstery Upholstery of detergent Carpet/ Detergent W F_JUOrE.
D Empty the recovery Unplug ¢ deep An automatic from picking the recovery You will • The know amount • When the cleaner from shut-off up more tank. device prevents the cleaner dirty water than it can hold the motor • You do not see the nozzle. needs water sound dirty electrical outlet. to be emptied has rises reached solution coming through has risen to cap (Fig. _/ Press remove (Fig. 9). _/ Release 10). ,/ Empty (D) on tank line up tank latches full in pitch.
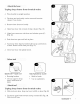
Unplug deep cleaner from electrical handle in upright _/ Place ,/ The hose and cleaner if you tool caddy desire. _/ Remove from _/ Open ,/ Align hose (Fig. 14). ,/ Push _/ To remove hose: of hose. Remove Squeeze latches hose from port _/ Close (A) tightly hose hose hose door into hose f Select can be removed with and from the caddy. (A) on back port door position. tool connector outlet. of deep hose lock cleaner and (Fig. solution 13).
The handle et cleaning Drain When must the upright solutionbe inthrough the position hose. in order the hose finished using the hose and tool, remove water if'ore the hose. ¢" Turn deep cleaner on and hold end of hose up for several seconds (A). Do not press trigger. (Fig. 20) ,t" Turn deep cleaner off and unplug it. V" Hold hose connector in sink and press trigger to remove solution from hose (B) (Fig. 20). Unplug deep cleaner from electrical Hook hose connector outlet.
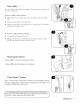
Hose caddy You can either store to store separately. To store caddy }_ Slide tabs 25). }_ Hook the on the hose into slots to cleaner 1_ caddy Dora Lift caddy off cleaner Wrap cord 28). Rotate around bottom Choose ON Choose OFF when the or remove it on back of" cleaner (Fig. (_) on caddy (Fig. 26). Rotate cleaner: (Fig. 27). cord hook for normal cleaner ([4). Wrap cord around cord hooks top hook to release cord.
1 2 3 Remove lightweight furniture (tables, lamps, etc,) from Protect any remaining ftu-nitm-e by pinning up furniture aluminum foil or plastic under bgs. Vacuum carpet (Fig. 31). Test detergent thoroughly to remove for colorfastness loose on a hidden and high Spray spot or area with cleaning steps. For stubborn cleaner. spots traffic Spot and or stains, Fill solution tank with "h ¸¸¸¸¸¸¸5¸¸¸¸ detergent (see page 5) area areas with Stain Spray. refer hot tap water (Fig. 33).
Check ¸¸1¸¸¸¸¸¸tag for deep 2 fabric cleaning code (Fig. 36). Look on the flwniture mamlfacturer's a 'W' or 'WS' code. These codes indicate that it is alright to use your cleaner to clean the upholstery. Do not use the deep Only'. cleaner Vacuum thoroughly upholstery Test detergent on upholstery marked with your for colorfastness vacuum on a hidden spots and stains Spray spot or area with cleaning steps. For stubborn cleaner.
Unplug deep cleaner _,- Remove solution _,- Lift up _,- Wipe B from on top debris and electrical recovery of nozzle tanks (A) and off nozzle and on upper Clean Unplug the deep _,- Remove cleaner off cleaner of cleaner of cleaner (Fig. 42). of nozzle to snap electrical outlet. from solution and back brush _,- Rinse possible (Fig. leaks. 41). with a damp off floor. Slide cloth. nozzle in place.
,/ Empty ,/ Place empty deep cleaner cleaner. ,/ Empty recovery _/ Allow cleaner brushes and underside on a carpeted or wood The The solution tank solution forward and rinse tank and tank, thoroughly. on deep cleaner. Turn deep cleaner ON. Squeeze trigger back several times. This will clear any solution remaining rinse thoroughly of deep surface.
Full One Year Warranty Usethe list below to help solveminor problems. Deep cleaner won't run ¢' Make sure plugged ,/Check Low suction solution won't won't fuse or breaker. rotate in hose during recovery latched. tank ,/Make sure solution securely in place tank solution tank it cap is if it is ,/Clean brush filter as described in Fig. 45. ,/Set Brush ON. Low suction :ool use is ,/Empty the recovery tank; may be full and the automatic shut-off engaged.
I5