HOOVER. Owner’s Manual English pp. 1-13 Espadrille =» pag. 15-22 FloorMATE™ Francis =» p. 24-31 The Hard Floor Cleaner Thank you for selecting a HOOVER product. This cleaner was inspected and packaged carefully before being shipped from the factory. If you should happen to need assistance during assembly or operation: Visit us online at www.hoover.
Index Assembly obis 3-4 Cleaner HOW 10 USe.ccrrvvcnricssrranen 5-8 Automatic shut-off 7 General operation Clean solution tank... 8-7 RECOVERY task vrrssrsvrsssrsrsirsrsssn Forage ..oummnesinnrnmsnsnnevin 11 How to clean... 8-10 Recommended cleaning SEQUENCE wovvuvuvnrr sever cassavas rind To clean floor Cleaning sealed wood floors 10 Picking up spills. If You Have a Problem. Service Important Safeguards Maintenance Cleaning the brushes .. Cleaning the nozzle Warranty... © 2003 The Hoover Company www.hoover.
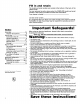
Questions or Concerns? The Hoover Company wants to quickly resolve any concerns about your cleaner or questions regarding its use. Look on the list provided with the product for your local Hoover Factory Service Center or in the Yellow Pages under “Vacuum Cleaners Household” for the nearest Authorized Hoover Warranty Service Dealer (Depot) or: Visit us online at www.hoover.
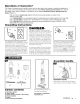
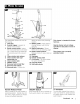
{ A With cord hook (8) to back of cleaner, push upper handle down onto cleaner. Insert screw with washer in front of tank area. Tighten screw with a Phillips screwdriver. Insert two screws into back of handle as shown. Tighten with a Phillips screwdriver. Push brush control switch (C) down to connect switch rod. You will hear a “click” when the switch rod is in place Replace clean solution tank by poi toning bottom first. Press latch and snap top portion into place.
The assembled cleaner will look like this drawing 1. Hand grip 2. Solution trigger: squeeze to release clean solution. 3. Brush control switch: lowers the brush assembly for wet clean ing or raises the brush assembly for wet pickup and dry vacuuming. Clean solution tank release Clean solution tank cap/ measuring cup Clean solution tank ON/OFF switch Recovery tank lid and filter Recovery tank release 0. Recovery tank: Collects dry oa gin . Wet/Dry pedal: debris as well as dirty cleaning solution.
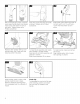
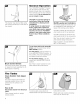
The cleaner may also be lifted using the carrying handle {C) on the back of the cleaner General Operation Your HOOVER FloorMate™ Cleaner can be used to both vacuum dry debris and wet clean non-carpeted floor surfaces such as vinyl, tile and sealed wood. it is not intended for use on carpet of rugs. CAUTION: To prevent damage to wood floors, follow the flooring manufacturer's cleaning recommendations.
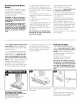
2.0 oz f60mi. Turn cap (H) upside down 10 serve as a measuring cup. 2.0 026m, mem Using cap, measure 2 oz. of applicable concentrate formulated for use with the ‘FloorMate™ hard floor cleaner. For bast results, use Machine Formula LYSOL® Floor Cleaning Concentrate when cleaning floor surfaces such as vinyl, ceramic and other tiles.
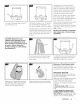
How to Empty Turn cleaner off and disconnect from electrical outlet. Although not necessary for satisfactory performance, it is recommended that the recovery tank be emptied after dry vacuuming and before wet operation. Check the solution tank also. It may need to be refilled at this time, To remove tank, press down on release bunion {L) and pivot tank forward, Lift up on tank lid latch (M) and remove the tank lid (N). Empty tank.
Recommended Cleaning Sequence Use your HOOVER Floor Mate” Cleaner to: 1. Dry Vacuum to remove loose dirt, hair and debris, 2. Wet Clean the floor surface 3. Wet Pickup reduces drying time of the floor surface. Follow the chart to set the controls for each cleaning step. OPERATION BRUSH CONTROL SWITCH| WET/DRY PEDAL Dry Vacuuming “Wet/Dry Pickup” (UP) Dry Pickup Wet Cleaning “Wet Scrub” (DOWNY Wet Pickup/ Scrub Wet Pickup “Wet/Dry Pickup” (UP) Wet Pickup/ Scrub See Page 6 Figs.
Cleaning Sealed Wood Floors Your HOOVER 'Floor Mate’ Cleaner may be used fo clean wood floors that have been sealed with a polyurethane coating and can be cleaned with water. CAUTION: To prevent damage to wood floors, follow the flooring manufacturer's cleaning recommendations. If using cleaner on sealed wood floors, inspect floor surface for worn finish, bare wood or separated joints. Do not use ‘Floor Mate’ cleaner to wet clean sealed wood floors if any of these conditions exist. 1.
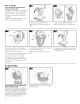
To replace nozzle, make sure latches are out. Align middle section (3) of nozzle with opening on cleaner While holding nozzle in place, slide latches inward to lock in place. Cleaning the brushes Turn cleaner OFF and disconnect from electrical outlet. The brush assembly can te removed tor easy cleaning. Remove nozzle as described in Fig 4-1 through 4-3. Using finger grips (E) on the brush assembly {F). pull straight out. The brush assembly can be washed with a mild detergent and rinsed.
5. If you have a IGT If a minor problem centaurs, it usually can be solved quite easily when the cause is found by using the check list below. Problem: Machine won’t run Possible cause Possible solution * Not firmly plugged in © Plug unit in firmly. » No voltage in wall receptacle + Check fuse or breaker. » Blown fuse/tripped breaker « Replace fuse/reset breaker.
Full One Year Warranty {Domestic Use) Your HOOVER® appliance is warranted in normal household use, in accordance with the Owner's Manual against original defers in material and workmanship for a period of one full year from date af purchase. This warranty provides, a to you, all labor and parts to place thi appliance in correct operating con during the warranted period.