HOOVER FloorMATE The Hard Owner's *_ Floor English -) pp. 1-13 Espafiol _ p&g. 15-22 Frangais -_ p. 24-31 Cleaner This cleaner inspected and packaged carefully before being shipped from the factory. If you should happen to need assistance during assembly or operation call 1-800-944-9200 for an automated referral of authorized service outlet locations (U.S. only) or 1-330-499-9499 to speak with a representative Consumer Response Center or in our Visit us online at www.hoover.
Fill in and retain The model and serial number are located at the bottom of the back of the cleaner body. For your personal records, please enter the COMPLETE model and serial number in the spaces provided and retain this information. Your cleaner is model and has serial number It is suggested that you attach your sales receipt to this owner's manual. Verification of date of purchase may be required for warranty service of your Hoover product. Important Index Assembly .....................................
Questions or Concerns? The Hoover Company wants to qutckly resolve any concerns about your cleaner or questtons regarding Its use Look on the hst provided w_th the product for your local Hoover Factory Service Center or _nthe Yellow Pages under "Vacuum Cleaners - Household" for the nearest Authorized Hoover Warranty Service Dealer (Depot) or call 1-800-944-9200 for an automated referral of authonzed servtce outlet IocatJons (U S only) OR 1-330-499-9499 to speak with a representattve tn the Hoover Consumer
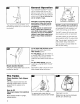
i¸ / With cord hook (B) to back of cleaner, push upper handle down onto cleaner, Insert screw with washer in front of tank area. Tighten screw with a Phillips screwdriver. Insert two screws into back of handle as shown. Tighten with a Phillips screwdriver. Replace clean solution tank by positioning bottom first. Press latch and snap top portion into place. Press brush assembly firmly to snap into place. To install nozzle, make sure latches are out.
3 9 -10 17 14 17 12 13 15 The assembled cleaner will look like this drawing. 1. Hand grip 2. Solution trigger: squeeze to release clean solution. 3. Brush control switch: Turns 4. 5. 6. 7. brushes ON for wet cleaning and OFF for wet pickup and dry vacu uming. Clean solution tank release Clean solution tank cap/ measuring cup Clean solution tank ON/OFF switch 8. Recovery tank lid and filter 9. Recovery tank release 10. Recovery tank: Collects dry debris as well as dirty cleaning solution. 11.
General Operation Your HOOVER FloorMate TM Cleaner can be used to both vacuum dry debris and wet clean non carpeted floor surfaces such as vinyl, tile and sealed wood. It is not intended for use on carpet or rugs. Thecleanermayalsobeliftedusing thecarryinghandle(C)onthe backof the cleaner. CAUTION: To prevent damage to wood floors, follow the flooring manufacturer's cleaning recommendations. If using cleaner on sealed wood floors, inspect floor surface for worn finish, bare wood or separated joints.
_+Si -- 2.0 oz./6OmL -- Use Machine Formula OLD ENGLISH® Wood Floor Cleaning Concentrate for wood floors when cleaning laminate wood, polyurethane sealed wood or other wood floors that can normally be cleaned using water. Check for worn spots or joint separations before using, as these conditions could lead to damaged flooring when using water to clean floor. Turn cap (H) upside down to serve as a measuring cup. Using cap, measure 2 oz.
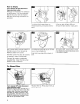
How to Empty Turn cleaner off and disconnect from electrical outlet. Although not necessary for satisfactory performance, it is recommended that the recovery tank be emptied after dry vacuuming and before wet operation. L To remove tank, press down on release button (L) and pivot tank forward. Lift up on tank lid latch (M) and remove the tank lid (N). Empty tank. QP Dry or loose debris will also collect on the filter screen (O) in the tank lid. Remove debris from screen.
Recommended Cleaning Sequence Use your HOOVER 'FloorMate' Cleaner to: 1. Dry Vacuum to remove loose dirt, hair and debris. 2. Wet Clean the floor surface. The brushes will provide light agitation to help loosen dirt. 3. Wet Pickup reduces drying time of the floor surface Follow the chart to set the controls for each cleaning step OPERATION BRUSH Dry Vacuuming Wet Cleaning Wet Pickup CONTROL SWITCH "Wet/Dry Pickup" (UP) Floor etc.
Cleaning Sealed Wood Floors Your HOOVER 'FloorMate' Cleaner may be used to clean wood floors that have been sealed with a polyurethane coating and can be cleaned with water 2. Set cleaner for Dry Vacuuming operation and vacuum floor (see chart on Page 9). 3. Empty recovery tank (Figs. 2-16 through 2-20). 4. Fill solution tank with Machine Formula OLD ENGLISH@ Wood Floor Cleaning Concentrate and water, according to instructions for Figs. 2-8 through 2-12.
° To replace brushes, first remove solu tion tank (Fig. 2-8) and recovery tank (Fig. 2-16). Set tanks aside. This will prevent possible leaking. I Press brush assembly firmly to snap into place. Cleaning the Nozzle Turn cleaner OFF and disconnect from electrical outlet. The cleaner's nozzle (E) can be removed for easy cleaning. With handle in upright position, tilt cleaner back so that it rests on the floor. Align post (C) on brush block with hole (D) on bottom of cleaner.
Service If a minorproblemoccurs,it usually canbe solvedquiteeasilywhenthe causeisfoundby usingthechecklist below. [d'_';]_1['_i'_ ILV. ,," ,** , Possible cause Possible solution • Not firmly plugged in • Plug unit in firmly. • No voltage in wall plug • Check fuse or breaker. • Blown fuse/tripped breaker • Replace fuse/reset breaker. Possible cause Possible solution • Cleaner not set for wet operation • Press wet/dry pedal to "WET" position.
Full One Year Warranty (Domestic Use) Your HOOVER® apphance _swarranted _n normal household use _naccordance w_th IRe Owner s Manual agans[ ong_nal defects _n material and workmanship for a period of one full year from date of put chase Th_s warranty prowdes, at no cost to you, all labor and parts to place t'n=s apphance _ncorrect operating condition during the warranted penod Th_s warran ty apphes when the appliance _spurchased in the United States _nclud_ng Its terntones and possessions or in Canada or fr
HOOVER° Llene y guarde El ndmero de modelo y el de serie se encuentran del cuerpo de la limpiadora de pisos. FloorMa te TM El limpiador de pisos de superficie en la parte inferior del respaldo Para sus archivos personales, anote los ndmeros COMPLETOS en los espacios provistos y conserve esta informaci6n.
&Tiene preguntas preocupaciones? o The Hoover Company desea resolver rapidamente toda preocupacion con respecto a su limpiadora de pisos o preguntas respecto a su uso.
5. 6. 7. 8. 9. 10. 11. 12. 13. 14. 15. 16. 17. 18. 19. 20.
el concentrado de limpieza de p_sos LYSOL® Machine Formula (formulado para maquinas) cuando limpie superficies de pisos como vinilo, ceramica y otros tipos de azulejos y lin01eo. (tanque Use el concentrado de limpieza de pisos de madera OLD ENGLISH@ Machine Formula (formutado para ma.
3. C6mo Secuencia de limpieza limpiar recomendada FUNClONAMIENTO INTERRUPTOR DE CONTROL DE LAS ESCOBILLAS Use su Iimpiadora de pisos HOOVER 'FloorMate' pare: Aspirar en seco "Recoger en mojado/seco" (ARRIBA) (UP) Limpiar la superficie del piso en mojado. Las escobillas se agitaran levemente para ayudar a desprender la suciedad. Limplar en mojado "Restregar en mojado" (ABAJO) (DOWN) Recoger/Restregar en molado La recogida en mojado reduce el tiempo de secado det piso.
mueva el interruptor de control en molado a "RECOGIDA EN MOJADO". 10. Para seguir limpiando, mueva el interruptor de control en mojado hacia abajo a "Restregar EN MOJADO". Repita los pasos del 7 al 9. Asegdrese de que todas las areas estdn completamente secas. Aseg_rese de que no quede agua en el piso. NOTA: Cuando alterne entre limpieza en mojado y recogida en mojado, no es necesario que apague la limpiadora de pisos. Basta con pasar el interruptor de control de una posicion a la otra 11.
• recuperac/on. • • • • • Filtro o tapa del filtro no colocados o colocados incorrectamente. Asegdrese de que el filtra y la tapa del filtro esten bien colocades en la tapa del tanque de recuperacion (fig 2-22) Tanque de recuperacion y/o tanque para la solucibn de limpieza colocados incorrectamente. Asegurese de que ambos tanques esten trabados en su luga_ La boquilla no esta bien colocada. AsegOrese de que la bequilla est6 bien colocada y trabada (fig 4-8 y 4-9).
Garantia de un afio completo (Para uso domestico) Su aparato HOOVER® esta garantizado en caso de uso domestico normal, segun el Manual del propietario, contra defectos originales en el material y la fabricacion pot el periodo de un a¢_o completo a contar desde la fecha de compra La presente garantia cubre gratuitamente toda la mano de obra y las piezas necesarias para dejar este aparato en buen estado de funcionamiento durante el periodo de garantia Esta garantia es valida si el aparato fue comprado en los
H Remplir FloorMate Mc Shampouineuse pour planchers surface dure Les numeros au bas, de serie et conserver et de modele sont inscrits b I'arri_re de la shampouineuse, Veuillez inscrire les numeros de module et de serie COMPLETS aux endroits indiques et garder ces renseignements pour reference ultdrieure. Votre appareil est le module et possede le numdro de serie n est recommande de joindre votre re(_u de caisse a ce document.
Questions ou commentaires ? La compagnie Hoover veut repondre & route question et resoudre tout probleme relatif a votre shampouineuse et & son utilisation.
9. 10. 11. 12. 13. 14. 15. 16.
m Utiliser te nettoyant concentre plancher pour shampoulneuse OLD ENGLISH@ pour le nettoyage du bois lamelle, du bois impregne de polyurethane ou d'autres planchers de bois pouvant normalement etre nettoyes I'eau.
3. Nettoyage SI_LECTEUR $6quence de nettoyage _command_e UTILISATION Jtiliser la shampouineuse HOOVER FloorMate' pour : I. le ramassage b sec de la salete, des cheveux et autres debris _> te nettoyage humide du plancher. Les balais s'agitent legerement et aident & deloger la salete. 3 le ramassage de liquides, qui reduira _e temps de sechage de la surface du plancher. Ramassage Nettoyage Nettoyage du plancher (vinyle, tulle, linol6um, etc.) 2, Vider le r6servoir de recup6ratiom (Fig 2-16 a 2-20) 3.
9. Pour accelerer grandement le sdchage du plancher, rel&cher la g,&chette puis regler le selecteur sur WET PICKUP ,, 10. Pour continuer le nettoyage, regler le selecteur sur ,, WET Scrub ,, Repeter les etapes 7 a 9. S'assurer que toutes les surfaces sent compl_tement seches, Verifier qu'aucune trace d'eau n'est rest_e sur le plancher.
Filtre sale. Nettoyer le filtre • Buse mal placee. S'assurer que la buse est placee correctement et verrouillee (Fig 4-8 et 4-9). • • • Formation excessive de mousse dans les rdservoirs. Utihser le nettoyant concentre plancher pour shampouineuse L YSOL® ou les nettoyants concentres a plancher de bois OLD ENGLISH® ; leur formule produit peu de mousse. Si un detergent autre que LYSOL® ou OLD ENGLISH® est utilis#, melanger une nouvelle solution en utflisant moins de detergent.
Garantie complete de un an (Usage domestique) Votre appareil HOOVER@ est garanti dans des conditions d'usage domestique, tel que stipule dans le guide de !'utilisateur, contre les defauts de materiau et de fabrication pour une periode de un an apres la date d'achat original.
HOOVER y(_ sonmamas registradas HOOVER andQ H3000-900 HOOVER etQ sontdesmarques d_pos_es areregistered trademarks Printed in China 59177-002