40003324.
40003324.qxd 28/06/2006 12:58 Page 2 Contents Introduction . . . . . . . . . . . . . . . . . . . . . . . . . . . . . . . . . . . 3 Delivery information . . . . . . . . . . . . . . . . . . . . . . . . . . . . . . . . 3 Unpacking the product . . . . . . . . . . . . . . . . . . . . . . . 4 European Directive 2002/96/EC. . . . . . . . . . . . . . . . . . . . . . . . . 4 Safety reminders . . . . . . . . . . . . . . . . . . . . . . . . . . . . . . 5 Installation . . . . . . . . Use . . . . . . . . . . . .
40003324.qxd 28/06/2006 12:58 Page 3 Introduction Please read and follow these instructions carefully and operate the machine accordingly. This booklet provides important guidelines for safe use, installation, maintenance and some useful advice for best results when using your machine. Keep all documentation in a safe place for future reference or for any future owners. Delivery information Check that no damage has occurred to the machine during transit. If it has, call for service by GIAS.
0003324.qxd 28/06/2006 12:58 Page 4 Unpacking the product 1. Cut carefully around the base of the packaging and up one corner. 2. Remove the polythene sleeve and lift the dryer off the polystyrene base. Dispose of the packaging safely. Make sure it is out of the reach of children, it is a potential source of danger.
40003324.qxd 05/12/2007 12:03 Page 5 Safety reminders Installation ● ● ● ● Check that the product has no visible signs of damage before use. If damaged do not use and please call our national number: 08705 400 600. Do not use adapters, multiple connectors and/or extensions. Never install the dryer against curtains and be sure to prevent items from falling or collecting behind the dryer.
40003324.qxd 28/06/2006 12:59 Page 6 ● ● Items that have been soiled with substances such as cooking oil, acetone, alcohol, petrol, kerosene, spot removers, turpentine, waxes and wax removers should be washed in hot water with an extra amount of detergent before being dried in the tumble dryer. Fabric softeners or similar products should be used as specified by the fabric softener instructions. Enviromental Issues ● ● All packaging materials used are environmentally-friendly and recyclable.
40003324.qxd 28/06/2006 12:59 Page 7 Installation Electrical requirements Tumble dryers are supplied to operate at a voltage of 230-240V, 50 Hz single phase. Check that the supply circuit is rated to at least 13A. This appliance is fitted with a moulded-on non-rewireable plug which is already equipped with a BS 1362 ASTA approved 13A fuse. Any replacement must be the same rating and specification. If the fuse cover is lost, do not use the plug until it is replaced.
40003324.qxd 28/06/2006 12:59 Page 8 Ventilation For your safety, this dryer must be correctly installed. If there is any doubt about installation, call the national GIAS Service number for advice. 08705 400 600 (Eire 018301 666) 8 Adequate ventilation must be provided in the room where the tumble dryer is located to prevent gases from appliances burning other fuels, including open fires, being drawn into the room during operation of the tumble dryer.
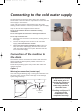
40003324.qxd 28/06/2006 12:59 Page 9 Connecting to the cold water supply The machine has an inlet hose with a 19mm (3/4") threaded ferrule fitted to the end. This hose is provided to connect the cold water supply to the machine. If your cold water supply is shared between the dryer and a washing machine use the Y connector provided to split this supply. Only use the new hose supplied with the machine. Do not re-use old hoses which are attached to existing installations.
40003324.qxd 28/06/2006 12:59 Page 10 Option 2 Into a standpipe Ensure that the standpipe is not located near an electrical socket. Install the hose into the standpipe ensuring that the pipe is at least 400mm from the floor. Insert the outlet pipe approximately 100mm into the standpipe. Ensure that the pipe is not kinked or restricted, as this will prevent the operation of the dryer. Moving the machine into position Do not drag or lift the machine by its door.
40003324.qxd 28/06/2006 12:59 Page 11 Preparing the load Before using the tumble dryer for the first time: ● Please read this instruction book thoroughly. ● Remove all items packed inside drum. ● Wipe the inside of the drum and door with a damp cloth to remove any dust which may have settled in transit. Clothes preparation Make sure that the laundry you are going to dry is suitable for drying in a tumble dryer, as shown by the care symbols on each item.
40003324.qxd 28/06/2006 13:00 Page 12 Drying advice IMPORTANT: Do not dry articles which have been treated with a dry cleaning fluid or rubber clothes (danger of fire or explosion). Do not tumble dry: Woollens, silk, delicate fabrics, nylon stockings, delicate embroidery, fabrics with metallic decorations, garments with PVC or leather trimmings, training shoes, bulky items such as sleeping bags, etc. Energy saving Only put into the tumble dryer laundry which has been thoroughly wrung or spin-dried.
40003324.qxd 28/06/2006 13:00 Page 13 Controls and indicators START DELAY INDICATOR BUZZER BUTTON TIME TO END INDICATOR DELAY START BUTTON DIGITAL DISPLAY FILTER CARE INDICATOR START/RESET BUTTON ACRYLICS/ SYNTHETICS BUTTON WATER GUARD INDICATOR ON/OFF BUTTON PROGRAMME SELECTOR Control panel and indicator lights Programme Selector – Select the required programme On/Off button and indicator – Press to switch on, the indicator will light.
40003324.qxd 28/06/2006 13:00 Page 14 Door and Filter Opening the door Pull on handle to open the door. To restart the dryer, close the door and press the ‘Start/Reset’ button. WARNING! When the tumble dryer is in use the drum and door may be VERY HOT. Never stop a tumble dryer before the end of the drying cycle unless all items are quickly removed and spread out so that the heat is dissipated.
40003324.qxd 28/06/2006 13:00 Page 15 Selecting the Programme The Hoover Sensor Dry machine gives many options for drying the laundry to suit all circumstances. The table below lists the programmes and the function of each programme. Note: The sensor may not detect a small load of small articles. For small loads and separate items or pre-dried fabrics with low moisture content, use the timed programmes.
40003324.qxd 28/06/2006 13:00 Page 16 Operation 1. Open the door and load the drum with laundry. Ensure that garments do not hinder closure of the door. 2. Gently close the door pushing it slowly until you hear the door 'click' shut. 3. Ensure that the water tap is ON. 4. Press the 'On/Off' button to switch on the dryer. The On/Off indicator will light up and the programme number will be indicated. 5. Turn the Programme Selector dial to select the required drying programme (see Programme Guide). 6.
40003324.qxd 28/06/2006 13:00 Page 17 Cleaning and Routine Maintenance Cleaning the dryer ● Clean the filter after every cycle. ● After each period of use, wipe the inside of the drum and leave the door open for a while to allow circulation of air to dry it. ● Wipe the outside of the machine and the door with a soft cloth. ● DO NOT use abrasive pads or cleaning agents. ● To prevent the door sticking or the build up of fluff periodically clean the inner door and gasket with a damp cloth.
40003324.qxd 28/06/2006 13:00 Page 18 Troubleshooting What might be the cause of... Defects you can remedy yourself Before calling GIAS Service for technical advice please run through the following checklist. A charge will be made if the machine is found to be working or has been installed incorrectly or used incorrectly. If the problem persists after completing the recommended checks, please call the GIAS Service (tel: 08705 400 600), they may be able to assist you over the telephone.
40003324.qxd 28/06/2006 13:00 Page 19 Customer Service Note: If the supply cord on this appliance is damaged, it must be replaced by a special cord which is only available from GIAS Service or an authorised Hoover Dealer. Should there still be a problem with your dryer after completing all the recommended checks, please call the national GIAS Service number for advice.
40003324.qxd 28/06/2006 13:00 Page 20 Your Guarantee For a period of one year from the date of purchase the appliance is covered by a guarantee which allows you to call GIAS Service free of charge. Remember to send off the guarantee certificate for validation within 10 days of the date of purchase. You should retain the receipt issued by the retailer when you purchased the machine to show to the call out engineer, should you need to consult one.