
Manual


• IMPORTANT•
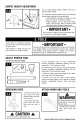
Allow filter to dry completely before replacing.
Dry filter on edge so air circulates on both sides
of filter. This may take up to 24 hours.
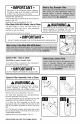
Replace filter, tab side out.
Close lid securely by pushing at (B) until it clicks as
shown in Fig. 4.6.
Replace dirt cup as described in Fig 4.5.
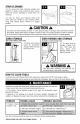
FilterMadeWith HEPAMedia:HowtoClean
4.8 With fingers in slots, pull filter frame (A)
straight out. Hold filter over a trash receptacle
and tap out dirt and debris.
Slide back into position on vacuum.
• IMPORTANT•
,&WARNINGA
To reduce the risk of personal injury - Unplug
before cleaning or servicing. Do not use
vacuum without dirt cup or filters in place.
DO NOT RINSE OR WASH THE FILTER MADE WITH HEPA MEDIA.
I
CarbonFilter • Howto Clean
(Available on select models only).
Your Carbon Filter is located on the underside of
the Filter made with HEPA media.
• IMPORTANT- I
DO NOT RINSE OR WASH the Carbon Filter.
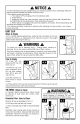
CyclonicFilterAssembly:Howto Clean
AWARNINGA
To reduce the risk of personal injury - Unplug
before cleaning or servicing. Do not use
vacuum without dirt cup or filters in place.
Remove dirt cup as described in Fig. 4.3.
4.9 Twist filter assembly (A) counterclockwise.
Remove assembly from dirt cup.
4.t0 Dirt and debris can be cleaned from the filter
assembly with the Dusting/Upholstery Tool.
4.tl Place the filter assembly on the dirt cup,
aligning (3) tabs (A) on filter with (3) slots on dirt
cup (B) and twist it clockwise to secure into posi-
tion.
4.12 The Hoover'_emblem and center lines on the
dirt cup should align on the front of the dirt cup (C)
if assembled correctly.
Replace dirt cup as described in Fig. 4.5.
Actual model may vary from images shown. 10