OWNEES MANUAL Operatingand ServicingInstructions Espa_ol- p,_gina E1 ® i i:: i: i READ CAREFULLYBEFORE ASSEMBLY AND USE. .... :: Questions or concerns? For assistance, please call Customer Service at 1-800-944-9200 Mon-Fri 8am-7pm EST. PLEASE DO NOT RETURN THIS PRODUCT TO THE STORE. THIS PRODUCT IS INTENDED FOR HOUSEHOLDUSE ONLY. IF USED COMMERCIALLY WARRANTY IS V01D. hoover.
Thankyou for choosinga HOOVEFPproduct. PIease enter the complete model and Manufacturing Code in thespaces provided. MODEL MFG, CODE Hint: Attach your sales receipt to this owner's manual. Verification of date of purchase may be required for ,warranty service of your HOOVER ®product, Be sure to register your product online at Hoover.corn or call t-800-944-9200 to register by phone Visit Hoover.com for additional video instructions for assembly and maintenance.
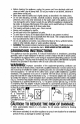
IMPORTANT SAFETY INSTRUCTIONS SAVETHESEINSTRUCTIONS When using an electrical appliance, basic precautions should always be followed, including the foflowing: READALLINSTRUCTIONSBEFOREUSINGTHIS APPLIANCE. WARNING:TOREDUCETHERISKOFFIRE, ELECTRIC SHOCK ORINJURY: • Fullyassemblebeforeoperating. • Operateapplianceonlyat voltagespecifiedon datalabelon bottomof product. ° Donotleaveappliancewhen pluggedin. Unplugfrom outletwhennotin useand before cleaningor servicingproduct. ° Notfor spaceheatingpurposes.
• Beforecleaningthe appliance,unplugthe powercord from electricaloutlet and cleanunit with a dry'or dampcloth.Donot pourwater or usealcohol,benzeneor paintthinneron the unit. • Makesurewaterfill safetycapis tightlyclosed,asdescribedin the instructions. • Do not add descaling,aromatic,alcoholicsolutions,cleaningsolutions,scented perfumes,oils or any otherchemicalsto the water usedin this applianceas this maydamagetheunitor makeit unsafefor use.
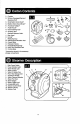
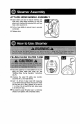
/ ! A, Canister B. Window Squeegee/Garment Steaming Tool* @ C. Small Nylon Scrub Brush* D. Medium Nylon Scrub Brush" E. Accassory Adaptor" E Ang]e Nozzle* G. Grout Cleaning Tool* H. Scraping Tool* ]. Garment Steamer Cloth* I e J N J. Mop Head K. Funnel* L. Measuring Cup M. Multi-Surface Microfiber Pad N. O. P, Q. R. Carpet Glider Extension Wands HoseiHandte Assembly Hard Floor Microfiber Pad Cooling Base J _%_,, *Accessories stored in the accessory storage compartment. 1. Main Power Switch 2.
ATTACH HOSE/HANDLE ASSEMBLY • Open steam port door to expose interface and hold open, Insert hose connector (A) onto the steam port interface (B) pressing firmly until you hear a click sound (3.1). • Pull on hose lightly to ensure hose is securely connected. I Release door. FILLING CLEAN WATER TANK i Place the appliance on a level platform. If you are tilling the clean water tank when hot, see "Refilling Water During Operation" instructions (pg. 8). • Unscrew clockwise • Add 1.
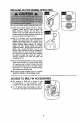
FILLING SOLUTION • Solution tank is TANK located in hoselhandle assembly. Place Hose!Handle Assembly on flat surface. Unscrew the solution tank cap (A) by turning counter- clockwise (4,3), and insert funnel, • • Fill the tank with recommended HooveP MultiPurpose Disinfectant or HooveP Multi-Purpose Cleaner using funnel and measuring cup (4.4), maximum solution volume 200ml (6.
REFILLING WATER DURING OPERATION • Turn paver switch off and unplug the power cord. • Press down steam tdgger (4.8,A) to release pressure. When tank is under pressure, the safety pressure indicator will rise above the surface of the cap (4.9,B). When the tank is not under pressure the safety pressure indicator wi!l be flush or below the su#ace (4.9,C).
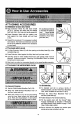
ATTACHING ACCESSORIES EXTENSION WAND SECTIONS • Align Extension Wand (A) with hose handle (B) (5._,). Connect the wand with the rotating cord hook first to the hose and handle assembly. • Press Extension Wand with the rotating cord hook against the hose handle until you hear a click. • Repeat this p_ocedure if it is necessary to attach more wands. The fixed hook extension wand will be last to be attached (closest to the accessory or mop head).
ACCESSORY ADAPTOR • 5.6 Align the H0seJHandle Assembly Accessopj Adaptor (H) on the end fitted corresponding attachment, Accessory can also be attached to the extension longer reach is needed. (G) with with the adaptor wand if • Slide the Accessory Adaptor over the Handle Assembly until you hear a click. • UseAccessory Adaptor to attach various different accessories depending on the task to be performed.
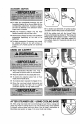
ACCESSORIES CHART: EXTENSIONS AND USAGE Small and Medium Nylon Scrub Brushes Oven, microwaves, stove tops, showers, bathtubs, faucet fixtures, tile, grout, toys. refrigerators, etc. Grout Cleaning Tool Cleaning all grout lines, sanded or non-sanded. Hard Floor Microfiber Pad (which contains the x Connect wand and Tdangular Mop Head For disinfecting hard floors. * Accessory Adaptor can also be attached to the extension wand if longer reach is needed.
This product contains no serviceable parts. Do not try to repair it yourself. Any servicing that requires disassembly other than cleaning must be performed by a qualified appliance repair technician. ALL servicing should be done by an authorized service representative. CLEANING MICROFIBER CLEANING PADS = Machine washable on "warm ° setting, Always use a mild detergent. i For best care results, lay fiat to dryr • After the steamer is used, turn power off and then unplug the power cord.
USE TROUBLESHOOTING GUIDE AS A FIRST STEP TO RESOLVE ANY PROBLEMS YOU MAY BE EXPERIENCING. All servicing should be done by an authorized PROBLEM service representative, POSSIBLE REASON POSSIBLE SOLUTION Reduced steam or no steam 2. Make sure unit is plugged in and/or tom power button on or check fuse or breaker in home, 4. Steam Nozzle may be blocked. 4.
LIMITEDTWO YEARWARRANTY (Domestic Use) WHAT THIS WARRANTY COVERS When used and maintained in normal household use in accordance with the Owner's Manual, your HOOVER ® appliance and hose assemb]y is warranted against odgina[ defects in material and workmanship for a full two years from date of purchase (the "Warranty Pedod"). Dudng the W'arranty Pedod, Hoover _ will provide tabor and _arts, at no cost to you, to correct any such defect in appliances purchased in the United States, U.S.
MANUAL DEL PROPIETARIO Instruccionesde Funcionamientoy Servicio ® LEA MENTAMENTE ANTES DE ENSAMBLARY USAR. _,Tiene alguna pregunta 0 inquietud? Para obtener asistencia, Itame al Servicio de atenciSn al cliente al 1-800 944 9200, de funes a viemes, de 8 a.m. a 7 p.m., hera del ESTE. PeR FAVOR, NO DEVUELVA ESTE PRODUCTO A LA TIENDA. ESTA ASPIRADORA PARA ALFOMBRAS ESTA DISEI_ADA PARA USO DOMf:STICO. EL USO COMERCIAL DE ESTE PRODUCTO ANULA LA GARANTIA, hoover.
Graciaspar haberelegidoun producto HOOVER _. Anote los n0meros completos en los espacias provistos, de C6digo de fabricaci6n MODELO CODtGO DE FABRICACION Consejo: Adjunte su recibo de compra a este Manual del propietario. Para obtener el servicio de garantia de su producto HOOVER _ puede requerirse la vedficaci6n de la fecha de compra, inscdba su producto en linea en Hoover.
iSALVAGUARDIAS IMPORTANTES! iGUARDE ESTASINSTRUCCIONES! AI usar un aparato el_ctrico, observe siempre las precaucionesb_sicas, incluyendo las siguientes: LEATODASLAS INSTRUCCIOHES ANTESDE USARESTEAPARATO ADVERTENCIA: PARAREDUCIREL RIESGODE !NCENDIOS, CHOQUES ELECTRICOS 0 LESIONES: Ensamblecompletamenteel productoantesde hacerlofuncionar. • Hagafuncionarel electi'odom_stico _nicamenteconla tensi6nque se especificaen la etiquetade datosen la parteinferiorde la aspiradora.
• El electrodom6stico s61ose debeutilizaren contenedores o cubasque no est6nIlenosde liquido.Nohagafuncionarel trineoa vaporsinaguaen eltanquede agua!impia.NoIleneel tanqueenexceso.U'dlice la tazamedidoraquesesuminisiraconla uniaaa. • No utilicesin la alrnohadillade limpiezade microfibracolocadacorrectamente en el cabezalde la fregona. i • • o ° ° • el6ctricoy lirnpiela unidadcon un patiosecoo h_medo.
ADVERTENCIA: PARAREDUCIREL RIESGO DEDANOS: • Eviteaspirar0bjetosdurosy filos0sconeste product0, ya qua puedencausardafi0s. • Guardela m_,quinaen un lugarseco,Nola expongaa temperaturasde c0ngelamiento, A. Aspiradora B. UmpiacristaleslAccesorio para Iimpieza a vapor de prendas de vestir* ! C. Cepil[o de fregar pequefzo J de nylon" D. Cepiflo de fregar mediano de nylon* E. Adaptador para accesorios* F. Boquilla angular* M N G. Accesorio limpiador de juntas de baldosas* H. Accesorio L J. K. L M. N. O.
COLOQUE EL CONJUNTO DEL MANGO DE LA MANGUERA • Abra Ea pueda de la abedura de vapor para exporter la interfaz, y mant&ngala abierta. Inserte et conector de la manguera (A) en _ainterfaz de ]a abertura de vapor (B) presionando firmemente hasta escuchar un clic (3.1).
LLENADO DEL TANQUE DE SOLUCION • El tanque de soluciSn se ubica en el ensambla)e manguera/mango, Coloque e] ensamblaje mangueralmango an una superficie plana. Desenrosque la tapa del tanque de so]ucibn (A), girando en sentido antihorario (4.3), e inserte el embudo. dispensar& la solucibn al presionar el gatillo. Co[oqua en la posiciSn "off" (apagado) si no se desea utilizar soluc(Gn HooveP.
REPONER AGUA DURANTE LA OPERACI(_N • Coloque eI interruptor det aparato en posiciSn de apagado y desenchufe el cable, • Presione el gatillo de vapor (4.8.A) pars liberar Ia presi6n. Cuando el tanque est_ bajo presi6n, el indicador de presibn de seguddad se eleva par encima de Is superfi¢ie de la tapa (4.9, B), Cuando e] tanque no est_ bajo presibn, el indicador de presi6n de seguddsd esters a nivel o par debsjo de ta supe_cie (4.9, C).
COLOCACI(_N DE ACCESORIOS SECCIONES ACERCA DEL TUBe DE EXTENSI(3N • Alinee el tube de extensi6n (A) con el mango de Ia manguera (B) (5.1), Conecte primero el tubo con el gancho rotativo del cable al ensamblaje de la manguera con el mango. • Presione el tube de extensi6n con el gancho relative del cable conVa el mango de ]a manguera haste que oiga un CfiC. • Repita este procedimiento si es necesado pare conectar m&s tubes.
ADAPTADOR PARAACCESORIOS • 5.6AIinee el conjunto deI mango de Ia manguera (G) con el adaptador para accesorios (H) en el extremo que est_ equipado con el accesorio correspondiente. • m Presione el adaptador para accesories contra el conjunto del mango de Ia manguera hasta que escuche un clic. I • Utilice el adaptador para accesorios para conectar ratios acr...esodos diferentes seg_n Ia tarea que se realizara.
CUADRO DE ACCESORIOS: EXTENSIONES Limpieza de todas las juntas de baldosas, lijadas o r_o. Accasorio limpiador de juntas de baldosas Para ut]Iizar cuando se aptica vapor a prendas, cortinas, manteles, etc. (sin usar soluciSn). Paho para timpieza a vapor de prendas de vestir Almohadilla de microfibra para pisos duros Y USO X Conecte el tubo y el cabezal triangular de la fregona antes de utilizar. Para desi,qfectar pisos duma.
No contiene piezas que el usuario pueda reparar. No intente reparaflo por su cuenta. Cualquier sen.,icio de mantenimiento que requiera desarmar el ar[efacto, que no sea ta limpieza, debe set ejecutado pot un tgcnico calificado en reparaci6n de electrodom6sticos. Toda tarea de servicio debe ser realizada per un representante de servicio autodzado. LIMPIEZA DE LAS ALMOHADILLAS PARA CUNA Y VARILLA • Lavaram_quinaenagua°CALIENTE •use detergente. • Para mejores resultados, deje superficie plana. secar ".
SI ocurre un problema manor, generatmente causa, usando esta lista de verificaci6n, Cualquier otra tarea de mantenimiento autorizado. puede resolverse con bastante facilidad cuando se halla la debe set rea|izada par un representante PROBLEMACAUSAPOSIBLE de mantenimiento SOLUCI'()N POSIBLE Vapor no produce vapor 2. No Ilega potencia a Ia unidad. 2. Presione el bot6n de encendido y aseg0rese de que la I_ azul est6 iluminada. 4. [] inyector de vapor puedeser bloqueado. 4.
GARANTIALliVilTADADE DOSANOS (Para uso dom_stico) QUE CUBRE ESTA GARANTJA Si se utiliza y mantiene conforme al usa normal en una casa de famUia segL3n Ias instrucciones del Manual del P_.propietario, su aparato HOOVER® y con junto de manguera estan garantizados contra defectos or_ginales en mater_ales y mano de obra durante dos afos completos a _artir de Ia fecha de compra (el "Per_odo de garantia").