Operator’s Manual Model AC300 ARC Welder WARNING: Do not assemble, install, or operate this equipment without reading ALL of this manual and the safety precautions and warnings illustrated in this manual. KDAR Company 1 Mulch Lane St. Louis, MO 63044 Tel: (314) 692-8555 Fax: (314) 692-8578 Web Site: www.hotmaxtorches.
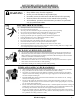
SAFETY PRECAUTIONS AND WARNINGS PLEASE READ BEFORE USING EQUIPMENT WARNING Keep children away from this equipment Protect your self and others from possible injury Pacemaker wearers should consult with their doctor before operating Read and follow all instructions in this manual before operating All installation, operation, and maintenance procedures are performed only by qualified individuals ELECTRIC SHOCK CAN KILL.
CUTTING SPARKS CAN CAUSE INJURY, FIRE, OR EXPLOSION Remove all flammable materials from the welding area Always have a charged fire extinguisher available in the cutting area When not welding make sure the welding electrode is not grounded, this causes a heat build up and possible fire Avoid welding near hydraulic lines, fuel lines, electrical cords, air hoses, or welding guns and cables Sparks and hot metal fly out from the arc when welding, wear approved safety glasses with side shields under a
HOT PARTS CAN CAUSE SERIOUS BURNS Do not touch hot parts without wearing protection. Allow the electrode to cool sufficiently before working with parts that could potentially be hot.
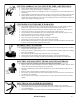
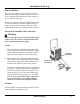
Installation & Set Up Specifications MODEL AC300 Input Voltage Input Amps Phase Output Amps (Low) Output Amps (High) Open Circuit Voltage (High) Working Voltage Duty Cycle 220 Volts AC 60 1 50 - 210 55 - 250 58 V 29 V 100% @ 100 Amps 20% @ 225 Amps Package Contents 1. Welder Assembly Welder Assembly Electrode Holder & Cable Assembly Ground Clamp & Cable Assembly Handle Wheels Axle Cotter Pins Crank Front Support Hardware Bag 16 MM Wrench Manual 2. Electrode Holder & Cable Assembly 3.
Installation & Set Up Assembly Instructions Retain packing material for use during assembly of the welder. 1. Line holes in the handle with the holes in the upper back of the welder. Place a 6mm flat washer on a 6mm x 35mm bolt and place through one of the holes. Repeat for the remaining three 6mm x 35mm bolts. Place a second 6mm flat washer and a 6mm lock washer over the bolt. Thread a 6mm nut on each of the bolts and tighten with a 10mm wrench. 2.
Installation & Set Up Plug Installation Do to the wide variety of 240V plug types, the Hot Max AC300 is shipped with out a plug. The user will have to purchase and install a plug. These welders require a 240V 50 Amp plug. Please refer to the instructions packaged with the plug for proper installation. The unit is shipped with a 6’ three conductor power cord with a blue and red hot conductor and a yellow and green (ground) conductor.
Operation Powering Up the Welder For most users, and 40Amp, 2 pole, 240V breaker will work for most applications. If you find that you are welding at the upper range of the rated output current or if you find that you are overloading (tripping) the breaker while welding, we suggest upsizing the breaker to a 50 Amp, 2 Pole, 240V breaker. Once the breaker size is confirmed, plug the welder into the appropriate matching receptacle and turn the rotary power switch to the on position.
Warranty KDAR Company, and its affiliates, warrants that all welders covered under this warranty is free from defects in material and workmanship for one year from the date of purchase. KDAR also warrants that the electrode holder assembly and ground clamp assembly iss free from defects in material and workmanship for 90 days from the date of purchase. This warranty is extended to the original purchaser who uses the product in a consumer application (personal, residential or household usage).