Instructions for Installation and Use Dishwasher Model BFZ 680
D ISHWASHER Contents Electrical Connection For Your Safety Installation Getting to know your Dishwasher The Controls How to use your Dishwasher Programme Chart Before Using your Dishwasher Loading your Dishwasher Care and Cleaning Troubleshooting Information for Test Labs After Sales Service Hotpoint Guarantee Notes Key Contacts 3 4 5 6 6 7 8 9-10 11 12 13 14 15 16 17-18-19 Back Cover Retention of this Instruction Book This Instruction Book must be kept handy for reference as it contains important details
D ISHWASHER Electrical Connection WARNING: This appliance must be earthed. Fuses Safety Information Your appliance comes fitted with a plug and a 13A fuse. If you need to replace the fuse, only those rated at 13A and ASTA approved to BS1362 should be used. If you lose the fuse cover, a replacement may be obtained from your local authorised Service Centre or Electrical company. Correct replacement is identified by colour coding or the marking on base of plug. At the time of delivery...
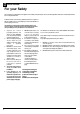
D ISHWASHER For your Safety This manual forms an integral part of the appliance. It must always be kept handy for reference. Read through all the instructions contained in this manual before using the dishwasher. Installation must be performed by a qualified technician, in compliance with the regulations in force, including the prevention and elimination of radio frequency interference. The dishwasher is designed for washing and drying dishes, any other use shall be considered improper.
D ISHWASHER Installation Choose where you want to install your dishwasher, you can place it so that its sides or back panel are side by side with furniture or up against the wall. The dishwasher is provided with water supply and drain hoses, which can be directed towards the left or right to facilitate appropriate installation. Levelling. Once the appliance is positioned, adjust the feet by screwing them in or out depending on how high you want it and to level it so that it is horizontal.
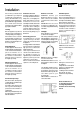
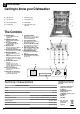
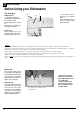
D ISHWASHER Getting to know your Dishwasher E. Upper basket I. F. Top spray arm J. Salt container cap G. Basket height adjuster K. Washing filter H. Lower basket L. Detergent and rinse aid dispenser Bottom spray arm The Controls A. ON-OFF Button Press this button to turn the appliance on. B. ON-OFF Indicator light Indicates that the appliance is turned on C. Door opening handle Use this handle to open the dishwasher door. D. Display (LCD) Buttons and indicator lights to program the appliance. G.
D ISHWASHER How to use your Dishwasher First of all. - Turn on the water supply tap completely. - Add the correct amount of detergent. - Load the baskets correctly. - Check that the spray arms rotate freely. - Close the door securely. - Press the ON-OFF button "A": indicator light "B" comes on. The display turns on and 3 dashes appear, these indicate that the dishwasher is now awaiting instructions. Select the wash cycle.
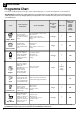
D ISHWASHER Programme Chart Select the most suitable programme for the type of dishes and how dirty they are. To select the wash programme see the chart below: Auto Wash Cycle: the dishwasher is equipped with a Sensor System that measures how dirty the dishes are and decides the most suitable programme for the load, setting the optimal cycle length, number of rinses and water level. This provides a more efficient and economic wash cycle.
D ISHWASHER Before Using your Dishwasher Topreventrustfromforming, load the salt just before beginning a wash cycle. Adjusting the water softener. Your dishwasher can adjust its salt consumption according to the hardness of the water in your home. This way, you can optimise and customise your dishwasher's salt consumption. To adjust salt consumption, do as follows: 1. Unscrew the salt container cap 2.
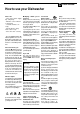
D ISHWASHER Before Using your Dishwasher The detergent Adding detergent To open lid A, press button B. The detergent should be put into the two containers C and D. If using a tablet, put it in container "D". Now you can close the lid: press it down until you hear it click. B • Use the right amount of detergent (see programme chart). • Store your detergent and rinse aid in a cool, dry place, safely away from children.
D ISHWASHER Loading your Dishwasher First of all. Before placing dishes in the baskets, remove all course food remains. This avoids blocking the filter, which would reduce the efficiency of the wash. If saucepans and frying pans are very dirty, allow them to soak before being washed. To make it easier to load your dishes, pull the baskets out. Multisystem baskets The dishwasher is fitted with upper, lower and cutlery baskets.
D ISHWASHER Care and Cleaning Unplug the appliance. Cleaning the spray arms. Before carrying out any cleaning or maintenance on the dishwasher, always remove the plug from the electricity socket. Food residue may become encrusted onto the spray arms and block the holes where water comes out. Check the spray arms regularly and clean them once in a while. After every wash. When the wash cycle has ended, always remember to turn off the water supply tap and to leave the appliance door ajar.
D ISHWASHER Troubleshooting Caution - Do not forget that repairs should only be carried out by a qualified specialist. Improper repairs can lead to considerable equipment damage, as well as danger to the user. - The dishwasher must first be disconnected from the electricity supply before any repairs or other work can be carried out. Switch off at the mains socket and water supply and remove the plug. Resolving minor problems yourself.
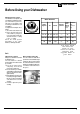
D ISHWASHER INFORMATION FOR TEST LABS Load for 12 Standard Settings tests (upper rack at top position) Loading the detergent The cleaning detergent should be introduced into the two containers “Comp.2” and “Comp.3”. "(see table at the end of the page). Loading the Rinse Aid The amount of rinse aid used for each cycle can be regulated by turning the dose adjuster ‘F’ which you will find under lid ‘C’.There are 6 different settings; the normal dosage is setting 5. D Comp.2 Comp.
After Sales Service "No company is better positioned to offer an after sales service on a Hotpoint appliance than us - the manufacturer" As part of our commitment to you, all Hotpoint appliances have the added benefit of a fully inclusive parts and labour guarantee for the first 12 months. In addition to this you also have the advantage of free replacement parts for the first 5 years when fitted by a Hotpoint engineer.
Guarantee "Satisfaction guaranteed or your money back" We give you a unique 'satisfaction guaranteed' promise - valid for 90 days - after you have purchased your Hotpoint appliance. If there is a technical problem simply call Hotpoint Repair service or visit our web-site at www.theservicecentre.co.uk and where necessary, we will arrange for an engineer to call. If the technical problem is not resolved under this guarantee, we will replace your machine or, if you prefer, give you your money back.
D ISHWASHER Notes 17
D ISHWASHER Notes 18
D ISHWASHER Notes 19
Key Contacts After Sales Service Over 1200 trained specialists, directly employed by us, ensure that you can have complete confidence in both the appliances and services we offer. Repair Service and Information Desk UK: 08709 066 066 (Open 8 to 8 Mon - Fri, 8 to 6 Sat, 10 to 4 Sun & Bank Holidays) www.theservicecentre.co.