Instructions for Installation and Use Electric Hood Model HD90X
CONTENTS RECOMMENDATIONS AND SUGGESTIONS INSTALLATION 3 4-6 ELECTRICAL CONNECTION 7 GETTING TO KNOW YOUR COOKER HOOD 8 CARE AND CLEANING 9 AFTER SALES SERVICE 10 GUARANTEE 11 KEY CONTACTS Back Cover CE marking certifies that this appliance conforms to the following EEC directives:- Low Voltage Equipment Electromagnetic Compatibility 72/23/EEC 89/336/EEC Retention of this Instruction Book This Instruction Book must be kept handy for reference as it contains important details on the safe and
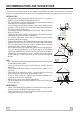
RECOMMENDATIONS AND SUGGESTIONS Using your new Cooker Hood is very simple. Nevertheless, to get the best results it is important that you read this manual thoroughly before installing and using your appliance for the first time. INSTALLATION • All installation and repairs should be carried out by a qualified technician in accordance to regulations in force. • The manufacturer will not be held liable for any damage resulting from incorrect or improper installation.
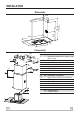
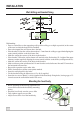
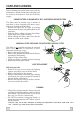
INSTALLATION Dimensions 358 320 760 760 min 1160 max 478 37 900 500 478 358 Components 12b 15 Ref. 1 14.1 9 7.2.1 12a 2.1 12e 2 11 2 2.1 2.2 9 14.1 15 Q.ty Product Components 1 Hood Body, complete with: Controls, Light, Blower, Filters 1 Telescopic Chimney comprising: 1 Upper Section 1 Lower Section 1 Reducer Flange ø 150-120 mm 2 Air Outlet Connection Extension 1 Air Outlet Connection Ref. Q.ty Installation Components 7.2.
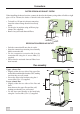
INSTALLATION 1÷2 Wall drilling and bracket fixing 116 116 650 min. 12a 323 11 X 7.2.1 Wall marking: • Draw a vertical line on the supporting wall up to the ceiling, or as high as practical, at the centre of the area in which the hood will be installed. • Draw a horizontal line at 650 mm above the hob. • Place bracket 7.2.1 on the wall as shown about 1-2 mm from the ceiling or upper limit aligning the centre (notch) with the vertical reference line.
Connections DUCTED VERSION AIR EXHAUST SYSTEM When installing the ducted version, connect the hood to the chimney using either a flexible or rigid pipe ø 150 or 120 mm, the choice of which is left to the installer. • To install a ø 120 mm air exhaust connection, insert the reducer flange 9 on the hood body outlet. • Fix the pipe in position using sufficient pipe clamps (not supplied). • Remove any activated charcoal filters.
Electrical Connection WARNING: This appliance MUST be earthed. Connect to a 230 - 240V A.C. Supply only. • Connection to the electricity supply should be made via a properly earthed, readily accessible wall socket which is adjacent to and not more than 1.25m away from the appliance and capable of electrical isolation. Should this plug not fit the socket outlet in your home it should be cut off and replaced with a suitable plug as outlined below.
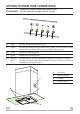
GETTING TO KNOW YOUR COOKER HOOD The Controls WARNING: Children should not be allowed to play with the appliance or tamper with the controls. L V1 V2 V3 V4 L Light Switches the lighting system on and off. V1 Motor Switches the extractor motor on and off at low speed. Used to provide a continuos and silent air change in the presence of light cooking vapours. V2 Speed Reduces the operating speed. V3 Speed Increases the operating speed.
CARE AND CLEANING Before cleaning your cooker hood or carry out any maintenance, switch off and remove the plug from the socket to disconnect it from the electricity supply. GREASE FILTERS: CLEANING METAL SELF- SUPPORTING GREASE FILTERS The filters must be cleaned every 2 months of operation, or more frequently with heavy usage, and can be washed in a dishwasher. • Remove the filters one at a time by pushing them towards the back and pulling down at the same time.
After Sales Service "No company is better positioned to offer an after sales service on a Hotpoint appliance than us - the manufacturer" As part of our commitment to you, all Hotpoint appliances have the added benefit of a fully inclusive parts and labour guarantee for the first 12 months. In addition to this you also have the advantage of free replacement parts for the first 5 years when fitted by a Hotpoint engineer.
Guarantee "Satisfaction guaranteed or your money back" We give you a unique 'satisfaction guaranteed' promise - valid for 90 days - after you have purchased your Hotpoint appliance. If there is a technical problem simply call Hotpoint Repair service or visit our web-site at www.theservicecentre.co.uk and where necessary, we will arrange for an engineer to call. If the technical problem is not resolved under this guarantee, we will replace your machine or, if you prefer, give you your money back.
Key Contacts After Sales Service Over 1200 trained specialists, directly employed by us, ensure that you can have complete confidence in both the appliances and services we offer. Repair Service and Information Desk UK: 08709 066 066 (Open 8 to 8 Mon - Fri, 8 to 6 Sat, 10 to 4 Sun & Bank Holidays) www.theservicecentre.co.