Dear customer, Congratulations on the purchase of your new HOUNÖ oven. You are now the owner of one of the leading oven products on the market. All HOUNÖ products are currently subjected to intensive product development, which ensures that the products always contain the latest technology and the most up-to-date and energy-saving methods of preparation.
TABLE OF CONTENTS Oven description ……………………………………………………………………………… 3 Panel description ……………………………………………………………………………… 4 - Programming …………………………………………………………………………………...
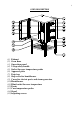
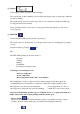
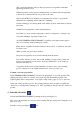
OVEN DESCRIPTION (1) Exhaust (2) Oven door (3) Operation panel (4) 2-step safety handle (5) Socket for core temperature probe (6) Approval plate (7) Drip tray (8) Stop valve for handshower (9) Cover for electric parts and steam generator (10) Handshower (11) Blind socket for core temperature (12) Drain (13) Core temperature probe (14) Stand (15)Adjusting screws
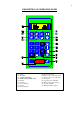
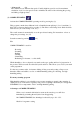
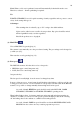
DESCRIPTION OF OPERATION PANEL (1) (2) (3) (4) (5) (6) (7) (8) (9) Display HOT AIR COMBI STEAMING REHEATING/GENERATING Exhaust Steaming Forced steaming Proving Fan speed/timer (10) Function key: Time (11) Function key: Oven temperature (12) Function key: Core temperature (13) Storing key (14) Operating mode ON/OFF (15) Function key: Programming (16) Steamer ON/OFF (17) Manual humidity pulsing
(1) Display 4-line display; 2 lines are used for menu headings. The total amount of time remaining is shown in the time display (incl. program steps) while the program is running. The display always shows how many steps (max. 6) are contained in a menu and which step is being performed at the moment. If any operational defects occur, an error code appears in the time display (see list of error codes, page 29). (2) HOT AIR Activate the HOT AIR operating mode by pressing (2).
- 2 fan speeds (9) The steamer has two different fan speeds. Usually, high fan speed is used for maximum circulation of air. Low fan speed is used to minimise the effect of the air during the proving and baking of light products. (3) COMBI STEAMING Activate the COMBI STEAMING operating mode by pressing key (3). This program contains three different levels of humidity/steam pulsing: 1) low, 2) medium, 3) high. Choose between the levels by pressing (3).
•Deep-frozen, ready-prepared dishes can be reheated in COMBI STEAMING at approx. 130°C using medium humidity/steam pulsing. This reduces the heating time considerably as compared to reheating in the HOT AIR mode. No crust forms on the products, as the preparation is done with steam. (4) REHEATING Activate REHEATING by pressing key (4). The combi steamer is automatically set to the pre-selected setting. The pre-setting can be changed as you please.
(5) Exhaust Open the exhaust by pressing key (5). Control lamp on = open / control lamp off = closed. The exhaust can be opened and closed any time during the cooking process. The exhaust is used to remove humidity and steam from the oven chamber leaving a dry heat which can be used for the browning and grilling of roasts, omelettes, etc. The exhaust is also used to give a crispy surface to baked products.
•The consistency/structure of the products are preserved. Vegetables retain their appetising and fresh colour. •Different products can be prepared simultaneously, for instance fish and vegetables, as flavour is not transferred from one product to the other. •Fish should ALWAYS be steamed at a temperature below 80°C, to prevent the albumen from coagulating and the fish from “shrinking”. •Gentle steaming process during which even delicate products retain their consistency and colour.
Note! When a cold oven is preheated, water will automatically be drained from the oven. Therefore, at least 8 – 10 min. preheating is required. Use FORCED STEAMING is used for quick steaming of sturdy vegetables such as potatoes, carrots celery, leeks, turnip cabbage, etc. Advantages •The steaming time is reduced by up to 25% owing to the additional heat. •Spices can be added to raw as well as frozen products. Dry spices should be mixed well and sprinkled evenly over the vegetables.
It is possible to change between high and low fan speed at any point in the cooking process (does not apply to PROVING). Note that the 2/3 models have only one fan speed. (10) Time The time can be set from 1 min. to 23 hours and 59 min. When the time has run out, the steamer automatically stops and an alarm sounds. The pre-set time can also be changed while the program is running.
(15) Programming Use the manual function. 1. Choose any of the desired functions (2, 3, 4, 6, 7, 8). 2. Adjust time, temperature and perhaps exhaust, core temperature and fan speed. If further steps are needed, press ENTER-STEP. 3. Choose any of the desired functions (2, 3, 4, 6, 7, 8). 4. Adjust time, temperature and perhaps exhaust, core temperature and fan speed. If further steps are needed, press ENTER-STEP and repeat steps 3 and 4. Press F1 twice and press 1 to store manual program.
The functions of F1 With the function key F1, 10 functions are available. Press F1 once * (1) Retrieve menu number * (2) Store changed menu * (3) Correct menu text Press F1 twice * (1) Store manual program * (2) Find vacant menu * (3) Delete menu/step Press F1 3 times * (1) Retrieve original menu * (2) Contrast adjustment * (3) Change pre-settings * (4) Serial port Retrieve menu number: This function retrieves an existing menu number.
With this function, you retrieve one of the menus 1 - 199 programmed in the control. Press F1 three times, press 1, and conclude by pressing ENTER-STEP. Contrast adjustment : Adjusting background light and contrast in the display. Press F1 three times, press 2 and the adjustment is made with keys 2 (lighter) and 8 (darker). The background light is adjustable with keys 1 (lighter) and 7 (darker). Conclude by pressing F1. Change pre-settings : Every time one of the six operating modes (HOT AIR, COMBI, etc.
(16) Combi steamer ON/OFF - main power supply Switch the steamer on and off by pressing key (16). Before the steamer starts, all functions are automatically tested, and, consequently, all displays and control lamps light up for approx. 2 seconds. The steamer always starts in the manual and HOT AIR modes. (17)Manual humidity pulsing By activating key (17), humidity/steam is added to the oven chamber. The humidity pulsing continues as long as the key is activated.
How to operate the CMC computer control Starting up: The oven always starts in the manual menu with the HOT AIR mode automatically selected. MANUAL OPERATION This function is activated by pressing ON/OFF. The pilot lamps change from red to green to indicate that the function is active. Changing operating mode, time, etc. If another operating mode than HOT AIR is required, this must be selected before selecting time, temperature, etc.
CORE TEMPERATURE Operation 1. Select the desired operating mode and set the time/manual time control, temperature, etc. When set to manual time control, the steamer will automatically stop when the desired core temperature is reached. If the time has been set at the same time as the core temperature, the steamer will stop at whichever setting is reached first – time or core temperature. 2. Insert the core temperature probe in the outlet on the front panel. 3.
Long-term roasting Long-term roasting in a HOUNÖ steamer is a particularly gentle roasting process during which the roasting temperatures are often reduced by more than 50% as compared to normal roasting. Because of the lower temperature and prolonged roasting time, the meat becomes particularly tender and juicy, and shrinkage is considerably reduced. During long-term roasting – below 100°C, for instance – it is often unnecessary to add steam/ humidity, as evaporation is already reduced to a minimum.
Lamb Well-done 79 - 85°C Poultry Chicken Goose Goose Turkey, duck 85°C 75 - 80°C 90 - 92°C 80 - 85°C Paste, pâté, etc.
Baking Product Operating mode Processing Temperature time in minutes °C Remarks and tips Rolls* 15-20 170-180 Manual humidity for the first 10 sec. 40-50 g/ea. Loaves* 25-35 160-180 Manual humidity for the first 10 sec. 650 g/ea. Buns* 15-20 160-170 Manual humidity for the first 15 sec. 40 g/ea. Baguettes, prebaked Closed/open exhaust 10-12 / 2-4 170-180 No humidity pulsing French loaves/ baguettes Closed/open exhaust 15-20 / 2-5 170-180 Manual humidity for the first 10-20 sec.
Vegetables Product Operating mode Processing Temperature time in °C minutes Remarks and tips 30-40 100 Fresh. Different sorts of potatoes require different steaming times.
Meat courses Products Operating mode Processing Temperature time in minutes °C Beef tenderloin Remarks and tips 5 / 15 200 / 140 Fresh, whole fillet of beef. Add spices before cooking 20 / 25 180 / 140 Add spices before cooking 15-20 / 70-90 / 20-25 100 / 140-150 10-15 / 60-70 / 15-20 160-190 Add spices and lard before cooking 10 / 60 / 25 100 / 180 / 190 Neck with lard.
Poultry, Fish and Game Product Chicken Chicken Chicken legs Duck Goose Turkey Flatfish Greenland Halibut Trout Turbot Cod Mussels Saddle of venison Haunch of venison Leg of lamb Meat loaf Vacuum-packed meat/poultry Operation mode Processing Temperature time in minutes °C Remarks and tips + open exhaust 20-25 / 10-15 160 / 185 Fresh, thawed, 1000 g + open exhaust 35-45 / 10-15 180 / 220 Frozen, 800 g + open exhaust 15 / 5 160 / 185 Fresh, thawed + open exhaust 50-60 / 50-60 17
CLEANING Daily cleaning of the oven is recommended for hygienic reasons and to avoid interruptions of operation. The design of the HOUNÖ ovens allows quick and easy cleaning. The oven chamber is made of allwelded stainless steel, which makes it splash-proof. You will find the easy-to-use hand shower with flexible hose very suitable for interior cleaning. The door sealing is easy to remove for cleaning. The flat front panel makes exterior cleaning quick and efficient. 1. Interior cleaning A.
3. Cleaning behind filter housing For thorough cleaning of the oven chamber, move the filter housing so that it becomes possible to clean round the fan and heating elements. Loosen the 2 screws (A) and (B) on the filter housing, turn the filter housing and clean behind it. The filter housing can be dismounted entirely by lifting it upwards till it is clear of the pin at the bottom and then tipping it. (A) (B) 4.
6. Cleaning of exhaust valve The exhaust valve should be checked once a week. Remove the valve, clean thoroughly with a brush and detergent, rinse with water, dry, and fit again. It is very important to avoid the forming of a layer of fat on the valve, as the fat might affect the valve’s ability to function. Integrated cleaning program – introduced on 1st Feb.
AUXILIARY EQUIPMENT In order for you to get maximum benefit from your oven, HOUNÖ offers a number of optional extras and auxiliary equipment, which makes it possible to tailor ovens to the needs of any kitchen. A. Racks The HOUNÖ ovens are equipped with removable racks. To achieve a more rational workflow in the kitchen and optimum utilisation of the capacity of the oven, it is possible to use racks with different spacing between the runners, if required. TYPE 1.06 - 1.08 - 1.10 - 1.12 TYPE 1.16 - 2.
As the HOUNÖ ovens are all part of a modular system, HOUNÖ offers only 2 different sizes of trolley for the 8 different sizes of oven. The 1/1-GN trolley for racks is used for 1.06, 1.08, 1.10, 1.12, 1.16 and 1.20 models and the 2/1-GN trolley for 2.10 and 2.14 models. In this way, the same trolley for rack can be used for several different ovens. For a stacking arrangement of e.g. oven and steamer or bake-off oven and proving cabinet (COMBI-PLUS System), a special trolley for rack is available. Model 1.
D. Extraction hood As the ovens use hot air and combi steam, steam will inevitably escape from the oven chamber when the oven door is opened. To catch the steam, the oven can be equipped with a specially designed integrated extraction hood. The extraction hood is available for 1/1-GN and 2/1-GN ovens. E. Handshower To facilitate work, increase safety, and make cleaning more efficient, most HOUNÖ models are equipped with an integrated handshower.
ERROR CODES The HOUNÖ ovens have an automatic error detecting system. In the event of malfunctioning of the oven or faulty connection, error codes appear in the display. This means that any defects are specified immediately and can be remedied quickly and efficiently, which again means fewer interruptions of operation and thus fewer service calls. The following list of error codes provides you with a brief description of each error code and an indication as to how the fault can be remedied.
: Oven sensor defective Possible cause: The temperature sensor in the oven chamber is defective. The oven cannot be operated until the defect has been remedied. Remedy: Replace sensor. : Core temperature probe defective or wrongly fitted Possible cause: Probe is not fitted in socket. Probe defective, socket for probe defective or shortcircuited (due to water or fat). The program cannot be used until the defect has been remedied. Remedy: Check that the probe is correctly fitted or clean the socket.
: Incorrect phase sequence Possible cause: - Fan rotates in the wrong direction. - 2 phases in the electric installation have been exchanged by mistake. The oven cannot be operated until the defect has been remedied. Remedy: Change about the 2 phases in the electric installation. Let the oven cool for 20-30 min., then restart it. Check that the direction of rotation of the fan is counter-clockwise (looking at the fan from inside the oven chamber).
HOW TO ACHIEVE PERFECT BAKING AND ROASTING RESULTS A HOUNÖ oven gives you optimum possibilities of achieving good baking/roasting results. Below are a few pieces of advice on baking and roasting in your HOUNÖ oven. If your baking/roasting results leave something to be desired, for instance, ‘uneven’ baking/ roasting occurs, follow these directions:PREHEATING It is important always to preheat the oven.