
Manual


Floorplate Installation
IMPORTANT: Fit Dorgard to a door before
fitting Floorplate.
Warning! Before drilling holes or fastening
Screws into the floor, check the location of
waterpipes, electrical cables, gas pipes etc.
Failure to do so could cause disruption to the
building’s services and may result in serious
injury or death.
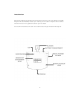
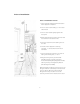
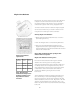
1. Open the fire door to 90 degrees or to the desired
open position greater than 65 degrees. Slide the
Floorplate under the fire door with the Bump Stop
side positioned behind the door and as close to an
adjacent wall as possible to avoid tripping hazards.
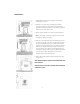
2. Depress the Plunger on Dorgard so that the Ferrule
sits in the recess of the Floorplate.
3. Slide/swivel the Floorplate so that the Bump Stop
comes into contact with the back of the door,
ensure that the Ferrule is still sitting centrally in
the recess of the Floorplate.
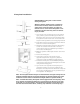
4. Mark the position of Floorplate holes on to the floor
surface.
5. Remove the Floorplate.
6. If the floor is concrete, drill 4 x 6mm holes
(approximately 40 mm deep) at the positions
marked and insert the Masonry Plugs supplied.
7. Position the Floorplate over the Masonry Plugs or
marked points and fasten the Floorplate to the floor
using the Screws supplied.
8. Open the fire door against the Bump Stop and
depress the Plunger. If you have positioned the
Floorplate correctly the Ferrule should fit neatly into
the recess of the Floorplate. If not go back to step 3
and reposition the Floorplate.
8
Note. The Floorplate allows Dorgard to withstand the strongest closing force as
defined in BS EN 1155 and it prevents slippage on smooth surfaces & in other
conditions such as where a wooden floor might deflect as persons walk by.
Note. A smaller Secondary Floorplate comes supplied with no Bump Stop. This
is for specific circumstances where it is not necessary for the door to be held
open flush to a vertical surface. The Secondary Floorplate can be fitted using
the instructions described above, omitting any reference to the Bump Stop.