
Quick Reference Guide

Uninstall the print driver by using the Server Properties feature
If the print driver was installed by the Add Printer Wizard, perform the following to uninstall the driver:
NOTE: To uninstall the software, you must log on with Administrator privileges.
1. Close all programs.
2. On the Start menu, do one of the following steps:
●
Windows XP and Windows Server 2003: Click the Settings item, and then open the
Printers and Faxes item.
●
Windows Server 2008: Click the Control Panel item, and then open the Printers
folder.
●
Windows Vista: Click the Control Panel item. Under the Hardware and Sound
category, click the Printer item.
●
Windows 7: Click the Devices and Printers item.
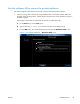
3. Right-click the icon for your product and then click the Delete button. This removes the icon for the
product only, but it does not remove the associated files.
NOTE: You cannot have any print jobs in the print queue for the print driver being deleted.
Double-click the print queue icon to verify the there are no jobs in the print queue.
4. To remove the associated files, do one of the following steps:
●
Windows XP and Windows Server: Click the File menu from inside the Printers or
Printers and Faxes dialog, and then click the Server Properties menu item.
●
Windows Vista: Right-click the list pane, and then click the Server Properties menu
item.
●
Windows 7: Click another item in the Printers and Faxes group, and then at the top of
the list click the Printer server properties button.
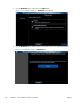
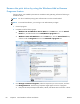
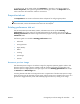
5. Click the Drivers tab, click the name of the product, and then click the Remove button. When
you are prompted to confirm the deletion, click the Yes button.
NOTE: This will fail if there are any queues on the printer using this driver.
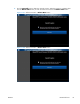
6. Click the OK button to close the Print Server Properties dialog, and then close the Printers
or Printers and Faxes dialog.
50 Chapter 2 Install Windows software and utilities ENWW