HP Access Control (HP AC) Job Accounting Dashboard User Guide
© Copyright 2013 Hewlett-Packard Development Company, L.P. August 2013 Confidential computer software. Valid license from HEWLETT-PACKARD required for possession, use or copying. Consistent with FAR 12.211 and 12.212, Commercial Computer Software, Computer Software Documentation, and Technical Data for Commercial Items are licensed to the U.S. Government under vendor's standard commercial license. The information contained herein is subject to change without notice.
Table of contents 1 Introduction .................................................................................................................................................. 1 1.1 Requirements .................................................................................................................................................. 1 2 Installation ...................................................................................................................................................
List of figures Figure 2-1 Dashboard Setup Wizard .................................................................................................................................... 2 Figure 2-2 Server name ........................................................................................................................................................ 3 Figure 2-3 Select installation folder ...............................................................................................................
1 Introduction The Job Accounting Dashboard is a tool that allows users to monitor detailed printer usage information by printer, user, project, department, or cost center. The data can provide meaningful analysis of printer and MFP activity and gives you a precise accounting of device usage. 1.1 Requirements Microsoft .NET Framework 4 HP Access Control (HP AC) Job Accounting installed and setup on a server. See your administrator for more information. Section 1.
2 Installation Complete the following steps to install the Dashboard: 1. Double-click the Dashboard installation file. The Dashboard Setup Wizard window displays. Click Next.
2. On the Dashboard Setup screen, enter the name or IP address of the Job Accounting server. Click Next.
3. On the Select Installation Folder screen, make sure the correct folder path is displayed in the Folder field. Select Everyone to allow all users and guests on the computer to use the Dashboard. Select Just me to allow only the current user to use the Dashboard. Click Next.
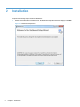
4. On the Confirm Installation screen, click Next. Figure 2-4 Confirm installation 5. When the installation is complete, click Close. To open Dashboard, double-click the Dashboard desktop icon or select Dashboard from the Start menu.
3 Using the Dashboard 3.1 Default Dashboard The Default Dashboard tab allows you to view printing information about yourself and about your group, extended information about users’ printing history in your group and graphs of information about the printing history of the past three months. Figure 3-1 Default Dashboard 3.1.1 User(s) area In the User(s) area you can see your user name, your total number of pages printed, and the total number of pages printed by the group you supervise.
To view printing information about a user in your Direct Reports, double-click a user name in the Direct Reports section. The following happens: ● This moves the user name up to the User(s) section. The User(s) section now displays the hierarchy of users. ● Information about that user’s printing history displays in the data visuals and data grid sections on the right. ● The Direct Reports section also changes to display the names of users who report directly to the user selected.
◦ The Mono/Color chart shows the percentage of printed pages that were black and white or color. ◦ The Simplex/Duplex chart shows the percentage of printed pages that were printed using the simplex or duplex printing feature. ◦ The Copy/Digital/Print chart shows the percentage of printed pages that were printed using the copy function, the digital sending function, or were printed directly to the printer.
3.1.4 Data grid area The data grid section displays columns with the user’s printing data details for the current month. Figure 3-6 Data grid area Arrange data so that it is easier to analyze. Click the column headings to sort the column data in ascending or descending order. In the filter field, under the column headings, you can set the rules for the data that should remain visible after the filter is applied.
Figure 3-7 Group data Click the Expand groups when grouped checkbox to automatically expand all grouped data when the data is grouped. To export the data as a report, click the Export report to Excel the report. Click the Min/Max icon Click the expand icon 10 Chapter 3 Using the Dashboard to maximize or minimize the data grid. to expand the data grid vertically. icon .
3.2 My Dashboard Using the My Dashboard tab, you can open multiple reports at one time to review and compare your printing data. The My Dashboard tab consists of three areas: the Reports area, the Report Details area, and the report viewer area. Figure 3-8 My Dashboard 3.2.1 Reports The Reports area lists saved reports. The reports listed are reports that were saved using the Basic Designer tab or the Advanced Designer tab.
3.3 Basic Designer The Basic Designer tab allows you to customize your printing data or your group’s printing data. Figure 3-9 Basic designer tab 3.3.1 Basic Designer toolbar Figure 3-10 Basic Designer toolbar Click the New icon to clear all data to create new customized data. Click the Open icon to open a saved report. Select a report from the list and then click Load. Click the Save icon Save. to save a customized report.
3.3.2 Data checklist Figure 3-11 Data checklist Use the checkboxes on the left to select what data you want to see in the columns. Figure 3-12 My Dashboard Data grid area At the top, select My Data to view your printing data, or select My Group Data to view your group’s printing data. These options are intended for managers and display only if there are users in your Direct Reports list. 3.
Figure 3-13 Advanced Designer 3.4.1 Advanced Designer toolbar Figure 3-14 Advanced Designer toolbar The following icons display on the Advanced Designer toolbar: Click the New icon to clear all data to create new customized data. Click the Open icon to open a saved report. Select a report from the list and then click Load. Click the Save icon Save. to save a customized report. Type the name of the customized report and then click Click the Delete icon to delete a saved report.
3.4.2 Report dimensions Use the dropdown menu to select the job accounting server. Figure 3-15 Job Accounting report dimensions - dropdown menu Click and drag the dimensions to the Columns/Rows/Filter areas to group and customize your data. The data appears in the Viewer area. 3.4.3 Columns/Rows/Filter area Figure 3-16 Columns/Rows/Filter area Click and drag the dimensions from the Report dimensions area to the Columns, Rows or Filter area to group and customize your data.
Figure 3-17 Member editor 3.4.4 Viewer area Figure 3-18 Report viewer Click the Show/Hide Grand Total check box to hide the data totals. Click the Show/Hide Expanders icon Click the Toggle Pivot icon 16 Chapter 3 Using the Dashboard to display or not display the icon to expand the detailed data.
Click the Filter/Sorting icon 3.4.5 Filtering and Sorting window Click the Filtering/Sorting icon if you want to arrange data so that it is easier to analyze. In the Filtering and Sorting window, you can filter data to quickly see only the printing data that you specify. When you are finished making changes, click Update to apply the filter or sort settings. Figure 3-19 Filter tab Uncheck the Filter Empty Rows checkbox if you do not want to include rows with empty data in the filter.
Figure 3-20 Sorting tab Click the Sort checkbox to turn on sorting. Click the Sorting On dropdown menu to select the page type that you want to sort the data by. Select Ascending or Descending to determine the order of sorting.