HP Access Control (HP AC) Secure Pull Print User Guide
Printed in the US © Copyright 2013 Hewlett-Packard Development Company, L.P. Microsoft, Windows, and Windows NT are U.S. registered trademarks of Microsoft Corporation. Confidential computer software. Valid license from HEWLETT-PACKARD required for possession, use or copying. Consistent with FAR 12.211 and 12.212, Commercial Computer Software, Computer Software Documentation, and Technical Data for Commercial Items are licensed to the U.S. Government under vendor's standard commercial license.
Table of contents 1 Introduction .................................................................................................................................................. 1 2 How to Pull Print ........................................................................................................................................... 2 3 Using a browser to delete documents ..............................................................................................................
List of figures Figure 2-1 Card or code login ............................................................................................................................................... 2 Figure 3-1 Documents button .............................................................................................................................................. 3 Figure 3-2 Delete button ..........................................................................................................................
1 Introduction Thank you for choosing to use HP Access Control (HP AC) Secure Pull Print in your HP device. This user guide includes a set of one-page 3-6 step instructions for performing typical tasks on HP LaserJet MFPs and printers with HP Access Control (HP AC) Secure Pull Print installed. ● How to Pull Print Basic instructions for Pull Print.
2 How to Pull Print Following is a general overview of how to use the Pull Print feature of your HP device: 1. Print a. At the computer, click Print. b. Select the shared HP Access Control (HP AC) Secure Pull Print printer, as advised by your administrator. Click OK. Your document is stored on the HP Access Control (HP AC) Secure Pull Print server for 1 day or until you login and collect it. 2. Log in. Walk to the MFP device and log in with card or code. Figure 2-1 Card or code login 3.
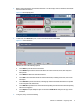
3 Using a browser to delete documents To delete documents using a browser, complete the following steps: 1. Open browser to log in. Open a web browser and enter the following in the address field: http://servername/hpac ● Where servername is the name or IP address of the server containing the installation of HP Access Control (HP AC) Web Interface Configurator. ● If Windows authentication is enabled, you will be prompted for User name and Password the first time you login.
4 Using HP Access Control (HP AC) Secure Pull Print on MFPs The following sections describe how to use the HP Access Control (HP AC) Secure Pull Print feature on a multi-function printer. ● Pull Print – Login by card ● Pull Print – Windows Login If User identification is Card or Windows it is possible to login by either using card or entering Windows login credentials. This can be useful if the user has forgot his card.
2. Before 10 seconds elapses, touch the desired button – for these steps, we’ll use “HP Access Control (HP AC) Secure Pull Print” button. Figure 4-2 HP AC display panel 3. To Pull Print, touch Print all to print, or select documents and then touch Print. Figure 4-3 “Print all” button Likewise, for each of the following options: 4. ● Touch Print to print the selected documents. ● Touch Retain if you want the selected documents to remain on the list (server) after they have been printed.
● Touch Sign Out. ● Leave device idle for 60 seconds. ● Press Reset button. ● Use card reader. 4.2 Pull Print — Windows login If you have forgotten your card, Windows login may be used. To use your Windows login information to log into Pull Print, complete the following: 1. Touch HP AC Secure Pull Print. Figure 4-4 HP AC Secure Pull Print button 2. To log into Windows, enter your login credentials and complete the following steps: a. Touch Username and enter Username on the touch-screen.
3. Touch Print all to print or select documents and then touch Print. Figure 4-6 “Print all” button 4. To Log out, do one of the following: ● Leave device idle for 60 seconds. ● Press Reset button. ● Touch Sign Out. ● Use card reader. 4.3 Pull Print – Login by ID code and PIN code To log into Pull Print using ID code and PIN code information, complete the following steps: 1. Touch HP AC Secure Pull Print (or another icon, as desired). Figure 4-7 HP AC Secure Pull Print button 2.
a. Enter ID code and PIN code on the keypad or touch-screen. b. Touch OK. Figure 4-8 PIN and ID code information 3. Touch Print all to print or select documents and then touch Print. Figure 4-9 “Print all” button 4. To log out, do any of the following: ● Leave device idle for 60 seconds. ● Press Reset button. ● Touch Sign Out. ● Use card reader. 4.
1. Use card reader to enter and select Email. Figure 4-10 Card reader access Before 10 seconds elapse, touch Email button. Figure 4-11 Device panel — Email button 2. For each field, touch the field button and enter the value on the touch-screen. Touch Start to scan and email the document. Touch More Options to control the file type (PDF, JPG, TIFF, and MTIFF), resolution (DPI), and more. Figure 4-12 Enter email information 3. To log out, do any of the following: ● Leave device idle for 60 seconds.
● Touch Sign Out. ● Use card reader. 4.5 Register card with Windows logon To register card with Windows logon, complete the following steps: 1. Use the card reader. Figure 4-13 Card reader 2. Touch HP AC Secure Pull Print (or another icon). Figure 4-14 Touch desired icon 10 3. Touch OK. The Login to register card dialog appears. If a “Please enter PUK code dialog appears, touch Cancel. 4. Enter Windows login credentials and touch OK: a.
d. Touch OK again. Figure 4-15 Enter Windows credentials Card registered. The card is now registered and you are logged in. 5. To log out, do one of the following: ● Leave device idle for 60 seconds. ● Press Reset button. ● Touch Sign Out. ● Use card reader. At this point, the card is registered and you will be prompted to log in. 4.6 Register card with PUK code To register a reader card with PUK code, complete the following steps: 1. Use card reader. Figure 4-16 Card reader Section 4.
2. Touch HP AC Secure Pull Print (or another icon). Figure 4-17 Touch Pull Print icon 3. Enter PUK code and touch OK. If the device requires login by PIN code (“Login without PIN code is NOT checked”), you are asked to enter a PIN code of your choice and confirm this. Touch OK.
5 Using HP Access Control (HP AC) Secure Pull Print on printers Please see the following sections for information about using HP Access Control (HP AC) Secure Pull Print on printers. ● Pull Print – Login by card ● Pull Print – Login by user code and PIN code ● Instructions for HP LaserJet P3015, P4015, and P4515 5.1 Pull Print – Login by card To Pull Print with Login by card, complete the following steps: 1. Use card reader. Figure 5-1 Card reader 2. Pull Print.
5.2 Pull Print – Login by user code and PIN code To log in to Pull Print with user and PIN code information, complete the following steps: 1. Log in by numeric user code [0-9]. Figure 5-2 Login by numeric user code [0–9] 2. a. Press OK or Menu. b. Scroll to “User code.” Press OK. c. Enter user code on keypad. Press the Down ( ) once to get Enter ( d. Scroll to PIN code. Press OK. e. Enter PIN code on keypad. Press OK. ). Press OK. Pull Print.