HP Application Recovery Manager software A.06.10 Getting started © Copyright 2008 Hewlett-Packard Development Company, L.P. Product names mentioned herein may be trademarks of their respective companies as reflected by an associated footnote. The information in this document is subject to change without notice. First edition: March 2008 The information in this document is subject to change without notice.
Installing NOTE: For full installation details, see the HP Application Recovery Manager software installation and licensing guide in the /docs directory of the installation CD-ROM.
Prepare for installation 1. On the system that is to be your Application Recovery Manager Cell Manager: a. Enable TCP/IP protocol and hostname resolution. To check if they are enabled: i. Verify that name resolution is working properly by finding the name of the computer. Open Command Prompt (on Windows platform) or Terminal (on UNIX platform), and type: hostname The name of your computer will be displayed. ii.
Install Application Recovery Manager on Windows 1. Insert the Windows installation CD-ROM and start the wizard: • 32-bit systems: \i386\setup.exe • 64-bit systems: \x8664\setup.exe 2. Select Cell Manager and follow the wizard. 3. In the Account information window, enter the user name and password for the user account you created in step 3 of the installation preparation procedure. Install Application Recovery Manager on UNIX 1. Insert and mount the UNIX installation CD-ROM to a mount point.
• TCP/IP protocol and node name resolution enabled To install remotely, from the Cell Manager GUI: NOTE: To install the clients remotely, you need and Installation Server in your cell. If you used the default values during the Cell Manager installation, than the Installation Server is already installed on the Cell Manager system. 1. Log on to the system as Administrator 2. Start > Programs > Hewlett Packard > HP Application Recovery Manager software > Application Recovery Manager 3.
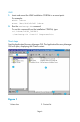
UNIX 1. Insert and mount the UNIX installation CD-ROM to a mount point. For example: mkdir /cdrom mount /dev/dsk/c0t0d0 /cdrom 2. Run the omnisetup.sh command. To run this command from the installation CD-ROM, type: cd /cdrom/LOCAL_INSTALL ./omnisetup.sh -install ComponentList Next steps Start the Application Recovery Manager GUI. The Application Recovery Manager GUI will open, displaying the Clients context: Figure 1 1. Menu bar 2.
3. Tool bar 4. Scoping pane 5. Results area 6. Navigation tabs 7. Results tabs 8. Status bar Configuring your system for backup The following steps provide the basic configuration steps for HP StorageWorks Disk Array XP and Enterprise Virtual Array before you can use Application Recovery Manager for filesystem backup and restore using the SMI-S and SSE agents alone.
Configuring HP StorageWorks Disk Array XP Prerequisites • Ensure that you have installed all necessary Disk Array XP licenses and components. • Ensure that the same operating system (and its version) is installed on the application and backup systems. • Connect the application and backup systems to the same Disk Array XP. Primary LDEVs must be connected to the application system and have paired disks assigned and presented to the backup system.
7. In the Source page, browse for and select all logical volumes inside a volume group, or mount points, or drive letters of disks residing on disk array, then click Next. 8. Optionally, select the Backup specification and Filesystem options. For details, press F1. Click Next. 9. Select the schedule options and then click Next. See Defining a schedule for a simple backup routine for an example. 10. Review the backup specification and click Next. 11. Click Save As to save the backup specification. 12.
2. Under Recurring, select Daily and set the time to 10 PM. Under Recurring options, set the value to 1 day. Figure 2 3. Click OK. Restoring from a backup By default, the backup object is restored to the same path from which it was backed up. The following steps show how to perform an instant recovery. 1. In the Application Recovery Manager GUI, select Instant Recovery from the Context List. 2. In the Scoping Pane, expand Filesystem. 3.
Application Recovery Manager documentation map The following table shows where to find information of different kinds. Shaded squares are a good place to look first.
Installation support For installation support contacts, see http://www.hp.com/support. Licensing Application Recovery Manager comes with an instant-on license for 60 days after installation. Within this period you can request a permanent password from the HP Password Delivery Center (PDC) and install it. The permanent password permits you to configure an Application Recovery Manager cell with regard to your backup policy, provided that you have purchased all required licenses.