
Getting Started Guide


7. In the Source page, browse for and select all logical volumes inside a
volume group, or mount points, or drive letters of disks residing on disk
array, then click Next.
8. Optionally, select the Backup specification and Filesystem options. For
details, press F1.
Click Next.
9. Select the schedule options and then click Next. See Defining a schedule
for a simple backup routine for an example.
10. Review the backup specification and click Next.
11. Click Save As to save the backup specification.
12. Click Start Backup to run the backup.
13. When the Start Backup window opens, click OK to start the backup.
14. The Backup window shows you the progress of the backup session. The
Session Information window will tell you when the backup is finished.
Defining a schedule for a simple backup routine
As an example, suppose you want to define a schedule with a backup every
week day at 10 PM.
To create the defined schedule:
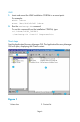
1. When creating your backup specification, at Step 9 on page 9, double
click a date to open the Schedule Backup dialog box.
Page 9