
Setup and Install


HP MultiSeat Solution
Tips for using HP Classroom Manager with an HP
MultiSeat Computing Solution
www.hp.com/go/hpclassroommanager
Restricting Access to the HP Classroom Manager Tutor in an
HP MultiSeat Environment
HP Classroom Manager is a class leading training software solution, providing teachers with the ability to instruct, monitor, and interact with
their students.
With a wealth of unique and innovative features, HP Classroom Manager is consistently voted ‘Top of the Class’ by industry experts. Combining
advanced classroom PC monitoring, real-time Presentation and Annotation tools, with an innovative customised Testing suite, Internet and
Application control, automated Lesson Plans, Printer Management, Instant Messenger control, Content Monitoring and Desktop Security, HP
Classroom Manager rises to the challenge and requirements of today's modern classroom.
Restricting Access to the HP Classroom Manager Tutor Application
HP Classroom Manager is a powerful classroom management tool designed specially with the teacher in mind. To avoid misuse, it is
recommended that use of the HP Classroom Manager Tutor console is restricted to designated users. HP recommends using HP MultiSeat
Server’s built in security feature AppLocker to deny access to a selected group of users.
How to Configure HP MultiSeat Server to Restrict Access to the HP Classroom Manager Tutor using App Locker
1. Start the HP MultiSeat Server in Maintenance Mode and logon as
an administrative user.
2. Run the Computer Management Console by typing
compmgmt.msc into the search bar and pressing Enter.
3. In the Computer Management Console, navigate to Groups which
can be found under {System Tools}{ Local Users and Groups}
4. Right Click on Groups and select ‘Create Group...’
5. On the New Group dialog provide a suitable name and optionally a
description to identify this group.
6. Click Add.. and select the user(s) that you do not want to be able
to run the HP Classroom Manager Tutor Application.
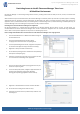
7. Run the Local Group Policy Editor by typing gpedit.msc into your
search bar and pressing Enter.
8. In the Local Group Policy Editor, navigate to AppLocker which can
be found under {Computer Configuration},{Windows
Settings},{Security Settings},{Application Control Policies}
9. Right Click on Executable Rules and select ‘Create a New Rule...’
10. On the Permissions dialog set the Action to ‘Deny’.
11. Click Select and choose the Group created in Step 4 that this rule
should apply to.