HP df720, df780, df820 , df1000 Series Digital Picture Frame Cadre Photo Numérique User Manual Manuel de l’Utilisateur Revision 1.
English FCC Compliance Statement Note: This equipment has been tested and found to comply with the limits for a Class B digital device, pursuant to Part 15 of the FCC Rules. These limits are designed to provide reasonable protection against harmful interference in a residential installation. This equipment generates, uses, and can radiate radio frequency energy and, if not installed and used in accordance with the instructions, may cause harmful interference to radio communications.
Table of Contents 1 What’s in the Box? 3 Getting Started 4 Remote Control 7 Initial Setup 8 Setup Menu 10 Key Features 12 Selecting a Memory Source 13 Picture Options 14 Picture Rotate and Zoom 15 Copying and Deleting Pictures 16 Printing with PictBridge™ 20 Music Playback 22 Video Playback 23 Four-Quadrant Display 25 Clock & Calendar Display 26 Specifications 30 Frequently Asked Questions 34 Cleaning and Care Tips 36 Getting Help 37 English FCC Compliance Statemen
What’s in the Box English Qty 1 1 Item Image Digital Picture Frame Remote Control Replacement Battery = CR2025 Universal Power Adapter PULL 1 (df720, df780, & df820 — 9V, 2A) (df1000 — 12V, 1.5A) 1 USB 2.0 Cable 1 User Manual 1 Quick Start Guide 1 Warranty Document IMPORTANT: Please keep this document for technical support contact information.
Getting Started 1. Connect the power cord into the DC input of the digital picture frame and plug the adapter into a power outlet as illustrated below. English MEMU DC 12V DC 12V SD/MS D /MMC/X MUTE HP df720, df780, & df820 HP df1000 2. The HP Digital Picture Frame is preloaded with pictures that illustrate the basic features of this product. If you want to view these pictures, turn the frame on as illustrated in step 4. The slideshow will begin in a few seconds.
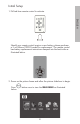
MUTE English 4. Power on the digital picture frame. MEMU Move the POWER switch to the ON position Push the POWER botton HP df720, df780, & df820 HP df1000 A slideshow of your pictures will begin automatically in a few seconds. If music tracks are available on the same external memory device, the slideshow will be displayed with background music unless disabled in the SETUP MENU. Enjoy it and have fun! 5.
6. When using the remote control, point it at front remote sensor as illustrated below.
Remote Control English MENU: Press to access main menu mode or card selection mode TIME SET: Press this button in the time mode to set up the date and time SLIDESHOW: Press this button to begin a picture slideshow. VIDEO PLAYBACK: Press this button to playback video files. UP: Press to move up in thumbnail mode or when setting options. NEXT or FORWARD: Press to move right in browse, thumbnail or menu mode. PLAY/PAUSE or SELECT: Press to change display mode (slide show, browse, or thumbnail).
Initial Setup 1. Pull tab from remote control to activate. English PULL Should your remote control require a new battery, please purchase a 3 volt lithium CR2025 model for replacement. The remote control has battery replacement instructions stamped into the back side as illustrated below. 2. Power on the picture frame and allow the picture slideshow to begin. Press below.
English 3. Press or to highlight the icon. Press the open the SETUP MENU as illustrated below to 4. LANGUAGE setting will be highlighted in blue. Press the button to display additional language selections. Note: If desired language is already selected, go to step 6. 5. Use or to highlight the desired On-Screen-Display language (OSD) and press to return to the setup menu. 6. Press or to select the language. Press to highlight other options and press to select.
Setup Menu Description Language Choose from 7 On Screen Display languages. Options are: English, German, French, Spanish, Portuguese, Italian, and Dutch. The factory default is “English”. Display Image Size Select “ORIGINAL” to display pictures with their original properties. Display picture in full height in normal aspect ratios. Many pictures may not fill the screen, and leave space on both sides. Select “OPTIMAL” to allow the frame to display pictures with optimized properties.
English Option Description Auto Image Compression When enabled, this feature will reduce the size of pictures copied from memory cards and USB thumb drives by rescaling their resolutions to the resolution of the picture frame’s LCD screen. Note that pictures which are copied from a PC via USB connection will not be compressed. The factory default is set to “Enable”.
Key Features Features Automatic picture rotation to match frame orientation. Multiple picture viewing options.
English Selecting a Memory Source The HP Digital Picture Frame can play back content from internal and external memory devices such as USB flash drives and memory cards typically used with digital cameras. More than one external memory device can be inserted at any given time. However, content from only one memory source can be selected for playback. To select the desired picture source, there are many methods to get to the memory source selection menu. 1. In slideshow or browse mode: Press 2.
Picture Options Slideshow modes Browse mode once. “Browse mode” will be disTo exit slideshow mode, press played on the lower right of the screen for a few seconds. This allows forward and previous picture viewing. Press to return to slideshow mode. Thumbnail mode TWICE when in To view pictures in a thumbnail mode, press slideshow or ONCE when in browse mode as illustrated below. Use the arrow buttons to navigate to a picture. Press selected picture.
Picture Rotate and Zoom Picture Rotation English Pictures will be automatically rotated based on the frame orientation. button in Pictures can be manually rotated by pressing the slideshow or browse mode. Note: if a picture is rotated while in slideshow mode, the frame will automatically enter into photo browse mode. Each press of this button will rotate the picture by 90 degrees to the right.
Copying and Deleting Pictures Copying pictures onto frame internal memory begin in a few seconds. Press browse mode or press button once to enter picture button twice to enter thumbnail mode. At the desired picture, press the the copy/delete menu as shown below. button to display ‘Copy picture to’ will be highlighted in blue. Press to again to copy the desired display Internal Memory. Press picture onto the frame’s internal memory.
English Copying pictures onto frame internal memory From a PC/laptop: For the first connection, it is recommended to remove all external memory sources. Power on the HP Digital Picture Frame. Go to the SETUP MENU (see Initial Setup) and set the USB Mode to PC. Connect the HP Digital Picture Frame to your Windows™ 2000 (with service pack 4 or greater), Windows™ XP (with Service Pack 2 or greater), or Windows™ Vista PC/notebook by using the USB cable provided with the product.
Use standard Windows™ explorer file copy and paste procedures to move content onto the frame’s internal memory. When finished copying pictures, disconnect the PC/laptop by in double-clicking on the Safely Remove Hardware icon the lower right on the screen of the PC/Laptop. This will display the menu as illustrated below. Highlight the HP df720, df780, df820 or df1000 drive and then click on the Stop button. After notification, unplug the USB 2.0 cable from both the PC/Laptop and the picture frame.
English Deleting pictures from internal or external memory Pictures can be deleted from internal and external memory sources in the same manner as it was added. Before deleting a picture or pictures, it is important to select the desired memory source (see Selecting a Memory Source section for details). Select the desired picture to be deleted and press the button to display the copy/delete menu. Press to display the YES and NO text. ‘Delete picture’ text.
Printing with PictBridge™ The PictBridge™ function allows you to connect the digital picture frame to a PictBridge™ photo printer via USB for quality photo printing. Connect the HP Digital Picture Frame to your PictBridge™ photo printer by using the USB cable provided with the product. A message will appear on the screen to indicate that the printer connection is detected. In the browse mode, Use Press or to access the desired photo. , select OK and press to start printing.
English Once the printing is finished, press mode.
Music Playback Go to the MAIN MENU (see Initial Setup section). Note: make sure the desired memory source is selected (see Selecting a Memory Source section for details). or to highlight the icon then press . The frame will display a list of music/audio files found on the selected memory source as illustrated below. The first music track in the list will be highlighted. Press playback. to begin • The default playback mode is to play from first to last track then repeat from the first track.
Video Playback English There are two methods to playback video files on a memory source. Note: make sure the desired memory source is selected (see Selecting a Memory Source section for details). 1. Go to the MAIN MENU (see Initial Setup section) and press the button. If compatible video files are available, playback of the first (if more than one file) will begin. • The default playback mode is to play from first to last clip then repeat until stopped. • Press to adjust volume.
English Use the or to highlight a desired video clip. Press to start playback. • The default playback mode is to play from first to last clip then repeat until stopped. • Press to adjust volume. • Press to pause playback. • Press to return to the list of video files. Copying and Deleting Videos Video clips CANNOT be copied or deleted using the feature.
Four-Quadrant Display English In the four-quadrant display, the screen is divided into four sections that can be used to display slideshow (or images), calendar, and time/alarm setting in various combinations. Go to the MAIN MENU (see Initial Setup section). Use the or to highlight the icon then press . The frame will display the four-quadrant screen similar to the illustration below. Initially, the calendar and clock will display an incorrect date and time until they are properly set up.
Setting the Calendar and Clock: • Use the & clock values. & • Use the or buttons to move between the calendar and buttons to change the date and time values. when desired date and time are selected. This will return • Press to the TIME SET menu. • Use & options. Press to highlight the Set Alarm or Slideshow Photo to select the desired option. Setting the Alarm: • Highlight the Set Alarm option. Press the open the Set Alarm screen.
English • Use the & buttons to change these values. when desired settings are selected. This will return to the • Press TIME SET menu. • Use & options. Press to highlight the Set Clock or Slideshow Photo to select the desired option. Setting the Slideshow Photo feature: • Highlight the Slideshow Photo option. Press the button to open the Slideshow Photo screen. or & buttons to highlight Internal Memory or • Use the None(Clock Display) option.
• Press to select desired option. This will return to the TIME SET menu and display the selected feature. Customizing the Four-Quadrant Display: • Go to SETUP MENU (see INITIAL SETUP section). • Use the buttons to highlight the Four-Quadrant Display option. button to display additional four-quadrant selections. Press the • Use press • Press to highlight the desired four-quadrant display mode and to select it. Press to return to the setup menu. button to return to the MAIN MENU.
English Mode 3 Mode 4 Mode 5 Mode 6 29
Specifications - df720 Panel Specification 7” Size 16:9 Resolution 480 x 234 pixels Power External AC Power Adapter +9V, 2.0A Audio Internal speakers 1.0 W x2 Connectivity USB Ports 1 – USB 2.0 (Host, for thumb drive) 1 – Mini USB 2.0 (Device, for link to PC for manage internal memory, and printing images via PictBridge™ enabled printer) Storage/Media Internal memory 512MB Supported Memory cards Memory cards slot 1 Memory Stick Pro (MS Pro), Secure Digital (SD 2.
Specifications - df780 Panel Specification 7” English Size Aspect ratio 16:9 Resolution 800 x 480 pixels Power External AC Power Adapter +9V, 2.0A Audio Internal speakers 1.0 W x2 Connectivity USB Ports 1 – USB 2.0 (Host, for thumb drive) 1 – Mini USB 2.0 (Device, for link to PC for manage internal memory, and printing images via PictBridge™ enabled printer) Storage/Media Internal memory 512MB Supported Memory cards Memory cards slot 1 Memory Stick Pro (MS Pro), Secure Digital (SD 2.
Specifications - df820 Panel Specification 8” Aspect ratio 4:3 Resolution 800 x 600 pixels Power External AC Power Adapter +9V, 2.0A Audio Internal speakers 1.0 W x2 Connectivity USB Ports 1 – USB 2.0 (Host, for thumb drive) 1 – Mini USB 2.0 (Device, for link to PC for manage internal memory, and printing images via PictBridge™ enabled printer) Storage/Media Internal memory 512MB Supported Memory cards Memory cards slot 1 Memory Stick Pro (MS Pro), Secure Digital (SD 2.
Specifications - df1000 Panel Specification 10.4” English Size Aspect ratio 4:3 Resolution 800 x 600 pixels Power External AC Power Adapter +12V, 1.5A Audio Internal speakers 1.0 W x2 Connectivity USB Ports 1 – USB 2.0 (Host, for thumb drive) 1 – Mini USB 2.0 (Device, for link to PC for manage internal memory, and printing images via PictBridge™ enabled printer) Storage/Media Internal memory 512MB Supported Memory cards Memory cards slot 1 Memory Stick Pro (MS Pro), Secure Digital (SD 2.
Frequently Asked Questions Answer Why can't I power on/off HP Digital Picture Frame (df1000)? Please press the power button for about 2-3 seconds. How far away can I use the remote control? Around 100cm. My remote control doesn’t work? You may need to change the battery. Please use a lithium 3V-model number CR2025 only. Why can’t I display some of my Pictures? Some picture/image file formats are not supported. Please refer to the specifications.
English Question Answer Why can’t I use my Windows™ 98 or Me system to copy content onto the frame? The appropriate USB drivers are not supplied for this product and are NOT native to these operating systems I have lost or damaged my remote and/or power adapter. Can I order replacements? Yes. Visit www.hp.com/support for more details. How can I find the latest information/FAQs about my HP Digital Picture Frame? Visit www.hp.com/support for more details and the latest information.
Cleaning and Care Tips √ Please power off the HP Digital Picture Frame before cleaning. √ DO NOT push on the screen too firmly. √ DO NOT use ammonia, alcohol, or abrasive detergent cleaning agents. Cleaning the Screen: 1. Wipe screen with a clean, soft, lint-free cloth to remove dust and loose particles. 2. If further cleaning is required, apply an appropriate cleaning agent (approved for LCD displays) to a clean, soft, lint-free cloth and wipe the screen.
English Getting Help Should you have a technical support question or your HP Digital Picture frame requires service within the warranty period, please contact the original point of purchase or an authorized HP reseller in your country. If service is not available at those locations, please contact an HP Branded Product warranty agent from the support contact list provided below.
Contact/Phone Support: Country Language Number België Dutch and German + 32 2700 1724 FRANCE French + 33 171230454 DEUTSCHLAND German + 49 6950073896 IRELAND English + 353 1850882016 ITALIA Italian + 39 269682189 NETHERLANDS Dutch + 31 202015093 ESPAÑA Spanish + 34 914533458 SWITZERLAND German/French/Italian + 41 18009686 UK English + 44 2073652400 United States English 1.866.694.7633 Canada English & French 1.866.694.
Déclaration de Conformité de la FCC Remarque: Cet appareil a été testé et déclaré conforme aux limites d’un appareil numérique de Classe B, en application de l’Article 15 des Règles de la FCC. Ces limites sont conçues pour fournir une protection raisonnable contre les interférences nuisibles dans une installation résidentielle.
Table des matières 39 Qu’est-ce qu’il y a dans la boîte? 41 Pour commencer 42 Télécommande 45 Configuration initiale 46 SETUP MENU (MENU CONFIGURATION) 48 Fonctionnalités principales 50 Sélection d’une source mémoire 51 Options des photos 52 Zoom et rotation d’image 53 Copie et suppression des photos 54 Impression avec PictBridge™ 58 Lecture de la musique 60 Lecture vidéo 62 Affichage Quatre Quadrants 65 Affichage Horloge et Calendrier 66 Spécifications 70 Questions Fréquemm
Qu’est-ce qu’il y a dans la boîte? Qté 1 Français 1 Élément Image Cadre Photo Numérique Télécommande Pile de remplacement = CR2025 1 Adaptateur d’alimentation universel (df720, df780,& df820- 9V, 2A) (df1000-12V, 1.5A) 1 Câble USB 2.0 1 Manuel de l’Utilisateur 1 Guide de Démarrage Rapide 1 Document de garantie PULL IMPORTANT: Veuillez conserver ce document en cas de besoin pour contacter le service d’assistance technique.
Pour commencer 1. Connectez le cordon d’alimentation à l’entrée DC du cadre photo numérique et branchez l’adaptateur dans la prise de courant comme illustré ci-dessous. MEMU DC 12V DC 12V SD/MS D /MMC/X MUTE HP df720, df780, & df820 HP df1000 2. Le cadre photo numérique HP est préchargé avec des photos qui illustrent les fonctionnalités élémentaires de ce produit. Si vous voulez afficher ces photos, allumez le cadre comme illustré dans l’étape 4. Le diaporama commencera dans quelques secondes.
4. Allumez le cadre photo numérique. MUTE MEMU Positionnez le commutateur d’alimentation POWER sur On (Marche) du HP df720, df780, et df820 Appuyez sur le bouton d’alimentation POWER du HP df1000 Un diaporama de vos photos commencera automatiquement dans quelques secondes. Si des morceaux de musique sont disponibles sur le même périphérique de mémoire externe, le diaporama sera affiché avec la musique en arrière-plan à moins que cela ne soit désactivé dans le SETUP MENU (MENU CONFIGURATION).
6. Lors de l’utilisation de la télécommande, visez le capteur distant comme illustré ci-dessous.
Télécommande MENU: Appuyez pour accéder au mode MAIN MENU (MENU PRINCIPAL) ou au mode card selection (sélection de la carte). TIME SET (MISE À L’HEURE): Appuyez sur ce bouton en mode heure pour configurer la date et l’heure. SLIDESHOW (DIAPORAMA): Appuyez sur ce bouton pour commencer le diaporama des photos. VIDEO PLAYBACK (LECTURE VIDEO): Appuyez sur ce bouton pour lire des fichiers vidéo.
Configuration initiale 1. Tirez l’onglet de la télécommande pour activer. PULL Si vous avez besoin d’une nouvelle pile pour votre télécommande, veuillez acheter le modèle CR2025 3 volts au lithium pour remplacer la pile usagée. La télécommande a des instructions pour le remplacement de la pile imprimées à l’arrière comme illustré cidessous. 2. Allumez le cadre photo et laissez le diaporama de photos pour afficher le commencer.
3. Appuyez sur ou sur pour mettre l’icône en pour ouvrir le SETUP MENU (MENU surbrillance. Appuyez sur CONFIGURATION) comme illustré ci-dessous. 4. Le paramètre LANGUE sera mis en surbrillance en bleu. Appuyez pour afficher les selections de langue sur le bouton supplémentaires. Remarque: Si la langue souhaitée est déjà sélectionnée, allez à l’étape 6. 5. Utilisez ou pour mettre la langue d’affichage à l’écran (OSD) en surbrillance et appuyez sur la langue. Appuyez sur (configuration). Français 6.
SETUP MENU (MENU CONFIGURATION) Description Language (Langue) Choisissez parmi 7 langues d’affichage à l’écran. Les options sont: English (Anglais), German (Allemand), French (Français), Spanish (Espagnol), Portuguese (Portugais), Italian (Italien), et Dutch (Néerlandais). Par défaut, la langue est l'anglais. Display Image Size (Taille de l'image d’affichage) Sélectionnez “ORIGINAL” (“ORIGINAL”) pour afficher les photos avec leurs propriétés d’origine.
Option Description Cette fonction activera/désactiver automatiquement l’lCD pour économiser de l'énergie. Sélectionnez Power On Time (Heure Marche) ou Power Off Time (Heure Arrêt) pour respectivement définir l'heure de marche/arrêt. Utilisez Programmable On/ Off (Programmable Marche/Arrêt) ou pour commuter entre les champs Hour/Minute/ AM PM (Heure/Minute/AM PM), et ou Français pour changer les valeurs. Sélectionnez pour désactiver la fonction.
Fonctionnalités principales Fonctionnalités Rotation automatique de la photo correspondant à l’orientation du cadre. Diaporama des photos avec ou sans musique. • 6 différentes options de transition des photos • Option du mode shuffle Options d’affichage de photos multiple.
Sélection d’une source mémoire Le cadre photo numérique HP peut lire le contenu des périphériques de mémoire interne et externe comme des mémoires flash USB et des cartes mémoire typiquement utilisées avec des appareils photos numériques. Plus d’un périphérique de mémoire externe peut être inséré à un moment donné. Cependant, le contenu d'une seule source mémoire peut être sélectionné pour la lecture.
Options des photos Slideshow modes (Diaporama) Le mode Slideshow (Diaporama) commencera automatiquement quelques secondes après que le cadre ait été allumé ou lorsqu'une carte de mémoire externe/mémoire flash USB est insérée. Il y a deux modes slideshow (diaporama), un avec de la musique en arrière-plan et l’autre sans. Reconsultez les sections Initial Setup (Configuration initiale) et Setup Menu (MENU CONFIGURATION) de ce document pour plus de détails afin de savoir comment changer les paramètres désirés.
Zoom et rotation d’image Rotation d’image Les photos pivoteront automatiquement en fonction de l’orientation du cadre. Vous pouvez faire pivoter les photos manuellement en appuyant sur le en mode slideshow (diaporama) ou browse (parcourir). bouton Remarque: si la rotation d’une photo est effectuée en mode slideshow (diaporama), le cadre passera automatiquement en mode photo browse (parcourir les photos). Chaque appui de ce bouton fera pivoté la photo de 90 degrés vers la droite.
Copie et suppression des photos Copie des photos dans une mémoire interne du cadre À partir d’un périphérique de mémoire externe: Avec le cadre photo éteint, insérez un périphérique de mémoire externe contenant vos photos préférées dans le connecteur approprié. Allumez le cadre photo et un diaporama commencera automatiquement à partir de la mémoire externe dans quelques secondes.
Appuyez sur pour revenir au mode photo browse (parcourir ou pour sélectionner une autre les photos). Utilisez image et répétez l’étape ci-dessus pour copier dans la mémoire interne. Appuyez sur pour continuer le diaporama. Copie des photos dans la mémoire interne du cadre À partir d’un PC/portable: Pour la première connexion, il est recommandé de supprimer toutes les sources de mémoire externe. Français Allumez le Cadre Photo Numérique HP.
L’une des trois lettres du nouveau lecteur est la mémoire interne du Cadre Photo Numérique HP et est marquée HP df720, df780, df820 ou df1000 (selon votre modèle de cadre photo). L’affectation de la lettre du lecteur PEUT varier d’un PC à un autre. Utilisez les procédures de copier/coller de l’explorateur de fichiers Windows™ pour déplacer le contenu de la mémoire interne du cadre.
Mettez le périphérique HP df720, df780, df820, ou df1000 en surbrillance puis cliquez sur le bouton Stop (Arrêter). Après notification, débranchez le câble USB 2.0 du PC/ Portable et du cadre photo. Suppression des photos de la mémoire interne ou externe Les photos peuvent être supprimées des sources de la mémoire interne et externe de la même manière qu’elles ont été ajoutées.
Impression avec PictBridge™ La fonction PictBridge™ vous permet de connecter le cadre photo numérique à une imprimante photo PictBridge™ via USB pour une impression de qualité photo. Allez au SETUP MENU (MENU CONFIGURATION) (voir Initial Setup (Configuration Initiale)) et définissez le Mode USB sur Printer (Imprimante). Connectez le Cadre Photo Numérique HP à votre imprimante photo PictBridge™ en utilisant le câble USB fourni avec l’appareil.
Français Une fois que l’impression est terminée, appuyez de nouveau sur pour revenir au browse mode (parcourir).
Lecture de la musique Allez au MAIN MENU (MENU PRINCIPAL) (voir la section Initial Setup (Configuration initiale) en page 9). Remarque: Assurez-vous que la source mémoire souhaitée est sélectionnée (voir la section Sélection d’une source mémoire pour plus de détails). Utilisez appuyez sur ou pour mettre l’icône en surbrillance puis . Le cadre affichera une liste de fichiers de musique/audio trouvés dans la source de mémoire sélectionnée comme illustré ci-dessous.
Copie et suppression de la musique Le procédé pour copier ou supprimer de la musique vers ou de la source mémoire interne et externe du cadre est le même que celui décrit dans la section précédente intitulée Copie et suppression des photos. Veuillez consulter cette section pour plus de détails. Français Format audio pris en charge: .
Lecture vidéo Il y a deux méthodes pour lire des fichiers vidéo d’une source mémoire. Remarque: assurez-vous que la source mémoire souhaitée est sélectionnée (voir la section Sélection d’une source mémoire pour plus de détails). 1. Allez au MAIN MENU (MENU PRINCIPAL) (voir la section Initial Setup (Configuration initiale)) et appuyez sur le bouton . Si des fichiers vidéo compatibles sont disponibles, la lecture de la première vidéo commencera (s’il y a plus d’un fichier).
Le cadre affichera une liste de clips/fichiers vidéo trouvés dans la source mémoire sélectionnée comme illustré ci-dessous. Utilisez ou pour mettre le clip vidéo choisi en pour démarrer la lecture. surbrillance. Appuyez sur • Le mode de lecture par défaut est de lire du premier au dernier clip puis de répéter jusqu’à ce que la lecture soit stoppée. Français • Appuyez sur pour régler le volume. • Appuyez sur pour mettre la lecture en pause. • Appuyez sur vidéo.
Cependant, si connecté à un PC ou à un Portable, les clips vidéo peuvent être gérés en utilisant les mêmes procédures comme décrit dans la section Copie des photos – À partir d’un PC/portable.
Affichage Quatre Quadrants Dans l’affichage quatre quadrants, l’écran est divisé en quatre sections qui peuvent être utilisées pour l’affichage de diaporama (ou d’images), de calendrier, et la configuration de l’heure/alarme suivant différentes combinaisons. Accédez au MENU MAIN (MENU PRINCIPAL) (voir la section Initial Setup (Configuration Initiale)). Utilisez appuyez sur ou pour mettre en surbrillance l’icône puis . Le cadre affichera un écran quatre quadrants similaire à l’illustration ci-dessous.
Configuration du calendrier et de l’horloge: • L’option Set Clock (Configurer l’horloge) sera mise en surbrillance. ou pour ouvrir l’écran Set Clock Appuyez sur le bouton (Configurer l’horloge) comme montré ci-dessous. • Utilisez les boutons et calendrier et de l’horloge. • Utilisez les boutons date et de l’heure. pour modifier les paramètres du et pour modifier les paramètres de la une fois que la date et l’heure souhaitées sont • Appuyez sur sélectionnées.
• Utilisez les boutons et pour parcourir les valeurs du calendrier, de l’horloge, et Marche/Arrêt. • Utilisez les boutons et pour changer ces valeurs. lorsque les paramètres souhaités sont • Appuyez sur sélectionnés. Ceci renverra au menu TIME SET (MISE À L’HEURE). et pour mettre Set Clock (Configurer l’horloge) ou • Utilisez les options Slideshow Photo (Diaporama de photos). Appuyez sur pour sélectionner l’option souhaitée.
• Remarque: SEULES les images de la mémoire interne seront affichées. pour sélectionner l’option souhaitée. Ceci • Appuyez sur renverra au menu TIME SET (MISE À L’HEURE) et affichera la fonction sélectionnée. pour quitter le menu TIME SET (MISE À • Appuyez sur le bouton L’HEURE). Appuyez à nouveau sur MENU (MENU PRINCIPAL). pour afficher l’écran MAIN Personnaliser l’Affichage Quatre Quadrants: • Allez au SETUP MENU (MENU CONFIGURATION) (voir la section INITIAL SETUP (Configuration Initiale)).
Mode 2 Mode 3 Mode 4 Français Mode 5 Mode 6 69
Spécifications - df720 Spécifications du panneau 7” Taille Format de l’écran 16:9 Résolution 480 x 234 pixels Alimentation Adaptateur d’alimentation CA externe +9V, 2.0A Audio Haut-parleurs internes 1.0 W x2 Connectivité Ports USB 1 – USB 2.0 (Host, pour périphérique de stockage) 1 – Mini USB 2.
Spécifications - df780 Spécifications du panneau 7” Taille Format de l’écran 16:9 Résolution 800 x 480 pixels Alimentation Adaptateur d’alimentation CA externe +9V, 2.0A Audio Haut-parleurs internes 1.0 W x2 Connectivité Ports USB 1 – USB 2.0 (Host, pour périphérique de stockage) 1 – Mini USB 2.
Spécifications - df820 Spécifications du panneau Taille 8” Format de l’écran 4:3 Résolution 800 x 600 pixels Alimentation Adaptateur d’alimentation CA externe +9V, 2.0A Audio Haut-parleurs internes 1.0 W x2 Connectivité Ports USB 1 – USB 2.0 (Host, pour périphérique de stockage) 1 – Mini USB 2.
Spécifications – df1000 Spécifications du panneau 10.4” Taille Format de l’écran 4:3 Résolution 800 x 600 pixels Alimentation Adaptateur d’alimentation CA externe +12V, 1.5A Audio Haut-parleurs internes 1.0 W x2 Connectivité Ports USB 1 – USB 2.0 (Host, pour périphérique de stockage) 1 – Mini USB 2.
Questions Fréquemment Posées Question Réponse Why can't I power on/off HP Digital Picture Frame (df1000)? Please press the power button for about 2-3 seconds. Jusqu’à quelle distance puis-je utiliser la télécommande? Environ 100cm Ma télécommande ne fonctionne pas? Vous pouvez avoir besoin de changer la pile. Veuillez uniquement utiliser le modèle CR2025 3V au lithium.
Question Answer Retirez toutes les sources de mémoire externe. Ou appuyez sur le bouton jusqu’à ce que l’écran de la sélection de la source Comment puis-je sélectionner la mémoire interne? de la mémoire soit affiché. Utilisez pour mettre l’icône de la mémoire et interne en surbrillance et appuyez sur . Les pilotes adéquates de l’USB ne sont pas fournis pour ce produit et NE sont PAS natifs pour ces systèmes d’exploitation J’ai perdu ou endommagé ma télécommande et/ou l’adaptateur d’alimentation.
Astuces pour le nettoyage et la maintenance √ Veuillez éteindre le Cadre Photo Numérique avant de le nettoyer. √ NE PAS appuyer sur l’écran trop fort. √ NE PAS vaporiser ou renverser des agents de nettoyage liquides directement sur l’écran ou sur le cadre. √ NE PAS utiliser d’ammoniac, d’alcool, ou des agents de nettoyage détergents abrasifs. Nettoyage de l’écran: 1. Essuyez l’écran avec un chiffon propre, doux, et non pelucheux pour retirer la poussière et les particules. 2.
Obtenir de l’aide Si vous avez une question d’ordre technique ou si votre Cadre Photo Numérique HP a besoin d’être réparé pendant la période de garantie, veuillez contacter le point de vente d’origine ou un revendeur HP agréé dans votre pays. Si aucun service n’est disponible à ces endroits, veuillez contacter un agent de garantie des produits HP se trouvant dans la liste ci-dessous.
Contact/Support téléphonique: Pays Langue Numéro Région Europe (EMEA) BELGIQUE Néerlandais et Allemand + 32 2700 1724 FRANCE Français + 33 171230454 ALLEMAGNE Allemand + 49 6950073896 IRLANDE Anglais + 353 1850882016 ITALIE Italien + 39 269682189 HOLLANDE Néerlandais + 31 202015093 ESPAGNE Espagnol + 34 914533458 SUISSE Allemand/Français/ Italien + 41 18009686 ANGLETERRE Anglais + 44 2073652400 Amérique du Nord États-Unis Anglais 1.866.694.
7511C00032C