Designjet SmartStream User’s Guide
Edition 2 Legal notices Trademarks © 2014 Hewlett-Packard Development Company, L.P. The information contained herein is subject to change without notice. Microsoft® and Windows® are U.S. registered trademarks of Microsoft Corporation. The only warranties for HP products and services are set forth in the express warranty statements accompanying such products and services. Nothing herein should be construed as constituting an additional warranty.
Table of contents 1 Introduction .................................................................................................................................................. 1 What is it for? ......................................................................................................................................................... 1 Getting started .............................................................................................................................................
7 Printing ...................................................................................................................................................... 34 Submit jobs for printing ....................................................................................................................................... 34 Filtered and unchecked pages ............................................................................................................................. 34 Printing queue ..........
1 Introduction What is it for? HP Designjet SmartStream is a professional software solution for technical-production environments, which offers true PDF management, allows you to cut job preparation time by 50%, and achieves total control across the printing workflow. ● With HP Designjet SmartStream, true PDF management is fully guaranteed and you will no longer spend time solving PDF issues.
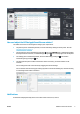
Getting started 1. Install the application. See Installation on page 5. 2. Create a job in the job preparation pane, which gives you many tools for manipulating and setting up each job before printing. You can preview pages in the preview pane. See Job preparation on page 18. To create your first job, select the printer that you want to use, and drag and drop one or more files onto the job preparation pane (or press the icon to browse for files). 3.
How can I adjust the HP Designjet SmartStream window? The widths of each area can be changed according to your requirements. ● The printers pane is minimized by default, but can be widened by clicking the active printer. See also The printers pane on page 11. ● The preview pane can be minimized by pressing the icon or the PREVIEW title, or widened by dragging icon in the top right corner of the pane.
● A job moves from the job preparation pane to the printing queue. ● A job moves from the printing queue to the job history (when it has been printed). ● Scanned pages are available for importing. ● A stacker or folder has been installed or uninstalled. The notification normally fades in, remains for 5 seconds, and then fades out. You can stop it from fading by hovering over it, or see it again by hovering over the notification icon in the icon tray (if you have enabled it).
2 Installation Requirements Computer hardware and software ● Intel Core i3 2.4 GHz with 4 virtual cores/threads, or equivalent or better processor ● 4 GB of RAM, or more ● 3.
For documentation and other support, see http://www.hp.com/go/Z6600/support. ● HP Designjet Z6800 Photo Production printer For documentation and other support, see http://www.hp.com/go/Z6800/support. NOTE: HP Designjet SmartStream supports only PostScript printers. If your printer requires an accessory to handle PostScript, you must install the accessory to use the printer with HP Designjet SmartStream. For further up-to-date information, see http://www.hp.com/go/designjetsmartstream.
3. Press OK. Please wait, and do not remove the dongle. 4. The front panel asks you to press OK to restart the printer. 5. Press OK. 6. Remove the dongle from the USB port. IMPORTANT: printer. Keep the dongle: you will need it if you ever want to uninstall the license from this Now you are ready to install the Print Controller license. How to install the Print Controller license 1. Ensure that your printer is supported by HP Designjet SmartStream, and turned on. 2.
3. Press OK and wait; do not remove the dongle. 4. When the uninstallation is complete, remove the dongle and store it in a safe place. You may want to install it again later in the same printer or in another one. Install the HP Designjet SmartStream application 1. Download the correct installer for your operating system (32- or 64-bit) from http://www.hp.com/go/ designjetsmartstream/software. 2. Start the installer, and follow the instructions on the screen. 3.
3 Printers Add a printer ENWW 1. Ensure that the printer you want to add is turned on, awake, and accessible from your computer. 2. Click the 3. Click the Printers tab. 4. Click the Add Printer button. icon near the top right of the window.
5. Give the printer a name and enter its IP address, then press Continue. You can choose any name you like to assign to the printer; it will be used only in the printers pane. If you do not know the printer’s IP address, the printer’s own documentation will tell you how to find it. It is normally available from the Connectivity menu in the printer’s front panel.
3. Right-click the printer that you want to remove, and click Remove printer in the popup window. 4. Another window warns you of the implications of removing the printer, and offers you the chance to Cancel or Remove printer. The printers pane The printers pane is at the far left of the window. By default, it shows only the names of the printers that you have added.
To widen the pane and see more information about each printer, click the active printer or double-click an inactive printer (which also activates it). You can now see up-to-date status information on the printer and its accessories. NOTE: There may be a short delay while the application retrieves the status information from the printer. To return to the default narrow pane, click the close icon in the top right corner. To see more details about the active printer, click More.
When fully expanded, the printers pane contains the following items: 1. The name of the printer 2. The overall status of the printer 3. A picture of the printer 4. An expander button to increase or decrease the number of details shown 5. The ink level in each ink cartridge 6. The dimensions and type of paper loaded on each roll, and a warning or error message if necessary 7. The status of the folder, if any 8. The status of the stacker, if any 9.
14 ● Full: The stacker is full, and you must remove the stacked paper in order to continue printing. ● Busy: The stacker is being cleaned, and you must wait for the cleaning procedure to finish. ● Upgrading firmware: The stacker firmware is being updated, and you must wait for the updating procedure to finish. ● Jam: The stacker is jammed, and you must clear the jam in order to continue printing. ● Open: The stacker door is open, and you must close it in order to continue printing.
4 Set preferences General preferences The general preferences apply to all printers in the printers pane. To set them, click the right of the window.
You may be able to select the following preferences, although the list of preferences can vary, depending on your printer and its accessories: ● Default paper type ● Quality: Choose the default print quality. ● Folding style: Choose the default folding style. ● Cropping: If you choose Remove white areas, your pages are automatically cropped to remove white areas at the edges. The alternative is No cropping.
NOTE: Enabling this option may yield some false positives, and avoiding clipping on those pages will add extra margins to the print that are not actually needed. ● ENWW ◦ If content is detected in the printer margin, the application can try to fix the problem automatically by adjusting the paper source margins (never, when clipping occurs, or when it occurs or may occur).
5 Job preparation You can create and edit jobs in the job preparation pane. 1. Select the printer that you want to use to print your job. 2. Create a new job by pressing the button at the top left of the job preparation pane, or by dragging files or folders directly onto an empty job preparation pane. NOTE: Whenever you add a new printer, an empty job is created automatically. 3. To add files or folders to a job, you can press the job preparation pane.
5. After checking the files, the application automatically suggests the paper type (unless the preferences indicate to use one specific paper type), the page size, the rotation of the page on the roll, and the roll width. See Automatic attribute detection and setting assignment on page 21. 6. You can review and modify the settings using the job preparation pane and/or the settings pane. See Edit a job on page 22. You can also sort and/or filter the content of the grid.
to a job, an Action Required window is displayed, in which you can enter the required password(s). If you cannot provide a required password, the file is not added to the job. A PDF file with a Permissions password but no Open password is treated as being in error, and is not added to the job. Problems that do not prevent printing In these cases, an explanation is added to the resolution center for your information, but the page is added to the job and can be printed, unless you decide to exclude it.
In the resolution center, you can choose to see all the issues on a page, or you can choose a specific type of issue and browse through the pages that have that issue. Warnings are shown per page, and you can navigate from page to page by using the buttons at the top right. If I get a warning that the image will be clipped, what can I do about it? You can press the Solve all button, in which case HP Designjet SmartStream will try to solve the problem automatically.
● The page size ● The page rotation, if any NOTE: In the paper source options, you can turn automatic rotation on or off by means of a check box. See Paper source options on page 28. You can modify these proposed settings. If you have changed a setting and want to restore the automatic value, press the AUTO button. Edit a job You can edit a job in various ways to print the pages that you want, in the order that you want, and with the print settings that you want.
● Copies: You can print multiple copies of a job by changing the value in the Copies field. ● Collate: If you choose to print more than one copy of the job, you can choose to collate the copies; otherwise, the printer will print multiple copies of the first page, then multiple copies of the second page, and so on. ● Reverse order: You can choose to print the job in reverse order, which may be convenient if you are stacking the pages face-up as they emerge.
Extract pages You can extract pages from a job and store them elsewhere, to be printed later on another printer. This may be useful for small-format or monochrome pages. First select the pages that you want to extract, then right-click the selection and click Extract. Then choose a folder in which the extracted pages will be stored. NOTE: You can extract pages from PDF files only if extraction is not password-protected.
For example, if you want to see only the pages assigned to print on glossy paper, in order to apply a superior print quality, you can use the filter to do so quickly and easily. Multiple filters can be applied simultaneously to different columns. You can click the icon in a column header to see what filter is active for that column. If all boxes are unchecked, no filter is applied. When a specific filter has been applied, the filter icon changes to indicate that at a glance.
Remove a job To remove a job, click the icon to the right of the job name. Alternatively, you can select Remove job from the job option menu in the job header. Print settings For supported T-series printers For supported Z-series printers Print settings can be changed either in the job preparation pane or in the settings pane. The changes are applied to the currently selected item(s), which can be a single page, multiple pages, a document, or a job.
General settings ● Color mode: With supported T-series printers, you can select color, grayscale, or pure black and white (initially set automatically from the color mode detected in the image). With supported Z-series printers, you can select color, grayscale with gray and black inks only, or grayscale with the full set of inks (initially set automatically from the color mode detected in the image). ● Print quality: The available options are Fast, Normal, and Best. The default value is Normal.
● ◦ When you rescale the image, the page margins are also rescaled. ◦ When the page size is set automatically, it will change automatically if you rescale the image. ◦ However, when you set the page size manually and then rescale the image, the page size is not affected. Page size: This is initially set automatically, but you can change it. The page-size list enables you to select portrait or landscape mode. You can also press AUTO at any time to return to the automatic page size.
Advanced options ● Page copies: You can select how many copies are printed of that page. ● Destination: You can select the destination of the printed output if the printer offers a choice. For example, you may be able to choose between a basket and a stacker. If no choice is available, this option is not shown. A Manual mode checkbox may be provided if the printer has a stacker that offers this option.
6 Print preview The preview pane shows what your final print will look like, and adds a visual indication of margins and clipping (if any). While the preview is being generated, the waiting icon at the bottom left of the preview pane is animated. The preview pane can be enlarged by dragging the left pane border further to the left, or maximized by clicking the maximize button in the top right corner of the pane.
which may create margins between the image and the page. When there is a difference between the image size and the page size, you can set how the image is aligned within the page in the page options in the Settings pane: see Print settings on page 26. Pages are printed on rolls of paper. The roll can be wider than the page, in which case you can set how the page is aligned within the roll in the paper source options in the Settings pane: see Print settings on page 26.
● Fonts are used but not found in the PDF file nor in the system. ● Some PDF layers are enabled or disabled differently, depending on whether they are viewed or printed. ● There are references to external documents or images. ● Embedded PostScript (EPS) is contained in the PDF file.
PDF file with unprintable layers Crystal Preview showing what will be printed ENWW Crystal Preview 33
7 Printing Submit jobs for printing From the job preparation pane, you can submit the selected job(s) for printing by pressing the Print job button at the top right. Jobs are checked for possible problems before being added to the printing queue. If any problems are found, you can choose between the following options: ● Modify settings: The job is not added to the printing queue but is kept in the job preparation pane so that you can try to solve the problems.
In the printing queue tab, you can see the progress of each job and document in the active printer queue, including the destination of the print, which may be the stacker, the folder, or the basket. At the top of the printing queue are the Cancel all and Hold all buttons, which can be pressed to cancel or put on hold all jobs in the queue. There is also a Release all button to release all jobs that have been held. In the Actions column, at job level only, there is a Cancel button to cancel the job.
● A page cannot be rendered for one of various possible reasons ● The printer is paused, perhaps because a cover is open In such situations, a popup window explains what has happened, and offers options depending on the situation. For example: ● Paper jam: If there is a paper jam, you will have to clear the jam and restart the printer.
8 Color management HP Designjet SmartStream provides many advanced color management features with a very simple user interface. ICC V4 and V2 color profiles are fully supported for all supported file types, plus black point compensation, PDF output intent, HP Professional PANTONE emulation, and Crystal Preview soft-proofing (see Crystal Preview on page 31).
9 The job history The job history preserves a record of printed jobs in case you want to reprint any of them later; perhaps with changed settings. The job history contains a tab for each printer, which has its own separate job history. The job history includes various items of information about the original job, including its success or failure. If a page has failed to print, or has been printed twice because of a technical problem, a warning icon is displayed, which you can click for details.
Any settings that were originally set automatically are recalculated, which may change the settings, depending on the rolls loaded. Settings that were set manually remain unchanged. You may change any of the settings manually. Remove jobs from the job history You can remove an individual job by pressing the Remove button in the job action column.
10 Folding If your printer has a folder installed, you can select the folding style as one of the print options. See Advanced options on page 29. At the same time, you can choose to print jobs in reverse order whenever the folder is in use. If the folder permits custom folding styles, you can create them by selecting Create from the folding style print option and then filling in the specifications of your custom folding style.
ENWW 1. Set the default alignment between page and roll in the preferences so that the page is placed on the correct side of the roll (see Printer-specific preferences on page 15). You need to do this only once. 2. Select the first page of the job to see it in the preview. 3. Zoom in on the green rectangle. You may want to maximize the preview. 4. If required, use the D key on the keyboard to rotate the page 90° counterclockwise or the F key to rotate 90° clockwise. 5.
11 Scanning If you have a multifunction device with a scanner in the printers pane, you can scan directly into HP Designjet SmartStream. 1. Use the Embedded Web Server of your multifunction device to set up a scan folder in which scanned pages will be stored for use by HP Designjet SmartStream. Every printer compatible with HP Designjet SmartStream includes an Embedded Web Server that you can use to monitor printing activity and perform various other functions from any Web-connected device.
12 Troubleshooting There are some issues that may cause an application error window to be displayed, showing one or more error codes and descriptions. These are listed in the table below. Error code Short description Full description 2001-0199 Non-recoverable generic database error An internal database error has occurred. Restart the application. 2002-0186 Disk error: can't create temporary storage in infrastructure The application does not have sufficient system resources to create temporary data.
Index A application error 43 automatic settings 21 interrupted printing 35 C cancel jobs 36 clipping 31 collate 22 columns hide 2 resequence 2 show 2 copies 22 create a job 18 Crystal Preview 31 edit 22 job history 38 job preparation 18 15 H hardware requirements 5 history 38 hot folder 42 HP Designjet SmartStream installation 8 I image 30 install the application 5 44 Index 20 S scanning 42 send to print 34 settings 26 soft proofing 31 software installation 8 software requirements 5 sort pages 25