owner’s manual hp digital projectors xb31 & sb21 English • version 13.05.
owner’s manual for the hp digital projector xb31 and sb21
table of contents safety Personal Safety ............................................ 4 Protecting Your Projector ............................... 4 introduction Projector Features......................................... 5 Package Contents......................................... 6 Projector Overview ...................................... 7 Control Panel.......................................... 8 Back Panel Features ................................ 8 Remote Control With Mouse & Laser Pointer..............
safety Personal Safety CAUTION! CAUTION! CAUTION! PREVENT EYE INJURY. Do not look into the projector’s lens when the lamp is on. Do not point the remote control’s laser light at your own, or anyone else’s, eyes. AVOID BURN HAZARD. The lamp gets hot during normal operation. Allow it to cool down for 30 minutes before changing lamp! CUT HAZARD. If the bulb is broken, use caution while removing the bulb assembly to avoid injury. xb31 sb21 CAUTION! PREVENT ELECTRICAL SHOCK.
introduction Projector Features The hp digital projector xb31 is an XGA single chip 0.7” DLPTM projector with these outstanding features: xb31 sb21 • True XGA, 1024 x 768 addressable pixels • 1500 comparable lumens • Approximately 3.5 lbs (1.6 kg) compact design • Single chip DLPTM technology • SXGA compression and VGA, SVGA re-sizing • 156 watts (W) user-replaceable P-VIP lamp module • NTSC3.58/NTSC4.
introduction Package Contents The hp digital projectors come with the following items. Please check to make sure your unit is complete. If anything is missing contact your dealer immediately. sb21 xb31 sb21 Projector with lens cap Projector with lens cap Carrying Case Composite Video Cable 2.
introduction Projector Overview 1 5 9 4 6 6 3 2 7 1. 2. 3. 4. 5. xb31 8 Control Panel Power Connector I/O Connection Ports Zoom Ring Focus Ring 6. Remote Control Receivers (front & back) 7. Elevation Button 8. Elevation Foot 9. Lens Cap 4 5 8 1 sb21 6 7 5 3 2 1. 2. 3. 4. Control Panel Power Connector I/O Connection Ports Focus Ring 5. Remote Control Receivers (front & back) 6. Elevation Button 7. Elevation Foot 8.
introduction 7 Control Panel 1. Power (ON/OFF) Button 1 4 2. Lamp Warning Indicator Light xb31 sb21 2 3. Temperature Warning Indicator Light 4. Source Button 5. Menu (ON/OFF) Button 6. Auto Image Button 7. Four Directional Select Buttons 3 5 6 Back Panel Features 1 2 3 4 5 xb31 1. KensingtonTM Lock Hole 2. Composite Video Input 3. Audio Input 4. S-Video Input 5. VESA M1-DA Analog RGB / Digital / HDTV / Component Video / USB Mouse Input 5 3 2 sb21 1 1. KensingtonTM Lock Hole 2.
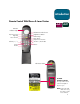
introduction Remote Control With Mouse & Laser Pointer xb31 sb21 Transmit Indicator Light Multi-Directional Selector Projector Power Page Up Laser Pointer Right Mouse Button Hide Image Page Down Keystone Correction Volume ( + / - ) Zoom In / Zoom Out Source Freeze Menu Left Mouse Button CAUTION! PREVENT EYE INJURY. Do not point the remote control’s laserlight at anyone’s eyes. NOTE: Connect the USB cable when using the remote control mouse features.
installation Connecting the hp digital projector xb31 to a computer Connect the power cord to the projector and a power outlet. Connect the black end of the video cable to the projector. xb31 Connect the blue end of the video cable to the PC; optionally, to have the remote control function as a mouse, connect the USB connector to the PC. CAUTION! Unplugging the projector while the fan is running may reduce lamp life. Start the projector; after a 30second warm-up it will search for a video signal.
installation Connecting the hp digital projector xb31 to other signal sources xb31 1 Antenna 5 Digital Tuner Output 2 4 3 Video Output 1. 2. 3. 4. 5. Power Cord Composite Video Cable Audio Cable S-video Cable M1-A to HDTV / Component and USB Cable (optional accessory) S-video Output CAUTION! Unplugging the projector while the fan is running may reduce lamp life. NOTE: For best performance, configure the display mode of your computer’s graphic card to 1024×768 resolution.
installation Connecting the hp digital projector sb21 to a computer Connect the power cord to the projector and a power outlet. Start the projector; after a 30second warm-up it will search for a video signal. Connect the black end of the video cable to the projector. If no video signal is found, you may need to set up the PC to send a video signal out the video port.
installation Connecting the hp digital projector sb21 to other signal sources Video Output sb21 3 2 S-video Output Antenna 4 Digital Tuner Output 1 1. 2. 3. 4. Power Cord Composite Video Cable S-video Cable M1-A to HDTV / Component and USB Cable (optional accessory) CAUTION! Unplugging the projector while the fan is running may reduce lamp life. NOTE: For best performance, configure the display mode of your computer’s graphic card to 800×600 resolution.
operation Turning the projector ON and OFF Turning the projector ON xb31 sb21 1. Remove the lens cap n by squeezing the cap’s tabs and pulling forward. 2. Ensure that the power cord and signal cables are securely connected to the projector and the signal source (computer, notebook, video player, etc.). 3. Turn the projector ON by pressing the Power ON/OFF button on the control panel. o • The cooling fan turns on.
operation Turning the projector ON and OFF (continued) xb31 sb21 2 3 4 1 CAUTION! Unplugging the projector while the fan is running may reduce lamp life. NOTE: Turn on the projector before turning on the signal source. NOTE: When the blue Power Indicator Light is blinking the unit cannot be turned ON or OFF. The projector will not respond to any user input. NOTE: The model shown is the hp xb31.
operation Adjusting the projected image Adjusting the display angle xb31 sb21 To raise the projector display angle: 1. Press and hold the elevation button n. 2. Raise the projector to the desired display angle o, then release the button to lock the elevation foot into position. To lower the projector display angle: 1. Press and hold the elevation button n. 2. Lower the projector, then release the button to lock the elevation foot into its retracted position.
operation Adjusting the display angle (continued) xb31 1 2 Elevation Button 3 Elevation Foot sb21 Elevation Button 1 2 3 Elevation Foot 17
operation Adjusting the hp xb31 zoom and focus xb31 Zoom is adjusted by rotating the zoom ring. Rotate the focus ring until the image is clear. The projector will focus at distances from 1.14 m to 12 m (3.7 feet to 39.4 feet). Zoom Ring Focus Ring Calculating the Projected Image Size The screen diagonal dimension can be approximated by using one of these formulas: Zoomed out 7.5*Distance(ft.)=Diagonal(in.) 0.625*Distance(m)=Diagonal(m) or Zoomed in 6.25*Distance(ft.)=Diagonal(in.) 0.
operation Adjusting the hp sb21 focus sb21 Rotate the focus ring until the image is clear. The projector will focus at distances from 1.0 m to 12 m (3.3 feet to 39.4 feet). Focus Ring Projected image size (diagonal) Calculating the Projected Image Size The screen diagonal dimension can be approximated by using one of these formulas: 7.5*Distance(ft.)=Diagonal(in.) 0.
user controls Control panel & remote control The projector’s functions are controlled via the Control Panel and the Remote Control, and the On Screen Display (OSD). 7 Control Panel 1. Power (ON/OFF) Button 1 2. Lamp Warning Indicator Light 3. Temperature Warning Indicator Light 4. Source Button 5. Menu (ON/OFF) Button 6. Auto Image Button 7. Four Directional Select Buttons xb31 sb21 4 2 3 5 6 Power ON/OFF Button • Refer to “Turning the Projector ON and OFF” on pages 14-15.
user controls On Screen Display Menus The projector has multilingual On Screen Display (OSD) menus that allow you to make image adjustments by changing a variety of settings. xb31 sb21 How to operate • Press the “Menu” button on the Remote Control or Control Panel to open the OSD. buttons to display the contents of the desired menu tab. • Press the The selected tab’s title will change from dark blue to white. • Press the buttons to select the desired menu item.
user controls xb31 sb21 “Language” Menu To open the “Language” menu: 1. Press the “Menu” button to open the On Screen Display (OSD) menus. 2. Use the 3. Press the or buttons to open the “Language” menu tab. buttons to select the desired language. 4. Press the “Menu” button to finalize the selection. NOTE: The hp sb21’s OSD does not include an Audio menu.
user controls xb31 sb21 “All Images” Menu To open the “All Images” menu: 1. Press the “Menu” button to open the On Screen Display (OSD) menus. 2. Use the 3. Press the or buttons to open the “All Images” menu tab. buttons to select one of the following items: Brightness • Press the button to darken the image. • Press the button to lighten the image. Contrast The contrast controls the degree of difference between the lightest and darkest parts of the picture. • Press the button to decrease the contrast.
user controls xb31 “Audio” Menu To open the “Audio” menu: 1. Press the “Menu” button to open the On Screen Display (OSD) menus. 2. Use the 3. Press the Volume or buttons to open the “Audio” menu tab. buttons to select one of the following items: • Press the button to decrease the volume. • Press the Treble button to increase the volume. NOTE: The hp sb21’s OSD does not include an Audio menu. The treble setting controls the higher frequencies of your audio source.
user controls xb31 sb21 NOTE: This message is displayed when an image source other than computer VGA is selected via the Source button or the auto detection function. The “Computer Image” parameters cannot be adjusted when this message is displayed. “Computer Image” Menu To open the “Computer Image” menu: 1. Press the “Menu” button to open the On Screen Display (OSD) menus. 2. Use the or buttons to open the “Computer Image” menu tab. 3.
user controls xb31 sb21 “Management” Menu To open the “Management” menu: 1. Press the “Menu” button to open the On Screen Display (OSD) menus. 2. Use the or 3. Press the Menu Location buttons to open the “Management” menu tab. buttons to select one of the following items: Choose the Menu location on the display screen. Projection Direction • Front-Desktop: The image used in standard desktop operation. • Rear-Desktop: The image is reversed for projection from behind a translucent screen.
user controls xb31 sb21 NOTE: This message is displayed when these settings cannot be adjusted for the image source selected via the Source button or the auto detection function (i.e. computer VGA or 480p). The “Video Image” parameters cannot be adjusted when this message is displayed. “Video Image” Menu xb31 sb21 To open the “Video Image” menu: 1. Press the “Menu” button to open the On Screen Display (OSD) menus. 2. Use the or 3. Press the Color Saturation buttons to open the “Video Image” menu tab.
user controls Remote control Power ON/OFF Button • Refer to ”Turning the Projector ON and OFF” on pages 14 and 15. “Hide” Button • Press the “Hide” button to project a black screen. Press the “Hide” button again to view the image. Multi-Directional Selector Controller * • This feature can be used as a mouse to control direction. Right Mouse Button * Page Up (up) and Page Down (dn) Buttons * • Press the “up” or “dn” buttons to page up or page down, respectively.
user controls xb31 sb21 Transmit Indicator Light Multi-Directional Selector Projector Power Page Up Laser Pointer Right Mouse Button Hide Image Page Down Keystone Correction Volume ( + / - ) Zoom In / Zoom Out Source Freeze Menu Left Mouse Button CAUTION! PREVENT EYE INJURY. Do not point the remote control’s laserlight at anyone’s eyes. NOTE: Connect the USB cable when using the remote control mouse features.
appendices Troubleshooting Consult this section if you are experiencing trouble with your projector. If the problem persists, please contact hp. Refer to Warranty and Support Information on page 39. Problem: No image is projected on screen. xb31 sb21 • Verify that the projector’s power cord is plugged in and properly connected. • Verify that all cables are properly installed and securely connected. • Make sure you have removed the lens cap and that the blue Power Indicator Light is ON.
appendices Troubleshooting (continued) • If you are using an Apple PowerBookTM: In Control Panels, open the PowerBook Display to select Video Mirroring “On.” Problem: Image is unstable or flickering • Activate the “Auto Image” function. • Adjust the “Tracking” variable in the “Computer Image” tab of the On Screen Display (OSD). Refer to page 25. • Change the color settings of the computer’s monitor (see page 27). Problem: Image has vertical flickering bar • Activate the “Auto Image” function.
appendices Changing the lamp module Your projector will monitor the lamp’s elapsed operating time, or “lamp hours.” After 1000 lamp hours, the projector will display the following message at start-up: xb31 sb21 “The lamp has been in use for over 1000 hours. You may consider purchasing a spare bulb.” After 1500 lamp hours, the projector will display the following message at start-up: “The lamp has been in use for over 1500 hours. You should purchase a spare bulb.
appendices Changing the lamp module (continued) NOTE: For both the xb31 and the sb21 digital projectors, a Phillips-head screwdriver is required for this procedure.
appendices hp xb31 specifications Light Engine Brightness Contrast Ratio Lamp Number of Pixels Displayable Colors Projection Lens Projection Screen Size Projection Distance Video Compatibility H. Frequency V.
appendices hp xb31 compatibility modes Mode VESA VGA VESA VGA VESA VGA VESA VGA VESA VGA VESA VGA VESA VGA VESA VGA VESA VGA SVGA SVGA SVGA SVGA SVGA VESA XGA VESA XGA VESA XGA VESA XGA VESA XGA * VESA SXGA * VESA SXGA MAC LC13” MAC II 13” MAC 16” MAC 19” * MAC MAC G4 MAC G4 MAC G4 I MAC DV I MAC DV I MAC DV * I MAC DV * I MAC DV * I MAC DV Resolution 640 x 350 640 x 350 640 x 400 640 x 480 640 x 480 640 x 480 640 x 480 720 x 400 720 x 400 800 x 600 800 x 600 800 x 600 800 x 600 800 x 600 1024 x 768 1024
appendices hp sb21 specifications Light Engine Brightness Contrast Ratio Lamp Number of Pixels Displayable Colors Projection Lens Projection Screen Size Projection Distance Video Compatibility • • • • • • • • • • Single Chip DLPTM Technology 1000 comparable lumens 1800:1 (Full On / Full Off) 132 watt (W) user-replaceable P-VIP Lamp Module 800 (H)×600 (V) 16.7 million F/2.4, f=22.4 mm with manual focus 0.6~7.5 m (25~295 inch) diagonal 1m~12 m (3.3~39.4 ft) NTSC3.58/NTSC4.
appendices hp sb21 compatibility modes Mode VESA VGA VESA VGA VESA VGA VESA VGA VESA VGA VESA VGA VESA VGA VESA VGA VESA VGA SVGA SVGA SVGA SVGA SVGA * VESA XGA * VESA XGA * VESA XGA * VESA XGA * VESA XGA MAC LC13” MAC II 13” * MAC 16” * MAC 19” MAC G4 * I MAC DV Resolution 640 x 350 640 x 350 640 x 400 640 x 480 640 x 480 640 x 480 640 x 480 720 x 400 720 x 400 800 x 600 800 x 600 800 x 600 800 x 600 800 x 600 1024 x 768 1024 x 768 1024 x 768 1024 x 768 1024 x 768 640 x 480 640 x 480 832 x 624 1024 x 76
regulatory information Regulatory information This section presents information that shows how your digital projector complies with regulations in certain regions. Any modifications to your digital projector not expressly approved by Hewlett-Packard could void the authority to operate the digital projector in these regions. U.S.A. This digital projector has been tested and found to comply with the limits for a Class B digital device, pursuant to Part 15 of the FCC Rules.
regulatory information DECLARATION OF CONFORMITY According to ISO/IEC Guide 22 and EN 45014 Manufacturer’s Name: Hewlett Packard Company Manufacturer’s Address: Hewlett Packard Company 1000 NE Circle Boulevard Corvallis, OR 97330-4239 Declares, that the product(s): Product Name: Model Number(s): Product Options: xb31 sb21 Digital Projector xb31, sb21 All Conforms to the following Product Specifications: Safety: IEC 60950: 1991 + A1, A2, A3, A4 / EN 60950: 1992 +A1, A2, A3, A4, A11, IEC 60825-1: 1993
regulatory information Reference Safety Information Laser Safety The remote controller used with the digital projector is certified as a Class 1 laser device according to the U.S. Department of Health and Human Services (DHHS) Radiation Performance Standard and International Standards IEC 825 / IEC 825-1 (EN 60825 / EN 60825-1). This device is not considered harmful, but the following precautions are recommended: • • • • Ensure proper use by reading and following the instructions carefully.
appendices Warranty & Support Refer to warranty/support information data sheet enclosed with the projector or contact hp post-sales support at www.hp.com/support/digitalprojectors or call (in the US) 208-323-2551 or (in Canada) 905-206-4663. xb31 sb21 hp offers telephone support world-wide. For the phone number of the customer care center nearest you, please visit the following URL: http://productfinder.support.hp.