HP 3PAR StoreAll 9300 Gateway Storage Implementation Guide Abstract This implementation guide provides the information you need to configure an HP 3PAR StoreServ Storage system with HP StoreAll 9300 Gateway Storage. General information is also provided on the basic steps required to allocate storage on the HP 3PAR StoreServ Storage that can then be accessed by the HP StoreAll 9300 Gateway Storage for file archiving and object services.
© Copyright 2013 Hewlett-Packard Development Company, L.P. Confidential computer software. Valid license from HP required for possession, use or copying. Consistent with FAR 12.211 and 12.212, Commercial Computer Software, Computer Software Documentation, and Technical Data for Commercial Items are licensed to the U.S. Government under vendor's standard commercial license. The information contained herein is subject to change without notice.
Contents 1 Introduction...............................................................................................5 Supported Configurations..........................................................................................................6 HP 3PAR OS Upgrade Considerations.........................................................................................6 Audience................................................................................................................................
Using Remote Replication....................................................................................................37 Using Intracluster Replication..........................................................................................37 Using intercluster replication...........................................................................................38 Using Data Tiering.............................................................................................................
1 Introduction This implementation guide provides the information you need to configure HP 3PAR StoreServ Storage system with the HP StoreAll 9300 Gateway Storage. General information is also provided on the basic steps required to allocate storage on the HP 3PAR StoreServ Storage that can then be accessed by the StoreAll 9300 for the creation of file archiving and object services. The guide explains how to: • Configure and discover HP 3PAR LUNs on the StoreAll 9300 host.
Supported Configurations The following types of host connections are supported between the HP 3PAR StoreServ Storage and hosts running the HP StoreAll OS: • Fibre Channel (FC) • Software iSCSI initiator Fibre Channel connections are supported between the HP 3PAR StoreServ Storage and the HP StoreAll 9300 host server in both a fabric-attached and direct-connect topology.
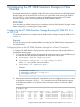
2 Configuring the HP 3PAR StoreServ Storage for Fibre Channel This chapter describes how to establish a Fibre Channel connection between an HP 3PAR StoreServ Storage system and an StoreAll 9300, and how to set up the fabric when running HP 3PAR OS 2.3.x and OS 3.1.x. For information on setting up the physical connections for an HP 3PAR StoreServ Storage system, see the appropriate HP 3PAR installation manual.
0:4:2 0:5:1 0:5:2 0:5:3 0:5:4 1:0:1 1:0:2 1:0:3 1:0:4 1:2:1 1:2:2 1:4:1 1:4:2 1:5:1 1:5:2 1:5:3 1:5:4 host host host host host disk disk disk disk host host host host host host host host point point loop point loop loop loop loop loop point loop point point loop loop loop loop auto auto auto auto auto auto auto auto auto auto auto auto auto auto auto auto auto 4Gbps 2Gbps 2Gbps 2Gbps 2Gbps 2Gbps 2Gbps 2Gbps 2Gbps 2Gbps 2Gbps 2Gbps 2Gbps 4Gbps 4Gbps 4Gbps 4Gbps disabled disabled disabled disabled disabl
Required Employ fabric zoning, using the methods provided by the switch vendor, to create relationships between host server HBA ports and storage server ports before connecting the host server HBA ports or HP 3PAR StoreServ Storage ports to the fabric(s). Fibre Channel switch vendors support the zoning of the fabric end-devices in different zoning configurations. There are advantages and disadvantages with each zoning configuration. Choose a zoning configuration based on your needs.
also work correctly for lower-speed HBAs, such as 4 Gb/2 Gb HBAs. For more information, see the Fabric OS command Reference Manual supporting FOS 6.3.1a and the FOS release notes. In addition, some HP switches, such as the HP SN8000B 8-slot SAN backbone director switch, the HP SN8000B 4-slot SAN director switch, the HP SN6000B 16 Gb FC switch, or the HP SN3000B 16 Gb FC switch automatically select the proper fill-word mode 3 as the default setting.
on Fibre Channel target ports that connect to Fibre Channel fabric and are in point-to-point mode where both the active and partner ports share the same fabric. Each Fibre Channel port has a partner port automatically assigned by the system. Where a given physical port assumes the identity of its partner port, the assumed port is designated as a persistent port.
When a node is down during an online upgrade or node reboot, from the output of the showport command, the FailoverState column would show that Persistent Ports is active. In the example below, node 1 has gone down, Persistent Ports for 1:1:1 has become active on port 0:1:1, and all filesystem I/O for port 1:1:1 is physically served by port 0:1:1.
Unsupported Configurations The Persistent Ports feature is not supported with iSCSI.
3 Connecting a StoreAll 9300 with Fibre Channel The StoreAll 9300 supports QLogic and Emulex Fibre Channel HBAs. Refer to the appropriate Emulex or QLogic section based on the Fibre Channel HBA installed and the tasks necessary for connecting the host to Fibre Channel. The latest StoreAll Storage SPOCK is now available at the SPOCK website: http://www.hp.
NOTE: The ramdisk image needs to be rebuilt for any changes made to /etc/ modprobe.conf to be effective. The system will pick up the ramdisk changes on bootup. 3. Rebuild the ramdisk image using the mkinitrd command. As the mkinitrd command requires the initrd file, check the contents of /etc/grub.conf to give the same initrd file name that the boot loader boots. # mkinitrd -f -v /boot/initrd-.img The following example shows a ramdisk build: # mkinitrd -f -v /boot/initrd-2.6.18-128.
Installing the QLogic HBA Install the QLogic host bus adapter(s) in the host server based on the documentation provided with the HBAs and host server. Modifying the /etc/modprobe.conf File and Building the Ramdisk 1. As shown below, modify the options qla2xxx line to include qlport_down_retry=1 if you are running a version of InForm OS earlier than 3.1.1. If you are running InForm OS 3.1.1 or later, enter qlport_down_retry=10.
file to give the same initrd file name that the boot loader boots. To make the changes, you can issue the mkinitrd command. # mkinitrd -f -v /boot/initrd-.img For example: # mkinitrd -v -f /boot/initrd-`uname -r`.img `uname -r` 3. Perform one of the two following actions to verify that all the required drivers are added to the ramdisk image: a. Check the verbose output. For example: Creating initramfs . . . . . . . . Looking for deps of module Looking for deps of module . . . . . . .
Setting Up the NVRAM and BIOS with the QLogic HBA This section describes how to set up the NVRAM and BIOS with the QLogic HBA. Configure the following NVRAM settings for QLogic 23xx, 24xx and 25xx cards using the QLogic Fast!UTIL. Access the Fast!UTIL utility by hard booting the server and, when prompted and follow these steps: NOTE: The NVRAM settings on QLogic HBAs can be changed by any server in which they are installed. These settings will persist for an HBA even after it is removed form a server.
Once you install the QLogic SANsurfer FC CLI utility for each of the HBA ports, set the correct port connection type (direct --> loop, fabric --> point) by running the following commands: • For fabric connection: # /opt/QLogic_Corporation/SANsurferCLI/scli -n X CO 1 • For direct connection: # /opt/QLogic_Corporation/SANsurferCLI/scli -n X CO 0 where X is equal to the HBA FC port #, the HBA port numbers start with number 0.
2. Append the device structure by adding a device sub-structure for HP 3PAR StoreServ Storage array and the changed multipath parameters for the array. After all of the edits are made, the relevant sections of the /etc/multipath.conf file should appear as follows: NOTE: If you are running Inform OS 3.1.1 or later, change the no_path_retry setting to 18 and the polling_interval setting to 10. # cat /etc/multipath.
mpath272: rr_weight = 1 (internal default) mpath272: minio = 100 (controller setting) mpath272: no_path_retry = 12 (controller setting) These variables were part of the device setting for HP 3PAR in the /etc/multipath.conf configuration file.
4 Storage Allocation for Access by the HP StoreAll 9300 and HP 3PAR StoreServ Storage Usage Creating Storage on the HP 3PAR StoreServ Storage This section describes the general steps and commands that are required to create the Virtual Volumes (VVs) that can then be exported for discovery by the Red Hat host and HP StoreAll 9300 software. For additional information, see the HP 3PAR Command Line Interface Administrator’s Manual. For complete details on creating VVs, see the appropriate HP 3PAR documentation.
Consult the HP 3PAR Command Line Interface Reference for complete details on creating volumes for the HP 3PAR OS version that is being used on the HP 3PAR StoreServ Storage. Note that the commands and options available for creating a VV may vary for earlier versions of the HP 3PAR Command Line Interface Reference. Exporting LUNs to the Host This section explains how to export LUNs to the host server as VVs, referred to as Virtual LUNs (VLUNs).
The following example displays a VLUN exported to a host set. # showvlun -t Lun VVName 0 TESTLUNS.0 HostName set:X9000 -Host_WWN/iSCSI_Name- Port Type ------------------ host If you use HP 3PAR thinly-provisioned volumes with HP StoreAll OS software, the volume state will remain thin when the StoreAll file system is created. The files system will use only a small space of storage for creation of inode tables and does not scrub the whole volume.
(PDs) or common provisioning groups (CPGs). Before exporting the virtual volume to StoreAll 9300 storage, HP 3PAR must first be registered as a vendor storage on the StoreAll 9300. This section describes general steps and commands that are required to create the virtual volumes and then export and discover them as physical volumes on the StoreAll 9300. 1. Register HP 3PAR as vendor storage on the StoreAll 9300. In the Navigator pane, click Storage, click Vendor Storage, and then click Add.
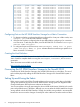
4. After creating the virtual volumes, you can then group them as a virtual volume set or export them to the host. The virtual volumes can also be exported to a host set. Run the following command on each StoreAll 9300 Gateway server to dynamically discover Volumes/LUNs presented to the StoreAll 9300 Gateway servers: # for i in `ls /sys/class/scsi_host/`; do echo " - - - " > /sys/class/scsi_host/$i/scan; done Figure 2 Virtual Volumes 5.
If the exported LUNs are already provisioned or discovered on the host by using the native scan such as echo "- - -" > /sys/class/scsi_host/hostX/scan, then execute the ibrix_pv or Discover Device command for the device to be seen by the StoreAll 9300. If the LUN is not discovered natively on the host then perform the ibrix_pv command twice. The first instance discovers the device on the host. The second instance adds the device to the StoreAll 9300.
For example, to unmount the file system fs1, you can use the following command: # ibrix_umount -f fs1 4. After unmounting the file system, you can delete it using the ibrix_fs -d -f FSLIST command. For example, to delete file system fs1, you can use the following command: # ibrix_fs -d -f fs1 For more information about these commands, see the HP StoreAll Storage User Guide, which is available on the following HP website: http://www.hp.
For example, to create a mountpoint /fs1 on the hosts eos172s1.vpi.hp.com” and eos172s2.vpi.hp.com, use the following command: # ibrix_mountpoint –c –h eos172s1.vpi.hp.com,eos172s2.vpi.hp.com –m /fs1 3.
g. Issue the following HP 3PAR OS CLI command to remove the VLUN export: # removevlun h. Issue the following HP 3PAR OS CLI command to remove the storage volume: # removevv Enabling and Disabling Quotas Quotas can be assigned to individual users or groups, or to a directory tree. Individual quotas limit the amount of storage or the number of files that a user or group can use in a file system.
For more information about these commands, see the HP StoreAll Storage CLI Reference Guide, which is available on the following HP website: http://www.hp.com/support/StoreAllManuals Using Segment Migration The segment migration feature is used to migrate the ownership of the segment from one host to the other host. To perform this operation, make sure that you have a mounted file system on the StoreAll 9300 host.
Root Segment Hint : 1 Root Segment Replica(s) Hint : Snap FileSystem Policy : N/A Associate a given file segment to an HP 3PAR volume using the following set of commands: • Consider the filesystem IBRIX_FS1 and file segment ilv1 (LV Name). # ./ibrix_fs -i -f IBRIX_FS1 .... • ilv1 is owned by sqa-dl360g6-02 and the backup node is sqa-dl360g6-01. The following command shows that ilv1 is part of the ivg1 VG group. # .
• The following command shows that dm-3 is sdb and that sdn exported as LUN 1 on host FC adapters host0 and host1: # multipath -ll mpath1 (350002ac0014400f4) dm-3 3PARdata,VV [size=100G][features=1 queue_if_no_path][hwhandler=0][rw] \_ round-robin 0 [prio=2][active] \_ 0:0:0:1 sdb 8:16 [active][ready] \_ 1:0:0:1 sdn 8:208 [active][ready] • The following output shows the disk size: # lvmdiskscan ../dev/dm-3 [ 100.
For example, to set the sticky policy for segment s1 of file system FS_IGATE, use the following command: # ibrix_fs_tune -f FS_IGATE -p STICKY -S 1 -h eo s172s1.vpi.hp.com,eo s172s2.vpi.hp.com 3. The rebalancer will determine how to distribute the data among all the segments. To rebalance all segments, use the ibrix_rebalance -r -f FSNAME command.
Coping with Cluster Node Failure • When an StoreAll 9300 cluster node fails, the I/O is moved over to the standby network on the surviving cluster node based on the configuration defined. Refer to the StoreAll Storage File System User Guide for more details. • The StoreAll 9300 does not failback automatically when the cluster node comes back online. Instead you must trigger the volume to failover from the backup node to the primary node.
For example, to take a snapshot of the snap path /fs1/dir1 with the snap name snap1, issue the following command: # ibrix_snap -c -f fs1 -P /fs1/dir1 -n snap1 4. List the snapshot that is created using the following command: # ibrix_snap -l -s For more information about these commands, see the HP StoreAll Storage CLI Reference Guide, which is available on the following HP website: http://www.hp.
For more information about these commands, see the HP StoreAll Storage CLI Reference Guide, which is available on the following HP website: http://www.hp.com/support/StoreAllManuals Using Remote Replication When selecting file systems for remote replication, be aware that one, multiple, or all file systems in a single cluster can be replicated. Using Intracluster Replication Continuous remote replication (CRR) can be used in two modes: continuous or run once.
Using intercluster replication Intercluster configurations can be continuous or run-once. The following steps are required when configuring intercluster replication: • Register source and destination clusters. • Create a target export. • Identify server assignments to use for remote replication. This section explains how to perform continuous remote replication in different clusters and different file systems using the StoreAll OS CLI.
Using Data Tiering The following steps must be completed to configure data tiering: • Assign segments to tiers. • Define the primary tier. All new files are written to this tier. • Create the tiering policy for the file system. This section explains how the data tiering feature works using the StoreAll OS CLI. • Create a mounted file system, fs1, with a minimum of four segments, using the LUNs that are exported from the HP 3PAR StoreServ Storage. See “Mounting a File System” (page 28).
NOTE: Data tiering has a cool-down period of approximately 10 minutes. If a file was last accessed during the cool-down period, the file will not be moved. For more information about these commands, see the HP StoreAll Storage CLI Reference Guide, which is available on the following HP website: http://www.hp.com/support/StoreAllManuals Using HTTP The HTTP feature allows you to create HTTP file shares for data stored on the cluster.
For example, issue the following command to add a virtual host # ibrix_httpvhost -m httpvhost -c httpprofile -I "10.30.172. 1:80;10.30. 172.2:80" -S sslcert=httpcert,objectapi=false where 7. • VHOSTNAME = httpvhost • PROFILENAME = httpprofile • IP-Address-Port = 10.30.172.1:80;10.30.172.2:80 • SETTINGLIST = sslcert=httpcert,objectapi=false The ibrix_httpshare command can be used to add a share to an existing file system.
3. You must add an SSL certificate to the cluster before creating the shares. This SSL certificate will be required to access the FTPS shares. To add an FTP certificate, use the following command: # ibrix_certificate -a -c CERTNAME -p CERTPATH 4. For example, to add a certificate named ftpcert at the location /root/ ftp_certificate.txt, use the following command: # ibrix_certificate -a -c ftpcert -p /root/ftp_certificate.txt 5. To configure FTP, first create one or more configuration profiles.
Using NFS A file system can be exported for NFS using either the StoreAll OS GUI or CLI. The following section describes general steps and commands that are required to export file system for NFS using the StoreAll OS CLI. 1. Create a mounted file system on the StoreAll 9300 hosts using the LUNs that are exported to the StoreAll 9300 from HP 3PAR. See “Mounting a File System” (page 28). 2.
1. 2. Create a mounted file system on the StoreAll 9300 hosts using the LUNs that are exported to the StoreAll 9300 from HP 3PAR. See “Mounting a File System” (page 28). You can now create an SMB share for the mounted file system using the following command: # ibrix_cifs -a –f FSNAME –s SHARENAME -p SHAREPATH [-S SETTINGLIST] [-h HOSTLIST] 3.
Figure 3 High Availability 3. Check for the details regarding high-availability pairing of the servers. Then click the Next button in the window. The window shown in Figure 4 (page 46) appears.
Figure 4 High Availability Details 4. 5. Click Finish to complete the pairing of the two servers. To verify whether the high-availability features are enabled for the pair, issue the following command: # ibrix_haconfig –i 6. Failover can either be performed manually or be triggered automatically by the server.
For example, to perform failback of the failover server “eos172s1.vpi.hp.com”, issue the following command: # ibrix_server –f –U –h eos172s 1.vpi.hp.com After the failback completes, the state of the file system is restored to “Mounted”. The state of the server also is restored to “Up”. For more information about these commands, see the HP StoreAll Storage CLI Reference Guide, which is available on the following HP website: http://www.hp.
You can now create two different files named abc and ABC in the same directory. For more information about these commands, see the HP StoreAll Storage CLI Reference Guide, which is available on the following HP website: http://www.hp.com/suppport/StoreAllManuals Using Data Retention The data retention and validation feature is intended for sites that need to archive read-only files for business purposes. Data retention ensures that files cannot be modified or deleted for a specific retention period.
Using Dynamic Optimization HP 3PAR Dynamic Optimization Software is an optional feature that allows you to improve the performance of virtual volumes dynamically. With Dynamic Optimization, you can perform the following tasks: • Change the RAID type of a virtual volume. For example, you can convert a RAID 1 volume to a RAID 5 volume. • Change the device type. For example, you can change from FC drives to NL drives. • Change the volume type.
Figure 5 Tuning Virtual Volume Parameters (1 of 4) Figure 6 Tuning Virtual Volume Parameters (2 of 4) 50 Storage Allocation for Access by the HP StoreAll 9300 and HP 3PAR StoreServ Storage Usage
Figure 7 Tuning Virtual Volume Parameters (3 of 4) Figure 8 Tuning Virtual Volume Parameters (4 of 4) HP StoreAll OS Software Usage 51
The preceding figures show that the RAID level of a TPVV has changed from RAID level 1 to RAID level 5. To use the dynamic optimization feature to change the RAID level of a virtual volume, using the HP 3PAR OS CLI, follow these steps: 1. Create multiple virtual volumes of different RAID level using either the HP 3PAR OS CLI or the HP 3PAR Management Console. 2. Export these virtual volumes to the StoreAll 9300 host and create a mounted file system using the StoreAll OS GUI or CLI. 3.
Persistent Cache is supported on all quad-node and larger HP 3PAR arrays, including the HP 3PAR F400 Storage System. Controller Node Redundancy Controller nodes are configured in logical pairs in such a way that each controller node has a partner. The two partner nodes have redundant physical connections to the subset of physical drives owned by the node pair. Within the pair, nodes mirror their write cache to each other, and each serves as the backup node for the logical disks owned by the partner node.
Figure 9 Displaying Controller Node Entries 4. 54 While rebooting of controller node 3 is in progress, the node entry disappears from the GUI, as shown in Figure 10 (page 55).
Figure 10 Controller Node Entries Not Visible during Reboot 5. Once the node reboot is successful, the node entry for node 3 reappears in the GUI (see Figure 9 (page 54)), and I/O is still in progress. For more information about the Persistent Cache software, see The HP 3PAR Architecture, which is available at the following HP website: http://h18006.www1.hp.com/storage/pdfs/4AA3-3516ENW.
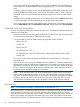
• If a continuous remote replication (CRR) task is running on a file system, the file system cannot be extended until the CRR task is complete. See “Using Remote Replication” (page 37). • To maintain file system performance when segments are between 85% and 90% and other segments are much lower, run a StoreAll 9300 rebalancer task, which helps in balancing the data across all the segments. See “Rebalancing Segments in a File System” (page 33).
5 Support and Other Resources Contacting HP For worldwide technical support information, see the HP support website: http://www.hp.
For information about: See: Migrating data from one HP 3PAR storage system to another HP 3PAR-to-3PAR Storage Peer Motion Guide 58 Configuring the Secure Service Custodian server in order to monitor and control HP 3PAR storage systems HP 3PAR Secure Service Custodian Configuration Utility Reference Using the CLI to configure and manage HP 3PAR Remote Copy HP 3PAR Remote Copy Software User’s Guide Updating HP 3PAR operating systems HP 3PAR Upgrade Pre-Planning Guide Identifying storage system compo
For information about: See: Planning for HP 3PAR storage system setup Hardware specifications, installation considerations, power requirements, networking options, and cabling information for HP 3PAR storage systems HP 3PAR 7200, 7400, and 7450 storage systems HP 3PAR StoreServ 7000 Storage Site Planning Manual HP 3PAR StoreServ 7450 Storage Site Planning Manual HP 3PAR 10000 storage systems HP 3PAR StoreServ 10000 Storage Physical Planning Manual HP 3PAR StoreServ 10000 Storage Third-Party Rack Physic
Typographic conventions Table 2 Document conventions Convention Element Bold text • Keys that you press • Text you typed into a GUI element, such as a text box • GUI elements that you click or select, such as menu items, buttons, and so on Monospace text • File and directory names • System output • Code • Commands, their arguments, and argument values • Code variables • Command variables Bold monospace text • Commands you enter into a command line interface • System
6 Documentation feedback HP is committed to providing documentation that meets your needs. To help us improve the documentation, send any errors, suggestions, or comments to Documentation Feedback (docsfeedback@hp.com). Include the document title and part number, version number, or the URL when submitting your feedback.