
HP 3PAR StoreServ 7450 Storage Service Guide


4. With your hands grasping each side of the replacement node, gently slide it into the enclosure.
Ensure the node is aligned with the grooves in the slot.
CAUTION: Ensure that the node is correctly oriented; alternate nodes are rotated 180°.
5. Keep sliding the node in until the it halts against the insertion mechanism.
CAUTION: Do not proceed until the replacement node has an Ethernet cable connected.
Without an Ethernet cable, node rescue cannot complete and the replacement node will not
be able to rejoin the cluster.
6. Reconnect the cables to the node.
7. Push the extended gray node rod into the node to ensure the node is correctly installed.
CAUTION: If the blue LED is flashing, it is an indication that the node is not properly seated.
Pull out the grey node rod and push it back in to ensure that the node is fully seated.
NOTE: Once inserted, the node should power up and go through the node rescue procedure
before joining the cluster. This may take up to 10 minutes.
8. Verify the node LED is blinking green in synchronization with other nodes, indicating that the
node has joined the cluster.
9. Follow the return instructions provided with the new component.
NOTE: If a PCIe adapter is installed in the failed node, leave it installed. Do not remove and
return it in the packaging for the replacement PCIe adapter.
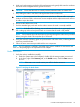
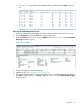
Node Verification
1. Verify the node is installed successfully:
a. Under the Systems tree in the left panel, double click the storage system just serviced.
b. In the lower, right of the Summary tab, in the Health section, check the State status is
Normal.
NOTE: If the state is not normal contact your ASP for further assistance.
Figure 37 Verifying the Node Status
Controller Node Replacement Procedure 33