
Basic Operation Guide 2014/02


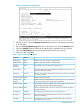

Table 1 Setup screen field descriptions (continued)
DefaultParameter
Recommended; If you entered an IP address, then enter a subnet mask
compatible with your network.*
xxx.xxx.xxx.xxxSubnet Mask
* The IP address and subnet mask assigned for the switch must be compatible with the IP addressing used in your
network. For more on IPv4 addressing, see “Configuring IP Addressing” (page 102). For IPv6 addressing topics, See
the latest IPv6 Configuration Guide for your switch.
Login banners
Custom login banners
You can configure the switch to display a login banner of up to 3070 characters when an operator
initiates a management session with the switch through any of the following methods:
• Telnet
• serial connection
• SSHv2
• WebAgent
The default banner displays product registration information; the copyright splash is no longer
displayed.
If a banner is configured, the banner page is displayed when you access the WebAgent. The
default product registration information is not displayed as there is already a product registration
prompt displayed in the WebAgent.
Banner operation with telnet, serial, or SSHv2 access
When a system operator begins a login session, the switch displays the banner above the prompts
for local password and Press any key to continue. Entering a correct password or, if no password
is configured, pressing any key clears the banner from the CLI and displays the CLI prompt.
Banner operation with the WebAgent
When a system operator uses the WebAgent to access the switch, the text of a non-default banner
configured on the switch appears in a dedicated banner window with a Continue link to the next
page. Clicking on Continue then displays either the Registration page or the switch’s home page.
If the banner feature is disabled or if the switch is using the factory-default banner, then the banner
page does not appear in the WebAgent screen when an operator initiates a login session with
the switch.
Configuring and displaying a non-default banner
You can enable or disable banner operation using either the switch’s CLI or an SNMP application.
The steps include:
1. Enable non-default banner operation and define the endpoint delimiter for the banner.
2. Enter the desired banner text, including any specific line breaks you want.
3. Enter the endpoint delimiter.
Use show banner motd to display the current banner status.
Syntax:
banner motd <delimiter>
no banner motd
10 Getting Started