
HP 5400R zl2 Quick Setup Guide and Safety/Regulatory Information


4
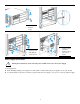
Hot-Swapping transceivers: The transceivers that you can install in your HP switch can be “hot swapped”— removed and
installed after the switch is receiving power. You should disconnect the network cables from the transceivers before hot
swapping them.
Best practice tip: After inserting a transceiver into a switch, the Mode LED will be on for two seconds while the transceiver
is initialized. Do not remove the transceiver until the Mode LED has turned off.
When you replace a transceiver with another transceiver of a different type and then execute the write memory command in
the switch console, the switch configures the port on the new transceiver with the default mode (speed and duplex) settings
used for the new transceiver type. The default mode for the transceivers is Auto. Note that the switch retains other port-specific
configuration settings, such as trunking Spanning Tree Protocol (STP) and VLAN values that were configured for the previous
transceiver.
Connecting the transceivers to devices with fixed configurations: For some older network devices, including some
older HP devices, the default for the Gigabit-SX, Gigabit-LX, and Gigabit-LH ports is a fixed configuration, for example 1000
Mbps/Full Duplex, or is otherwise different from these default configurations for the transceivers, which is Auto. As a result,
those devices may not connect properly to your transceiver port; you will not get a link. Because of these default configuration
and full-duplex considerations, for best operation, you should make sure that the devices connected to the transceiver ports
are also configured to Auto. At a minimum, make sure the configurations match.
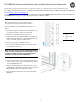
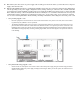
NOTE: For improved cable management, install the GigT/SFP and GigT/SFP+ combination modules
on the left side of the chassis. This will improve access to the uplink ports when the RJ45 cables
are retained in the cable manager.
Module installation notes
The following cases automatically result in a change to the running-configuration on your switch.
■ Replacing a module with another module of a different type and then rebooting the switch
■ Installing a module in a slot that has not previously been used (including when you install a module and apply power to
the switch for the first time)
If you want to save such changes to the startup-configuration file, use the write memory command in the switch’s command
line interface. This causes the switch to use the current new hardware configuration for subsequent reboots. (The switch
always reboots from the startup-configuration file.)
One of the features of your 5400R zl2 switch is the ability to “hot swap” the switch modules. You can install, exchange, or
remove modules after the switch has been powered on. Whenever a module is installed during this process, it is initialized
and tested for correct operation. During this process, the switch Self Test LED is on. If you hot swap another module while
the switch is initializing and testing the first module, it is possible to cause the first module or the entire switch to be reset.
To prevent the modules or switch from being reset when you must hot swap multiple modules, follow these simple precautions:
Before removing or installing any modules, make sure that all network cables are disconnected from the module. Do not
remove any modules from the switch while the switch Self Test LED is lit.
Installation Precautions
Warnings
■ Devices installed in a rack or cabinet should be mounted as low as possible, with the heaviest device at the bottom and
progressively lighter devices installed above.
■ The rack or cabinet should be adequately secured to prevent it from becoming unstable and/or falling over.
■ Ensure a cover plate is installed on any empty switch power supply or module slot. A cover plate is required for safe
operation, and to ensure proper switch cooling. Never have more than one power supply or module slot uncovered at a
time while the switch is powered on.
■ To avoid energy and mechanical hazards, never allow any part of your body, jewelry, tool, or other foreign object to enter
any module or power supply slot.