
Brocade Network Advisor SAN User Manual v11.1x (53-1002167-01, May 2011)


Brocade Network Advisor SAN User Manual 913
53-1002167-01
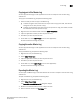
Server and client support save
31
6. Click OK on the SupportSave dialog box.
7. Cl ic k OK on the message.
The application generates separate master logs to show the status of the Server Support save
collection.
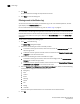
Capturing Client support save data
To capture client support save files, complete the following steps.
1. Select Monitor > Technical Support > SupportSave.
The SupportSave dialog box displays.
2. Select the Client SupportSave check box to run supportsave on the client.
3. Make sure the Server SupportSave check box is clear.
4. Enter a file name for the client support save file in the File Name field.
The default file name is DCM-Client-SS-Time_Stamp.
5. Click OK on the SupportSave dialog box.
6. Click OK on the message.
The application generates separate master logs to show the status of the Client Support save
collection.
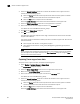
Client support save using a command line interface
Use the following procedures to capture client support save files through the command line
interface (CLI).
Capturing client support save using the CLI (Windows)
To capture client support save files through the CLI, complete the following steps.
1. Go to User_Home/Management_Application_Name_Folder/Server IP.
2. Run the clientsupportsave.bat file.
3. Define a capture location by typing
clientsupportsave <path> in the CLI. If the path has
spaces, enclose it in double quotes.
By default, the capture location is
User_Home/Management_Application_Name_Folder/Server IP/support.
4. Use an archive tool to create a ZIP file of the support save.
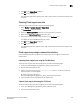
Capture client support save using the CLI (Linux)
To capture client support save files through the CLI, complete the following steps.
1. Go to /root /Management_Application_Name_Folder/Server IP.
2. Run the clientsupportsave.sh file.