
Data Center Fabric Manager Enterprise User Manual v10.3.X (53-1001357-01, November 2009)


DCFM Enterprise User Manual 457
53-1001357-01
Viewing port groups
14
5. Select one or more ports to add to the group in the Group Type - FC Ports table.
A port group must have at least one port in the Membership List. All ports must be from
switches in the same fabric.
6. Click the right arrow button.
The selected ports display in the Membership List.
7. Click Update.
The new port group displays in the Port Groups table.
8. Click OK to close the Port Groups dialog box.
Viewing port groups
Port groups are user-specific, you can only view and manage port groups that you create. To view
port groups, complete the following steps.
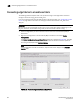
1. Select Configure > Port Groups.
The Port Groups dialog box only displays port groups defined by you.
If a fabric becomes un-monitored, any port groups associated with that fabric do not display in
the Port Groups table. Once the fabric becomes monitored again, the associated port groups
display in the Port Groups table. For more information about monitoring and un-monitoring
fabrics, refer to “Fabric monitoring” on page 55
If a fabric is removed from discovery, any port groups associated with that fabric are removed
permanently from the Port Groups dialog box.
If a device is removed from a fabric, then all ports associated with that device are
automatically removed permanently from the port group. If the port group only contains ports
from the removed device, then the port group is removed permanently from the Port Groups
dialog box.
If a fabric or device is added to the topology while the Port Groups dialog box is open, it does
not display in the Group Type - FC Ports tree until you close and reopen the Port Groups dialog
box.
2. Edit the port group, as needed.
To edit a port group, refer to “Editing a port group” on page 458.
3. Delete the port group, as needed.
To delete a port group, refer to “Deleting a port group” on page 458.
4. Click OK.