
Brocade Network Advisor SAN User Manual v11.1x (53-1002167-01, May 2011)
586 Brocade Network Advisor SAN User Manual
53-1002167-01
Zoning configuration
19
Adding members to a zone
Use this procedure to add a member to a zone when the member is listed in the Potential Members
list of the Zone DB tab.
Enterprise and Professional Plus versions: For instructions to add a member to a zone when the
member is not listed in the Potential Members list, refer to the procedure “Creating a new member
in a zone” on page 587.
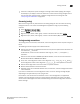
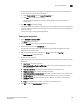
1. Select Configure > Zoning > Fabric.
The Zoning dialog box displays.
2. Click the Zone DB tab if that tab is not automatically displayed.
3. Select an FC fabric from the Zoning Scope list.
This identifies the target entity for all subsequent zoning actions and displays the zoning
database for the selected entity.
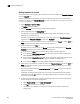
If you want to show all the discovered fabrics in your fabric group in the Potential Members list,
right-click in the Potential Members list and select Display All.
4. Select one or more zones to which you want to add members in the Zones list. (Press SHIFT or
CTRL and click each zone name to select more than one zone.)
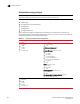
5. Select an option from the Type list.
By default, the first time you launch the Zoning dialog box for a Zoning Scope, the Potential
Members list displays valid members using the following rules:
• If you select the WWN type, the valid members display by the Attached Ports.
• If you select the WWN-Fabric Assigned type, the valid members display by the ports on
which FA-PWWN is configured.
• If you select the Domain,Port Index type, the valid members display by ALL Product Ports
(both occupied and unoccupied). This option is available for FC fabrics only.
• If you select the Alias type, the valid members display by the device Alias.
6. Select one or more members to add to the zone in the Potential Members list. (Press SHIFT or
CTRL and click each member to select more than one member. To add all ports on a device,
select the device.)
7. Click the right arrow between the Potential Members list and Zones list to add the selected
members to the zone.
A message may display informing you that one or some of the selected potential members
cannot be zoned. Click OK to close the message box. Reconsider your selections and make
corrections as appropriate.
8. For offline zone databases only, complete the following steps to save the zone configuration
into the switch from the offline zone database:
a. Select Save to Switch from the Zone DB Operation list.
b. Click Yes on the confirmation message.
The selected zone database is saved to the fabric without enabling a specific zone
configuration.