
Data Center Fabric Manager Enterprise User Manual v10.3.X (53-1001357-01, November 2009)


152 DCFM Enterprise User Manual
53-1001357-01
Changing the port display
3
Changing the port display
You have the option of viewing connected (or occupied) product ports, unoccupied product ports, or
attached ports.
NOTE
Occupied/connected ports are those that originate from a device, such as a switch. Attached ports
are ports of the target devices that are connected to the originating device.
Select View > Port Display, then select one or more of the following options:
• Occupied Product Ports. Displays the ports of the devices in the fabrics (present in the
connectivity map) that are connected to other devices.
• Unoccupied Product Ports. Displays the ports of the devices (shown in the connectivity map)
that are not connected to any other device.
• Attached Ports. Displays the attached ports of the target devices.
• Switch to Switch Connections. Displays the connections between devices. Switch to switch
connections only display when the Attached Ports option is also selected.
All port labels on all fabrics change to the selected port label type.
View management
You can customize the topology by creating views that include certain fabrics or devices and then
switch between the views to see specific information about those fabrics or devices.
If you discover or import a Fabric with more than approximately 2000 devices, the devices display
on the Product List, but not on the Connectivity Map. Instead, the topology area shows a message
stating that the topology cannot be displayed. To resolve this issue, create a new view to filter the
number of devices being discovered. Refer to Creating a customized view for instructions.
Creating a customized view
You may want to customize the Product List and Connectivity Map to simplify management of large
SANs by limiting the topology size or Product List columns.
For each customized view, you can specify the fabrics and hosts that display on the Connectivity
Map as well as the columns and device groupings that display on the Product List.
Customized view settings reside on the Server. Only users with the same login to the same Server
can see and select the view settings. No individual user can have access to the views created by
another user.
If you select a customized view and new devices are discovered, those new devices display in the
customized view if they belong in that view category or fabric.
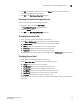
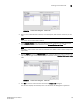
1. Use one of the following methods to open the Create View dialog box:
• Select View > Manage View > Create View.
• Click the View All tab and select Create View from the shortcut menu.
The Create View dialog box displays (Figure 56).