
Data Center Fabric Manager Enterprise User Manual v10.3.X (53-1001357-01, November 2009)


574 DCFM Enterprise User Manual
53-1001357-01
Creating a traffic isolation zone
18
Configuring traffic isolation zoning
The following procedure provides an overview of the steps you must perform to configure traffic
isolation zoning.
Note that for any zoning-related procedure, changes to a zone database are not saved until you
click OK or Apply on the Zoning dialog box. If you click Cancel or the close button (X), no changes
are saved.
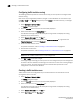
1. Select Configure > Zoning > Fabric.
The Zoning dialog box displays.
2. Click the Zone DB tab if that tab is not automatically displayed.
3. Select an FC fabric from the Zoning Scope list.
This identifies the target entity for all subsequent zoning actions and displays the zoning
database for the selected entity.
4. Select Domain, Port Index from the Type list.
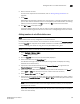
5. If you want to show all discovered fabrics in the Potential Members list, right-click in the
Potential Members list and select Display All.
6. Create the traffic isolation zones.
For specific instructions, refer to “Creating a traffic isolation zone” on page 574.
7. Add members to each zone.
For specific instructions, refer to “Adding members to a traffic isolation zone” on page 575.
NOTE
You cannot add a traffic isolation zone to a zone configuration.
8. Click OK or Apply to save your changes.
A message displays informing you that any zones or zone configurations you have changed will
be saved in the zone database, and warning you to make sure no other user is making changes
to the same areas. The traffic isolation zones are activated when you activate a zone
configuration in the same zone database.
Creating a traffic isolation zone
Traffic isolation zones are configurable only on a Fabric OS device. The seed switch must be
running Fabric OS 6.1.1 or later.
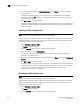
1. Select Configure > Zoning > Fabric.
The Zoning dialog box displays.
2. Click the Zone DB tab if that tab is not automatically displayed.
3. Select an FC fabric from the Zoning Scope list.
This identifies the target entity for all subsequent zoning actions and displays the zoning
database for the selected entity.
4. Select Domain, Port Index from the Type list.
5. Select New TI Zone from the New Zone list.