
Data Center Fabric Manager Professional User Manual v10.3.X (53-1001355-01, November 2009)


288 DCFM Professional User Manual
53-1001355-01
Creating a traffic class map
11
Creating a traffic class map
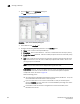
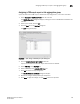
1. Select Configure > CEE Switch > CEE from the menu bar.
The CEE Configuration dialog box displays, showing the status of all CEE-related hardware and
functions.
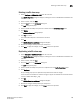
2. Select a switch, and click Edit.
3. Click the QoS tab on the Edit Switch dialog box.
The QoS dialog box displays.
4. Select Traffic Class from the Map Type list.
5. Name the Traffic Class map.
6. Click the Traffic Class cell in a CoS row and directly enter a value from 0-7. You can leave the
cell empty to indicate zero (0).
7. Click the right arrow button to add the map to the Traffic Class Maps table.
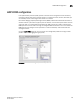
If the name of the Traffic Class map already exists, an overwrite warning message displays.
Click Yes to overwrite the existing Traffic Class map.
8. Click OK if the Traffic Class map does not already exist.
The CEE Confirmation and Status dialog box displays.
9. Review the changes carefully before you accept them.
10. Click Start to apply the changes, or click Close to abort the operation.
Editing a traffic class map
1. Select Configure > CEE Switch > CEE from the menu bar.
The CEE Configuration dialog box displays, showing the status of all CEE-related hardware and
functions.
2. Select a switch, and click Edit.
3. Click the QoS tab on the Edit Switch dialog box.
The QoS dialog box displays.
4. Select a Traffic Class Map from the Traffic Class Maps table, and click the left arrow button to
load its values to the left pane. The fields are now editable.
5. Keep the same Traffic Class Map name and modify the values, as required.
6. Click the right arrow button to re-add the map to the Traffic Class Maps table.
7. Click OK.
The CEE Confirmation and Status dialog box displays.
8. Review the changes carefully before you accept them.
9. Click Start to apply the changes, or click Close to abort the operation.