hp embedded web server for hp LaserJet printers user guide
Trademark Credits Warranty Microsoft ® is a U.S. registered trademark of Microsoft Corporation. The information contained in this document or software is subject to change without notice. Netscape is a U.S. trademark of Netscape Communications Corporation. UNIX ® is a registered trademark of the Open Group. Windows ® and Windows NT ® are U.S. registered trademarks of Microsoft Corp. Hewlett-Packard makes no warranty of any kind with respect to this information.
Contents Introducing the HP Embedded Web Server ............................................... 3 Overview............................................................................................... 3 Features ............................................................................................... 4 Additional Features with a Permanent Storage Device ................... 5 Introducing ChaiVM (Embedded Virtual Machine)........................... 6 Accessing the HP Embedded Web Server ..............
Appendix A – HP Web JetAdmin and the HP Embedded Web Server..... 43 Appendix B – How Do I? .......................................................................... 45 Sharing Printer Information ................................................................. 45 Setting Up the Printer to Send E-mail Messages................................ 46 Setting Up the Printer to Receive and Respond to E-mail Messages . 52 Index ........................................................................................
Introducing the HP Embedded Web Server Overview A web server provides an environment in which web programs may run, much in the same way that an operating system, such as Windows, provides an environment for programs to run on your PC. The output from these programs can then be displayed by a web browser, such as Microsoft Internet Explorer or Netscape Navigator.
Features The HP Embedded Web Server allows you to view printer and network card status and manage printing functions from your PC. With the HP Embedded Web Server, you can do the following: 4 • View printer control panel messages and status lights. • Determine the remaining life on all consumables. • Order consumables. • View and change tray configurations. • View and change the printer configuration. • View and print internal pages. • Receive notification of printer events.
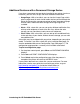
Additional Features with a Permanent Storage Device If you have a permanent storage device installed in your printer (such as a hard disk), you can view, set up, and retain additional information. • Usage Page—With a hard disk, you can view the Usage Page, which gives a page count for each size of media that has passed through the printer and shows the average percentage of toner coverage per page for each color; without the extra storage, the Usage Page is not available.
Introducing ChaiVM (Embedded Virtual Machine) The printer also includes an embedded virtual machine for running Java ™ applications, called ChaiVM. This infrastructure inside the printer allows for development of extended solutions, helps solve problems, and makes printer management easier. The embedded virtual machine has been specifically designed to make communication over the network or Internet easy.
Accessing the HP Embedded Web Server System Requirements To use the HP Embedded Web Server, you must have the following: • a TCP/IP-based network • a web browser installed on your computer, preferably either Netscape Navigator 4.7X or Microsoft Internet Explorer 5.0X and above Note The embedded web server can be accessed from any operating system that supports the TCP/IP protocol and a web browser.
Navigating the HP Embedded Web Server The HP Embedded Web Server has three sets of internal web pages for viewing printer information and for changing configuration options. You can access these pages by clicking one of the following three tabs: Home, Device, and Networking. • The Home pages are the informational pages for the printer. You cannot configure the printer from these pages. (For more information, see page 9.) • The Device pages allow you to configure the printer from your PC.
Viewing Printer Status with the Home Pages Overview The Home pages are the informational pages for the printer. You cannot configure the printer from these pages. The table below lists each of the Home pages and describes its features. For more information, see the page indicated.
Printer Status Under Control Panel, the messages and status lights that currently appear on the printer control panel are displayed. Click Control Panel Help to view any help that is currently available on the printer control panel. (This appears at the bottom of the screen.) You can click the printer’s Go button to continue printing or to begin a print job. The Job Cancel button must be enabled from the Security page.
Configuration Page Use the Configuration Page to view current printer settings, to help troubleshoot printer problems, or to verify installation of optional accessories, such as memory (DIMMs) or paper handling devices. Note You can send the Configuration Page to anyone you like via e-mail. See page 45 for more information.
Supplies Status The Supplies Status page shows the levels remaining for all consumables and the HP Part Numbers for each consumable. (It is helpful to have the part numbers available when it is time to order supplies.) To order supplies over the Internet, click the Order Supplies link.
Event Log The Event Log displays the most recent printer events, including printer jams, service errors, and other printer errors. For quick access to more information regarding error messages, click the Solve A Problem link, then select Error Messages. (This link takes you to hp.com on the World Wide Web; it is not part of the embedded web server.
Usage Page The Usage Page displays the printer’s name and serial number, gives a page count for each size of media that has passed through the printer, and shows the average percentage of toner coverage per page for each color. Note The Usage Page is only available if your printer has a permanent storage device (such as a hard disk) installed. Usage totals are displayed for each media size.
Device Information The Device Information page displays the device description, asset number, company name, contact person, and the printer’s IP address, model, number, and serial number. Note The device description, asset number, company name, and contact person must be entered from the Device pages. (From the top of the screen, click Device, then on the left navigational bar, click Device Information. See page 38 for more information.
16 Viewing Printer Status with the Home Pages
Configuring the Printer with the Device Pages Overview The Device pages allow you to configure the printer from your PC. The table below lists each of the Device pages and describes its features. For more information, see the page indicated. Device Pages Features Configure Printer (page 18) Provides a list of menus that let you remotely print internal printer pages and configure the printer. Alerts (page 21) Lets you set up the printer to send problem and status alerts to anyone you choose via e-mail.
Configure Printer The Configure Printer page provides the capability to remotely print internal printer pages and configure the printer. From the internal printer pages, you can configure the paper trays and change other printer settings. Click the menu name to display a menu and remotely manage the printer. These menus are similar to the menus that are available from your printer's control panel. (Some of the printer control panel menus are not available from the embedded web server.
The table below describes each of the menus. Menu Name Description Information Menu This menu contains printer information pages that give details about the printer and its configuration. Paper Handling Menu Using this menu, you can set the type of paper in each tray. Printing Menu In this menu, you can select printing options, such as number of copies. You can also configure custom paper size. Configuration Menu Items in this menu affect the printer’s behavior.
Selecting Paper Size This procedure is provided as an example. Other menu items can be set in a similar manner. Note Printer drivers and software applications frequently override selections made in the Printing menu and the Paper Handling menu. For more information, see the user guide that came with your printer. Follow the steps below to select the paper size for Tray 1: 1. Click PAPER HANDLING MENU. 2. Next to TRAY 1 SIZE, select LETTER. 3. Click Apply to save the change.
Alerts From the Alerts page, the system administrator can set up the printer to send problem and status alerts to anyone through e-mail. More than one individual can receive alerts, with each person receiving only specific alerts. For example, an administrative assistant might be responsible for keeping toner loaded in a printer or fixing paper jams, while major consumables are handled by an external service provider.
Without a hard disk, there is room for only two e-mail addresses. Since there are no lists to edit, you add e-mail recipients directly on the Alerts page. The screen below shows the Alerts page without a hard disk. For more information, see page 23. The table below describes each link under Select Events. For more information, see “Refining Event Notification” on page 27. 22 Event Name Description Supplies Select specific supplies, such as toner, fuser kit, or transfer kit.
Configuring Alert Notification Configuring Alert Notification Without a Permanent Storage Device Note These steps apply to printers without a permanent storage device (such as a hard disk). To configure alert notification, follow the steps below: 1. Under Notification Recipients, enter e-mail addresses for two recipients. 2. Click the checkbox next to Supplies, Service, Media Path, and Advisory for each recipient you would like to receive notification.
Configuring Alert Notification With a Permanent Storage Device Note These steps apply to printers with a permanent storage device (such as a hard disk). To configure alert notification, follow the steps below: 1. Under Notification Recipients, click Edit List1. 1.
2. Under Change List Name, enter a name, such as Service or Supplies. (See the screen below.) 3. 2. 4. 3. Under Add Recipient Address, enter e-mail addresses for anyone you would like to receive notification. In large environments, system administrators can route e-mail addresses to list servers or URLs for expanded notification. 4. Click Apply to save the information. Repeat steps 3 and 4 for each recipient address. When you have finished adding recipients, click Back to return to the Alerts page.
5. From the Alerts page, click the checkbox next to Supplies, Service, Media Path, and Advisory for each list you would like to receive notification. (For more information, see the table on page 22 or “Refining Event Notification” on page 27.) 5. 6. 6. Click Apply to save the information. 7. Repeat steps 1-6 for each additional list. Note For alerts to function, Outgoing Mail must be configured. To configure Outgoing Mail, see “Email” on page 30.
Refining Event Notification After you have set up your lists, you can further refine event notification by selecting specific details and options within each event. (See the table on page 22 for a description of each event category.) 1. Under Select Events, click an event category (Supplies, Service, Media Path, Advisory) to view the events that are available. 1.
2. For each event, select the lists (List 1 - 4) that you would like to be notified. (The screen below shows the Supplies events.) 2. 3. Note Those events that are hyperlinked (underlined with blue) have additional detail available.
3. After you have refined your events, click Email Contents to enter the information you want to include with your e-mail alert. This information may include Device Information, Contact Information, Supplies Status, Usage Page, Help Resources, Configuration Page, and an Event Log. Click the checkbox next to the information you would like to include. 3. 4. 5. 4. Click Apply to save the information. 5. Click Back to return to the Alerts page.
Email The Email page lets you configure e-mail settings for outgoing and incoming mail. This enables you to use the printer's “send and receive” capabilities. Note For step-by-step instructions on setting up the printer to send an outgoing e-mail message, see page 46. For instructions on setting up the printer to receive an incoming e-mail message and respond with an outgoing e-mail message, see page 52. • Outgoing Mail must be configured for Alerts and Email Command and Response to function.
Configuring Outgoing Mail Note It is only necessary to configure Outgoing Mail if you intend to use Alerts and/or Email Command and Response. If you intend to use Email Command and Response, you must also configure Incoming Mail (see page 32). To configure Outgoing Mail you will need the following: • The IP address of the SMTP mail server on your network. • The e-mail domain name suffix used for addressing e-mail messages within your organization.
Configuring Incoming Mail Note It is only necessary to configure Incoming Mail if you intend to use Email Command and Response. You must also configure Outgoing Mail for the Email Command and Response feature to work properly (see page 31). 1. Establish a Post Office Protocol 3 (POP3) mailbox account for the printer on a mail server within your organization’s network. Each POP3 account requires a username and a password.
Using Email Command and Response When outgoing and incoming mail are configured, you can send an e-mail message to the printer requesting a configuration page or a supplies status page, and the printer will respond with an e-mail message. You can use this capability to solve a problem or check the status of printer consumables. Note For step-by-step instructions on setting up the printer to receive an incoming e-mail message and respond with an outgoing e-mail message, see page 52.
The screen below shows an e-mail message to the printer requesting that a configuration page be returned in HTML format: The printer will check for new e-mail messages once every three minutes. When the printer receives the e-mail message, it will generate a reply and send the requested information back to the sender's e-mail address (as specified in the From: field of the original e-mail message).
Security From the Security page, you can set a password to control who can cancel jobs remotely or access the Device pages. The username is already set as “laserjet”. Once the password has been set, users will be prompted to enter a password when they access either the Device pages or the Order Supplies link. Select these checkboxes to display the Go and Cancel Job buttons on the Printer Status and Configure Printer pages.
Other Links The Other Links page lets you add or customize links to the web sites of your choice. These links are displayed on the left navigational bar throughout the embedded web server pages. There are three permanent links: The three permanent links appear here, along with any userdefined links. • My Printer connects to a set of web resources that will help you to solve specific problems and determine what additional services are available for your printer.
Adding a Link 1. Under Add Link, enter the URL and the Name as you would like it to appear in the embedded web server pages. 2. Click Add Link. The screen below shows the Other Links page with one user-defined URL. Removing a Link 1. Under User defined Links, select the link you would like to remove. 2. Click Remove Selected Link.
Device Information The Device Information page lets you name the printer and assign an asset number to it. You can add the name of the primary contact for information about the printer. This page also shows the printer’s IP address, printer model, printer number, and serial number. Note If you make any changes on the Device Information page, click Apply to save those changes. The information entered here appears on the Device Information page that can be accessed from the Home tab.
Language The Language page lets you select which language is used to display the embedded web server pages. Note The default language is the language currently in use by the web browser. If your browser and printer control panel both use a language that is not available for the embedded web server, English will be selected as the default.
40 Configuring the Printer with the Device Pages
Managing the Network with the Networking Pages Overview The Networking pages allow you to view network status and configure the printer's network card from your PC. The Networking pages are not part of the embedded web server in your printer; they reside on an embedded web server that is included with your HP JetDirect EIO network card. The appearance and features of the Networking pages will differ, depending on the version of your HP JetDirect card.
Below are some of the tasks you may be able to perform from the Networking pages: • Change network configuration settings for various types of network connections. • Enable or disable printing protocols. • Set up a support contact and support URLs. • Set up a password to control who can remotely access the Networking pages. • View general network status information, including network statistics stored on the print server. • View protocol information for all supported network connections.
Appendix A – HP Web JetAdmin and the HP Embedded Web Server How does HP Web JetAdmin work together with the HP Embedded Web Server? HP’s Web JetAdmin is a web-based system management tool that provides efficient installation and management of networked peripherals from a web browser. It allows network administrators to manage their network printers from virtually anywhere. The HP Embedded Web Server and Web JetAdmin work together to meet all your printer management needs.
44 Appendix A – HP Web JetAdmin and the HP Embedded Web Server
Appendix B – How Do I? Sharing Printer Information How can I share my printer information without setting up e-mail alerts? Your web browser has a feature that is useful for sharing printer information. 1. Browse to the embedded web server page that you want to share. 2. Follow the instructions below for your browser: • For Microsoft Internet Explorer: From the File menu, click Send, then click Page by E-mail. • For Netscape Navigator: From the File menu, click Send Page.
Setting Up the Printer to Send E-mail Messages How do I set up the embedded web server so that the printer can send an outgoing e-mail message? The following example shows how to configure the HP Color LaserJet 4550 printer to send you an e-mail alert anytime a printer door or cover has been left open. 1. Launch your web browser. 2. In the Address: or Go to: field, type the IP address assigned to the printer (for example: http://192.168.1.1) or the host name (for example: http://myprinter).
4. Add your e-mail address (follow the appropriate instructions below). If the Printer has a Permanent Storage Device Note These steps apply to printers with a permanent storage device (such as a hard disk). a. Under Notification Recipients, click Edit List1. a. b. Under Add Recipient Address, enter your e-mail address. (For example: “name@company.com”.) b. c. d. c. Click Apply. d. Click Back to return to the Alerts page.
If the Printer DOES NOT have a Permanent Storage Device Note These steps apply to printers without a permanent storage device (such as a hard disk). a. Under Notification Recipients, enter your e-mail address. (For example: “name@company.com”.) a. b. b. Click Apply. 5. Under Select Events, click Media Path. 5.
6. Select the List1 checkbox next to CLOSE DRAWERS/DOORS/ COVERS. 6. 7. Click Apply. The following screen should appear. Click OK.
8. On the left navigational bar, click Email. 8. 9. 10. 11. 12. Note Your organization’s network or e-mail administrator typically provides the information required to configure outgoing mail. See page 31 for more information. 9. Under Outgoing Mail, enter the SMTP Server IP address. 10. Under Outgoing Mail, enter the Domain Name. 11. Click Apply. 12. Click Security. 13.Under Security, select the Outgoing Mail checkbox. 13. 14. 14. Click Apply.
15. To test the configuration, open the top cover of the printer, then go to your computer and verify that you have received an e-mail message from the printer. (See the example below.
Setting Up the Printer to Receive and Respond to E-mail Messages How do I set up the embedded web server so that the printer can receive an incoming e-mail message and respond with an outgoing e-mail message? The following example shows how to configure the HP Color LaserJet 4550 printer so that you can send an e-mail message to the printer, requesting a configuration page, and the printer will respond with an e-mail message. 1. Launch your web browser. 2.
Note Your organization’s network or e-mail administrator typically provides the information required to configure outgoing and incoming mail. See pages 31-32 for more information. 4. Under Outgoing Mail, enter the SMTP Server IP address. 4. 5. 6. 7. 8. 9. 5. Under Outgoing Mail, enter the Domain Name. 6. Under Incoming Mail, enter the POP3 Server IP address. 7. Under Incoming Mail, enter the Username of the printer’s mailbox account (for example, “printer”). 8. Click Apply. 9. Click Security.
10.Under Security, select the Outgoing Mail and Incoming Mail checkboxes. 10. 11. 11. Click Apply. 12. From your e-mail application, compose a message to the printer, following the steps below: a. In the To: field, enter the printer’s e-mail address. (To find the printer’s e-mail address, from the top of the screen, click Device, then on the left navigational bar, click Email. Under Outgoing Mail, you should see the Printer Email Address.) b.
14. You should receive an e-mail from the printer in your e-mail application’s Inbox. (See the screen below.) Note Depending on delays in the network and your organization’s mail server, a response may take from one minute to several hours to arrive back in your e-mail application’s Inbox. If the To:, From:, and Subject: fields are not properly formatted in your e-mail message, the printer will not send a message in response.
56 Appendix B – How Do I?
Index accessories, status, 10, 11 Alerts, 21 configure notification, 23, 24 refine notification, 27 setting up, 46 asset number, 15 browser, required, 7 Calibration Menu, 18 Cancel Job button, 10, 35 ChaiVM, 4 company name, 15 Configuration Menu, 18 Configuration Page, 11 configuration page, printing, 6, 7 Configure Printer, 18 consumables ordering, 36 status, 10 contact person, 15, 38 control panel security, 11 status, 10 density settings, 11 Device Information page, 15, 38 Device pages, 8, 17–40 DIMMs or
Go button, 10, 35 group printer management, 43 hard disk, 6, 10 capabilites with, 22 ordering, 6, 36 help, 10, 36 network, 42 Home pages, 8, 9–15 host name, 7, 46, 52 HP JetDirect card, 41–42 HP JetDirect Print Server Administrator's Guide, 42 I/O Menu, 18 Information Menu, 18 IP address, 7, 11, 15, 46, 52 IP-based network, 7 IPX-based network, 7 jam recovery, 11 Java ™ applications, 4 Job Cancel button, 10, 35 Language page, 39 languages, 39.
Private/Stored Jobs Menu, 18 problem alerts, 21 solving, 36 PS, 11 Quick Copy Jobs Menu, 18 RAM DISK storage, 10, 11 recycle toner cartridge, 12 refresh rate, 10 network, 42 Resets Menu, 18 resolution, 11 security, 11 Security page, 35 serial number, 11, 12, 14, 15 share printer information, 45 simplex print jobs, 14 sizes printed, 14 status, 10, 12 alerts, 21 network, 41–42 Index supplies ordering, 36 status, 10, 12 Supplies Status page, 12 system requirements, 7 toner cartridge alerts, 21 recycling, 12