
HP StorageWorks XP Provisioning Manager User Guide (December 2005)


Managing Device Files 130
When the processing has been completed, the Add Device File - Result dialog box is displayed,
displaying the processing results.
4. In the Add Device File - Result dialog box, check the displayed information.
5. If there is no problem, click the Close button. The window closes. The add device file process has been
completed.
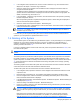
To confirm the settings when the device file needs to be identified on the host side:
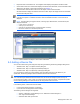
1. Check the contents of the Add Device File - Step 3 of 3 dialog box (refer to
Figure 8-4).
2. If there is no problem, select the I have checked the above warning, and still want to proceed checkbox
located below the warning message.
WARNING! Make sure that the physical volume corresponding to the specified LDEV is not being used
by another program. If you specify and operate an LDEV that is already being used, the data cannot be
guaranteed and operations might not be performed properly.
Also, if you click the Confirm button without selecting the check box, an error occurs.
3. Click the Confirm button.
If a message is displayed during the add device file process, the Add Device File - Suspended dialog box
is displayed. A message is displayed indicating that the device file needs to be recognized.
4. Manually check the device files as described in the manuals for the hardware and software that are being
used.
5. In the navigation frame, expand the Device Files tree directly under Hosts, and make sure that the
desired device file is displayed.
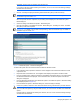
6. In the navigation frame, expand the tree, and then choose Transaction Logs. The information frame
displays the List Objects - Transaction Logs subwindow.
7. Check the contents of the operation where the Resume button is displayed in the Action field, and identify
the desired operation.
The Resume button is displayed for the processing that was interrupted. Check the contents of the
operation where the Resume button is displayed, and make sure that the operation is appropriate. For
details on transaction logs, see section
10-2 .
8. In the List Objects - Transaction Logs subwindow, click the Resume button. The add device file process
that was interrupted is restarted.
When the processing has been completed, the Add Device File - Result dialog box is displayed to show
the result of the device file addition.
9. Check the contents of the Add Device File - Result dialog box.
10. In the Add Device File - Result dialog box, click the Close button. The window closes. The add device file
process has been completed.
IMPORTANT: For details on the contents of the processing, see the transaction logs. For details on
transaction logs, see section
10-2 .
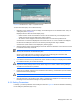
8-4 Viewing Information about Device File Paths
In the Show Properties - path-name subwindow, you can view file information and volume information about
device files for each path name. You can also view device files without using Provisioning Manager.
To view the path of a device file:
1. Expand the Hosts tree in the navigation frame. A list is displayed of all hosts that are within the access
scope of the user.
2. Expand the tree of the desired host. The navigation frame displays File Systems and Device Files.
3. In the navigation frame, select path-name under Device Files. In the method frame, the path-name
subwindow is displayed. In the information frame, the Show Properties - path-name subwindow is
displayed (see
Figure 8-5).
4. In the Show Properties - path-name subwindow, you can view information about the path of a device file.
• You can view device file information in Device File.
• Information about all volumes allocated to a host is displayed in Volume Information.