
HP StorageWorks XP Provisioning Manager User Guide (December 2005)


Using Provisioning Manager 51
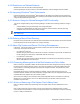
• Model name of the storage subsystem
• RAID level of the storage volume (RAID 0, RAID 1, RAID 5, or other)
• Drive configuration of the storage volume (3D+1P, 2D+2D, or other)
You create a provisioning (allocation) plan in either of two ways:
• Create an entirely new provisioning plan
• Use an existing plan as a template, change some of its parameters, and then save this changed plan
under a different name.
In the Add Allocation Plan dialog box, you can add an allocation plan.
CAUTION: A user with guest or local guest access permission cannot add an allocation plan.
To add an allocation plan:
1. From the navigation frame, click Provisioning Plans.
2. Click Allocation Plans, located in the navigation frame immediately below Provisioning Plans. The method
frame displays the Allocation Plans subwindow
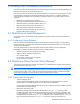
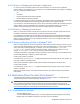
3. In the Allocation Plans subwindow, click Add Allocation Plan. The Add Allocation plan dialog box is
displayed (see Figure 3-13).
4. Specify settings for an allocation plan. For details about the settings items and restrictions, see the
windows Help.
5. When you finish specifying the settings, click the OK button. A confirmation dialog box is displayed for
confirming that the allocation plan is to be added.
6. Click the OK button. The Add Allocation Plan - Result dialog box is displayed.
7. In the Add Allocation Plan - Result dialog box, check the information for the allocation plan that you just
added.
IMPORTANT: The security level of the created allocation plan is configured as a private plan owned by
the user group to which the user who created the plan belongs.
8. Click the Close button. The dialog box closes, which completes the addition of the allocation plan.
Figure 3-13 Add Allocation Plan Dialog Box
3-6-2 Deleting a Provisioning Plan
In the Delete Allocation Plan – PlanName dialog box, a user can delete an allocation plan. You can also delete
allocation plans whose security level is public.