
HP Matrix infrastructure orchestration: ESXi OS Deployment

Technical white paper: ESXi OS Deployment
12
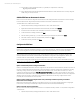
7. Click
View Request
, and on the My Requests tab, monitor the progress of the Create request until it completes.
Note
You can also monitor the progress by checking for e-mail notifications.
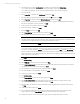
8. Select the
My Services
tab, select the ESXi host service just created, and then select
View Details
.
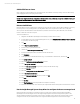
9. Select the ESXi host server
group, select the
Resource Details
tab, and note the Resource ID, which is the serial
number of the server blade where the ESXi host has been deployed. In the HP Matrix Operating Environment
visualization interface, the ESXi host is initially labeled with the serial number of the server blade, rather than with
the hostname.
Manual configuration of the ESXi host service console on the management network
When ESXi is installed, the service console is configured with an address on the deployment network. Using the ESXi
Technical Support Commands interface, a second service console must be configured with an address on the management
network. Once these steps are completed, the ESXi host can be managed from the vSphere Client.
To configure the second service console on the management network:
1. Identify the MAC address of the network port for the management network on the ESXi host:
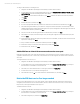
a. Navigate to the HP Matrix Operating Environment (http://<CMS_IP_address>:280/).
b. From the Matrix home page, in Monitor and Diagnose, select
Virtualization View
to launch the HP Matrix
Operating Environment visualization interface.
c. In the Physical and Virtual perspective, locate the new ESXi host server blade (labeled with the serial number
noted in step 9 above), and click on the logical server icon to view the logical server details. (If the logical
server icon is not visible, click the expand tray icon to show the hidden icons.) Note the MAC Address of the
network port for the management network, in this example, mgmt_A, and then click
Done
.
2. Open a console on the new ESXi host.
3. Identify the name of the virtual switch interface adapter:
# esxcfg-vswif --list
In this example, the name is “vswif0”.
4. Identify the name of the virtual switch:
# esxcfg-vswitch --list
In this example, the name is “vSwitch0”.
5. Create a new virtual switch:
# esxcfg-vswitch --add vSwitch1
6. Add a port group to the new virtual switch:
# esxcfg-vswitch --add-pg=“Service Console 2” vSwitch1
7. Create a new virtual switch interface adapter, specifying the management network IP address and netmask to be
used for the service console:
# esxcfg-vswif --add --portgroup “Service Console 2” --
ip=10.9.152.82 --netmask=255.255.255.0 vswif1
A warning similar to the following may be reported, and can safely be ignored:
[2010-11-29
18:57:14 ‘Vnic’ warning] Generated New MAC address,
00:50:56:46:ca:b3
for vswif1
8. List all of the physical network adapters, and identify the one that belongs to the management network, by
matching the MAC Address noted in step 1c above:
# esxcfg-nics --list
In this example, the name is “vmnic1”.
9. Set the physical network adapter as an uplink for the new virtual switch:
# esxcfg-vswitch --link=vmnic1 vSwitch1
10. Verify that the physical network adapter is now associated with the new virtual switch:
# esxcfg-vswitch --list