
Integrating Citrix XenServer and HP Data Protector


2. Delete the old virtual machine.
3. Import the .xva file from the temporary backup directory, activating the restore option.
The import operation of XenServer converts the
.xva file into a virtual machine and sets the virtual
machine in the same power state as it was during the export. When the restore option is set to
true, the MAC of the old virtual machine is preserved
Note: The file type of the backup file for offline backup is the same as that for online backup, but
you can differentiate between offline and online backups from the filename. See
Specifying a
restore
on page 13.
Restore considerations
When a restore is performed, the original storage repositories used by the virtual machine are not
known, so the user must specify in which storage repository the restore should be performed. If no
storage repository is specified, the virtual machine will be restored in the default storage
repository. See
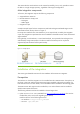
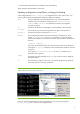
Figure 1:
Figure 1 Example backup and restore
On the left side is a virtual machine with two disks; one disk uses the shared storage repository
and the other the default storage repository.
When this virtual machine is backed up, an
.xva file is produced.
When the virtual machine is subsequently restored, two options are available:
• A storage repository is not specified. In this case, both disks are restored into the default
storage repository.
• A storage repository is specified. In this case, both disks are restored into the specified storage
repository. For example, if the Shared Storage repository is specified, both disks are restored
into the Shared Storage repository.
4