qrgbook.bk.
qrgbook.bk.fm Page 2 Tuesday, July 28, 1998 5:31 PM © Copyright Hewlett-Packard Company 1998 Printed in Europe For trademark information, legal notices, safety notices and warranty information, refer to the HP DesignJet 2500CP/2000CP User’s Guide, manual part number C4704-90241. Hewlett-Packard Company Barcelona Division Avda.
qrgbook.bk.
qrgbook.bk.
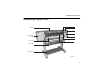
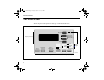
Identifying Printer Parts Identifying Printer Parts :LQGRZ ,QN &DUWULGJHV LQVLGH 5ROO &RYHU 0HGLD %LQ 6WRUDJH 6KHOI C4704106 5
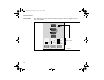
qrgbook.bk.fm Page 6 Tuesday, July 28, 1998 5:31 PM 7KH )URQW 3DQHO The Front Panel The front panel of the printer is made up of four functional areas. Previous Receiving Print Current Configuration (Press both Keys) 'LVSOD\ 6HFWLRQ Enter Best Color Cancel Form Feed and Cut Replace Ink System Pause Mono Normal Fast 6WDWXV /LJKWV Print Quality C4704002 $FWLRQ .H\V 6 3ULQW 4XDOLW\ .
qrgbook.bk.fm Page 7 Tuesday, July 28, 1998 5:31 PM The Front Panel Display Section The display section of the front panel consists of the two-line display and the four display keys to its right (3UHYLRXV, ↑, ↓ and (QWHU) 3UHYLRXV (QWHU C4704016 ■ The display is used for displaying: ± Menus used to configure the printer. ± Messages about printer status, required actions, or errors. ■ Use the display keys to navigate the menu system and select menu options.
qrgbook.bk.fm Page 8 Tuesday, July 28, 1998 5:31 PM 7KH )URQW 3DQHO Action Keys ■ ■ ■ ■ Press &DQFHO to cancel the current printer operation. Press )RUP )HHG DQG &XW to advance and cut media. Press 5HSODFH ,QN 6\VWHP to replace ink system components. Press 3DXVH to pause the printer. Action Keys & D dddddddy See chapter 7, Managing Your Prints, in the user’s guide for detailed information on the use of these keys.
qrgbook.bk.fm Page 9 Tuesday, July 28, 1998 5:31 PM The Front Panel Print Quality Keys ■ Use the &RORU 0RQR key to select whether to print in color or monochrome (black and grayscale). ■ Use the 3ULQW 4XDOLW\ key to select the print quality mode you want. Best Color Normal Mono Fast Print Quality C4704033 3ULQW 4XDOLW\ .H\V See chapter 6, Controlling the Overall Appearance of a Print, in the user’s guide for detailed information on the use of these keys.
qrgbook.bk.fm Page 10 Tuesday, July 28, 1998 5:31 PM 7KH )URQW 3DQHO Status Lights The status lights provide status information about the current configuration and state of the printer.
qrgbook.bk.fm Page 11 Tuesday, July 28, 1998 5:31 PM Entering the Menu System Entering the Menu System 1 Make sure a status screen is displayed, as shown in the example on the right.
qrgbook.bk.
qrgbook.bk.fm Page 13 Tuesday, July 28, 1998 5:31 PM Loading Roll Media /RDGLQJ 5ROO 0HGLD To start this procedure you need to have a roll of media installed on to the printer spindle. See page 34, Installing a New Roll into the Printer 1 Check the leading edge as it unwinds from the spool. If it is not evenly cut or if it is skewed (not perpendicular to the guides), continue with the next procedure.
qrgbook.bk.
qrgbook.bk.
qrgbook.bk.fm Page 16 Tuesday, July 28, 1998 5:31 PM /RDGLQJ 5ROO 0HGLD 7 $OLJQ WKH PHGLD a When the front panel displays “Lower Lever”. Lower the media lever.
qrgbook.bk.
qrgbook.bk.
qrgbook.bk.fm Page 19 Tuesday, July 28, 1998 5:31 PM Loading Roll Media 11 7KH SULQWHU FKHFNV WKDW WKH PHGLD LV DOLJQHG SURSHUO\ ,I WKH DOLJQPHQW LV VXFFHVVIXO WKH IURQW SDQHO GLVSOD\V 12 &ORVH WKH UROO FRYHU DQG SUHVV WKH ↓ NH\ WR FRQWLQXH &ORVH UROO FRYHU &RQWLQXH ! C4704029 13 :KHQ \RX FORVH WKH UROO FRYHU \RX KDYH WZR RSWLRQV GHSHQGLQJ RQ WKH VWDWXV RI WKH 7DNH 8S 5HHO a If the Take Up Reel is turned off the printer is now ready to print.
qrgbook.bk.
qrgbook.bk.
qrgbook.bk.
qrgbook.bk.fm Page 23 Tuesday, July 28, 1998 5:31 PM Take Up Reel Loading 5 3XOO WKH PHGLD GRZQ WDXW WR WKH SRVLWLRQ VKRZQ 'R QRW DWWHPSW WR SXOO PRUH PHGLD IURP WKH SULQWHU LI \RX QHHG PRUH PHGLD XVH WKH IURQW SDQHO & 6 8VH D VPDOO DPRXQW RI VWLFN\ WDSH VHH QRWH EHORZ WR DWWDFK WKH PHGLD WR WKH FRUH 8VH WKUHH VWULSV RQH DW HDFK VLGH RI WKH PHGLD DQG RQH LQ WKH PLGGOH 6WLFN WKH PLGGOH RQH ILUVW NOTE: Use only tape which will not tear the media when it is removed later.
qrgbook.bk.
qrgbook.bk.fm Page 25 Tuesday, July 28, 1998 5:31 PM Take Up Reel Loading 9 ,W LV LPSRUWDQW WKDW WKH 0HGLD :HLJKW LV WKH VDPH ZLGWK DV WKH PHGLD \RX DUH XVLQJ %\ PDWFKLQJ FRORU FRGHG OHQJWKV RI SODVWLF WXEH \RX FDQ PDNH D 0HGLD :HLJKW IRU GLIIHUHQW ZLGWKV RI VWDQGDUG PHGLD VL]HV ´ ´ 10 &DUHIXOO\ LQVHUW WKH 0HGLD :HLJKW HQVXUH WKH HQG FDSV DUH LQVWDOOHG DQG H[WHQG RYHU WKH HGJHV RI WKH PHGLD NOTE: It is important that the media weight is inserted.
qrgbook.bk.fm Page 26 Tuesday, July 28, 1998 5:31 PM 7DNH 8S 5HHO /RDGLQJ NOTE: When the Take Up Reel is in operation it is important to ensure that the Take Up Reel sensor is not blocked.
qrgbook.bk.fm Page 27 Tuesday, July 28, 1998 5:31 PM Unloading Media from the Take Up Reel 8QORDGLQJ 0HGLD IURP WKH 7DNH 8S 5HHO 7R UHPRYH PHGLD IURP WKH SULQWHU VHH SDJH 5HPRYLQJ D 5ROO IURP WKH 3ULQWHU 7R XQORDG UROO PHGLD IURP WKH 7DNH 8S 5HHO SHUIRUP WKH IROORZLQJ SURFHGXUH 127( %HIRUH XQORDGLQJ PHGLD HQVXUH WKH LQN LV GU\ VHH WKH 8VH¶V *XLGH 'U\LQJ WLPH 7DNH 8S 5HHO RQ 1 Press the Form feed and cut button on the front panel.
qrgbook.bk.
qrgbook.bk.
qrgbook.bk.
qrgbook.bk.fm Page 31 Tuesday, July 28, 1998 5:31 PM Unloading Media from the Take Up Reel 10 5HPRYH WKH 7DNH 8S &RUH IURP WKH 7DNH 8S 5HHO VSLQGOH 7DNH 8S 5HHO VSLQGOH 0HGLD JXLGH To remove roll media from the printer perform the following procedure.
qrgbook.bk.
qrgbook.bk.
qrgbook.bk.fm Page 34 Tuesday, July 28, 1998 5:31 PM ,QVWDOOLQJ D 1HZ 5ROO LQWR WKH 3ULQWHU Installing a New Roll into the Printer 1 If an empty spindle is installed in the printer, open the roll cover and remove the empty spindle by pulling firmly on each end, A and then B as shown.
qrgbook.bk.
qrgbook.bk.fm Page 36 Tuesday, July 28, 1998 5:31 PM ,QVWDOOLQJ D 1HZ 5ROO LQWR WKH 3ULQWHU 5 ,QVHUW WKH VSLQGOH VR WKDW WKH IL[HG VSLQGOH PHGLD JXLGH $ LV WR WKH ULJKW DQG WKH UHPRYDEOH VSLQGOH PHGLD JXLGH % WR WKH OHIW 3XVK LQ ILUPO\ RQ ERWK HQGV 0DNH VXUH WKH PHGLD UHPDLQV IOXVK DJDLQVW WKH PHGLD JXLGHV B A NOTE: The media must be positioned on the roll as shown.
qrgbook.bk.
qrgbook.bk.fm Page 38 Tuesday, July 28, 1998 5:31 PM &KDQJLQJ WKH &RUH 7XEH RQ WKH 7DNH 8S 5HHO 5 ,QVWDOO WKH QHZ &RUH \RX KDYH FKRVHQ RQWR WKH VSLQGOH DQG UH LQVWDOO WKH OHIW KDQG PHGLD JXLGH 12'' 5mm / 30 NOTE: You can also use an empty cardboard tube to & D replace the plastic Take Up Core that was supplied with your printer.
qrgbook.bk.
qrgbook.bk.fm Page 40 Tuesday, July 28, 1998 5:31 PM /RDGLQJ VKHHW PHGLD /RDGLQJ VKHHW PHGLD 1 You cannot load sheet media if roll media is loaded. If roll media is loaded refer to 32, Removing a Roll from the Printer.
qrgbook.bk.
qrgbook.bk.
qrgbook.bk.fm Page 43 Tuesday, July 28, 1998 5:31 PM Replacing the Ink System Replacing the Ink System :$51,1* Keep hair, jewelry, clothing, and other foreign objects away from the printer mechanisms. Keep used ink components out of the reach of children. CAUTION Do not touch, wipe, or attempt to clean the printhead nozzles or contacts. This can clog and damage the printhead. ◆ To start the replacement procedure, press the 5HSODFH ,QN 6\VWHP key on the front panel.
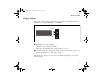
qrgbook.bk.fm Page 44 Tuesday, July 28, 1998 5:31 PM 5HSODFLQJ WKH ,QN 6\VWHP The components of the ink system are numbered to match the sequence in which they must be installed. The number is printed on the printhead cleaner and ink cartridge, and on the sleeve containing the printhead. 3ULQWKHDG &OHDQHU 3ULQWKHDG ,QN &DUWULGJH C2704112 Remember: 44 ■ Always change all three components for each ink color system at the same time. ■ Use only the components that come together in their box.
qrgbook.bk.fm Page 45 Tuesday, July 28, 1998 5:31 PM Replacing the Ink System NOTE Follow the instructions in the front-panel display. If there are any problems during the installation, the printer will give you instructions in the front-panel display. Descriptions of all front-panel messages and instructions on what to do are listed in 0HVVDJH ([SODQDWLRQV DQG $FWLRQV .
qrgbook.bk.
qrgbook.bk.fm Page 47 Tuesday, July 28, 1998 5:31 PM Replacing the Ink System $IWHU \RX RSHQ WKH ZLQGRZ WKH SULQWHU ZLOO GLVSOD\ WKH IROORZLQJ PHVVDJH RQ WKH IURQW SDQHO %OLQNLQJ LQGLFDWRUV VKRZ ZKLFK SULQWKHDGV PXVW EH UHSODFHG ,Q WKH IROORZLQJ H[DPSOH WKH \HOORZ SULQWKHDG QHHGV WR EH UHSODFHG 5HSODFH SULQWKHDG V
qrgbook.bk.fm Page 48 Tuesday, July 28, 1998 5:31 PM 5HSODFLQJ WKH ,QN 6\VWHP 3 Take the new printhead and remove the colored protective tape from the printhead’s nozzles. C4704046 4 Insert the printhead into the stall with the color dot that matches the color of the printhead label. Press down lightly and push the printhead away from you (toward the back of the cradle) until it snaps into place.
qrgbook.bk.fm Page 49 Tuesday, July 28, 1998 5:31 PM Replacing the Ink System 5 5HSHDW VWHSV WKURXJK IRU DQ\ DGGLWLRQDO SULQWKHDGV \RX QHHG WR UHSODFH When you have finished replacing printheads, the printer front panel displays the message “Close window to continue”. 6 &ORVH WKH ZLQGRZ RI WKH SULQWHU The front panel will display the message “Open right door to access head cleaners”. Continue with the next procedure, Removing and Replacing the Printhead Cleaner.
qrgbook.bk.fm Page 50 Tuesday, July 28, 1998 5:31 PM 5HSODFLQJ WKH ,QN 6\VWHP Removing and Replacing the Printhead Cleaner . 1 Open the right door on the printer.
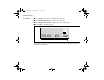
qrgbook.bk.fm Page 51 Tuesday, July 28, 1998 5:31 PM Replacing the Ink System 2 Press down on the printhead cleaner handle and pull it out of the printer. Discard the used printhead cleaner. C4707138 3 Insert the new printhead cleaner into the matching color-coded slot in the printer. C4704139 4 Repeat steps 2 and 3 for any additional printhead cleaners you need to replace.
qrgbook.bk.fm Page 52 Tuesday, July 28, 1998 5:31 PM 5HSODFLQJ WKH ,QN 6\VWHP 5 Close the right door on the printer. C4704107 The front panel will display the message “Open left door to access ink cartrg.”.
qrgbook.bk.fm Page 53 Tuesday, July 28, 1998 5:31 PM Replacing the Ink System Removing and Replacing the Ink Cartridge 1 Open the left door on the printer.
qrgbook.bk.fm Page 54 Tuesday, July 28, 1998 5:31 PM 5HSODFLQJ WKH ,QN 6\VWHP 2 While pressing down on the quick-release button (1), unplug the ink cartridge tube by pulling the tube connector away from the printer (2).
qrgbook.bk.fm Page 55 Tuesday, July 28, 1998 5:31 PM Replacing the Ink System CAUTION Never pull the ink cartridge out by the tube or connector. This may cause the ink cartridge to leak. Always grasp the body of the cartridge when removing or installing. 3 Remove the used ink cartridge from the slot in the printer. Discard the used ink cartridge.
qrgbook.bk.fm Page 56 Tuesday, July 28, 1998 5:31 PM 5HSODFLQJ WKH ,QN 6\VWHP 4 Insert the new ink cartridge into the slot in the printer, making sure that you match the ink color with the color code on the printer. C4704142 5 Plug the valve on the ink cartridge tube into the connector on the printer making sure that you match the valve color with the color code on the valve connector.
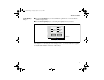
qrgbook.bk.fm Page 57 Tuesday, July 28, 1998 5:31 PM Replacing the Ink System When you have finished replacing ink cartridges, the printer front panel displays the message “Close left door to continue”. 7 Close the left door on the printer. C4704103 After the left door is closed, The front panel displays the message “STATUS, Checking ink system” while the printer checks that all ink system components have been installed correctly. This may take a few minutes.
qrgbook.bk.fm Page 58 Tuesday, July 28, 1998 5:31 PM 5HSODFLQJ WKH ,QN 6\VWHP After you replace the ink system, the printer performs some checks and alignments. If no media is loaded, the printer will display the message “Load media to align printheads.” Load media following the directions on page 32, Removing a Roll from the Printer, or page 37, Changing the Core Tube on the Take Up Reel. The alignment procedure requires a minimum media size of A3 or B-size.
qrgbook.bk.
qrgbook.bk.fm Page 60 Tuesday, July 28, 1998 5:31 PM 5HPRYLQJ DQG 6WRULQJ 3DUWLDOO\ 8VHG ,QN 6\VWHPV +DQGOH WKH ,QN 6\VWHPV ZLWK &DUH ■ $OZD\V VWRUH WKH SDUWLDOO\ XVHG SULQWKHDGV DQG SULQWKHDG FOHDQHUV LQ WKH +3 'HVLJQ-HW &3 ,QN 6\VWHP 6WRUDJH &RQWDLQHU .
Solving Ink System Problems Solving Ink System Problems Important An “ink system” refers to one color. It is made up of the ink cartridge, the printhead and the printhead cleaner. All three components of an ink system must be used together. The three components are designed to be used together Missing Ink System 0,66,1* ,1. 6<67(0 ,QVWDOO ! C4704034 When you first install your printer, or after removing ink systems and then powering on your printer, you will see this message.
qrgbook.bk.fm Page 62 Tuesday, July 28, 1998 5:31 PM 6ROYLQJ ,QN 6\VWHP 3UREOHPV If the Replace Ink System Key does not Work 1 Make sure the window is closed before you press the 5HSODFH ,QN 6\VWHP key. 2 7U\ SUHVVLQJ (QWHU WR FOHDU WKH SUHYLRXV PHVVDJH 3 7KH SULQWHU PD\ EH EXV\ ZDLW XQWLO LW KDV FRPSOHWHG WKH FXUUHQW SURFHVV 3UHVV WKH &DQFHO NH\ LI \RX ZDQW WR LQWHUUXSW WKH FXUUHQW SURFHVV If Brand New Printheads have Problems 1 Your printer may not detect the ink system that you have installed.
qrgbook.bk.fm Page 63 Tuesday, July 28, 1998 5:31 PM Solving Ink System Problems If there is a Failure after Refilling Printheads If you see the message “Ink cartridge valve out” or “Ink cartridges removed” after printheads have been refilled, it is because an ink cartridge valve has become disconnected or the printer cannot detect an ink cartridge. Printing is disabled. To fix this problem: 1 Press the ↓ key.
qrgbook.bk.fm Page 64 Tuesday, July 28, 1998 5:31 PM 6ROYLQJ ,QN 6\VWHP 3UREOHPV Printhead Alignment Errors 3ULQWKHDG DOLJQPHQW HUURU ■ ■ ❏ ■ ! C4704034 The printer runs the printhead alignment procedure every time you load, replace or even reseat a printhead. The routine is also run when media is loaded that is of a different media type from that previously loaded, or after powering on the printer with no media loaded.
qrgbook.bk.
qrgbook.bk.fm Page 66 Tuesday, July 28, 1998 5:31 PM 6ROYLQJ ,QN 6\VWHP 3UREOHPV If your media is colored or not sufficiently opaque, we recommend disabling the Color Calibration (Image Quality / Color Calib. / Off) and Printhead Check (Image Quality / Printhead Service / Check / Off) features of your printer, as they may not work correctly. Poor Printhead Start-Up 1 Perform the Recover Printhead procedure. Select Utilities / Service Tests / Recover Printheads.
qrgbook.bk.fm Page 67 Tuesday, July 28, 1998 5:31 PM Solving Ink System Problems Using the Replace Ink System Key The Replace Ink System key can be used to check what is wrong with the ink system. If you think you know which part of the ink system is giving trouble (see 62, If the Replace Ink System Key does not Work and the list of messages on page 80, Message Explanations and Actions), focus on that section, but if you are not sure, try all the steps carefully.
qrgbook.bk.
qrgbook.bk.
qrgbook.bk.
qrgbook.bk.
qrgbook.bk.
qrgbook.bk.
qrgbook.bk.fm Page 74 Tuesday, July 28, 1998 5:31 PM 6ROYLQJ ,QN 6\VWHP 3UREOHPV If You Have Problems Reseating a Printhead 5HSODFH SULQWKHDG ■■❏■ C4704034 &KHFN SULQWKHDG ■ ■ ❏ ■ $ERUW ! C4704034 When printheads are installed, in extreme circumstances it is possible that the printer will not recognise them. This will be visible on the front panel with the message “Replace pULQWKHDG ´ RU ³&KHFN SULQWKHDG / Abort´ where one or more of the squares are flashing.
qrgbook.bk.fm Page 75 Tuesday, July 28, 1998 5:31 PM Solving Ink System Problems 35,17+($' 817,/ 7+( 35,17(5 +$6 $&&(37(' 7+( &855(17 21( If the lights continue flashing and the printheads have been inserted correctly, try reseating them a few more times, by removing the printhead from its stall and then replacing it until it snaps correctly into position.
qrgbook.bk.fm Page 76 Tuesday, July 28, 1998 5:31 PM 6ROYLQJ ,QN 6\VWHP 3UREOHPV Cleaning Electrical Contacts The printer prints by firing tiny drops of ink onto the media. This is controlled by electrical signals that are sent from the printhead carriage to the printhead through electrical contacts. During normal printing operations, it is possible for ink to get spilt onto these electrical contacts. Ink can also be spilt onto them when printheads are loaded into the carriage.
qrgbook.bk.fm Page 77 Tuesday, July 28, 1998 5:31 PM Solving Ink System Problems Do not power off the printer. CAUTION Never drip water into the printer.
qrgbook.bk.fm Page 78 Tuesday, July 28, 1998 5:31 PM 6ROYLQJ ,QN 6\VWHP 3UREOHPV CAUTION Do not touch, wipe, or attempt to clean the printhead nozzles (on the right-hand side in the diagram above). This can damage the printhead. Handle the ink systems with care.
qrgbook.bk.
qrgbook.bk.fm Page 80 Tuesday, July 28, 1998 5:31 PM 0HVVDJH ([SODQDWLRQV DQG $FWLRQV 0HVVDJH ([SODQDWLRQV DQG $FWLRQV 7KLV LV D OLVW RI WKH PHVVDJHV LQ WKH IURQW SDQHO GLVSOD\ ,I DQ DFWLRQ LV QHHGHG LW LV VKRZQ LQ LWDOLFV LQ WKH ([SODQDWLRQ DQG $FWLRQ FROXPQ 7KH PHVVDJHV DUH OLVWHG LQ DOSKDEHWLFDO RUGHU 0HVVDJH ([SODQDWLRQ DQG $FWLRQ Accessing head cleaners The printer is moving the platform that contains the printhead cleaners to a place where you can access them.
qrgbook.bk.fm Page 81 Tuesday, July 28, 1998 5:31 PM Message Explanations and Actions 0HVVDJH ([SODQDWLRQ DQG $FWLRQ Calibrate error Continue→ The calibration print was loaded incorrectly and it could not be measured. Calibrate Yes → Color No → Calibration done Continue→ Cancelled Continue→ Press ↓ to continue, then reload the print for measurement. Follow front panel instructions. You are using sheet media and color calibration is on.
qrgbook.bk.fm Page 82 Tuesday, July 28, 1998 5:31 PM 0HVVDJH ([SODQDWLRQV DQG $FWLRQV 0HVVDJH ([SODQDWLRQ DQG $FWLRQ Check ink system→ Ignore→ After an error has been detected in the ink system, you are given the chance to check it. Press ↑ to check the ink system right now. The printer will indicate which ink systems are affected. Press ↓ to ignore the error and continue printing. In this case the image quality cannot be assured.
qrgbook.bk.fm Page 83 Tuesday, July 28, 1998 5:31 PM Message Explanations and Actions 0HVVDJH ([SODQDWLRQ DQG $FWLRQ Close window to continue You have finished installing the printheads. Create pattern→ Measure pattern→ Disk error Continue→ Edge not found Reload media Error processing job Flushing rest of job→ Fatal disk error Continue→ Close the window to continue. Press ↑ to create the pattern for automatic calibration. Press ↓ to measure the pattern for automatic calibration.
qrgbook.bk.fm Page 84 Tuesday, July 28, 1998 5:31 PM 0HVVDJH ([SODQDWLRQV DQG $FWLRQV 0HVVDJH ([SODQDWLRQ DQG $FWLRQ Head cleaner full ■■❏■→ Either: After finishing printing, the printer has detected that one or more of the printhead cleaners are full of ink. The squares that are flashing indicate the head cleaners that are full. Press ↓ to continue. The message “Check ink system→ / Ignore→” is displayed.
qrgbook.bk.fm Page 85 Tuesday, July 28, 1998 5:31 PM Message Explanations and Actions 0HVVDJH ([SODQDWLRQ DQG $FWLRQ Head cleaner removed ■■❏■→ The printer has detected that one or more printhead cleaners have become dislodged or the printer cannot detect them, as indicated by the flashing squares. Printing is disabled. Press ↓ to check the failing head cleaner. You should reseat the head cleaners immediately; see 70, Checking the Printhead Cleaners.
qrgbook.bk.fm Page 86 Tuesday, July 28, 1998 5:31 PM 0HVVDJH ([SODQDWLRQV DQG $FWLRQV 0HVVDJH ([SODQDWLRQ DQG $FWLRQ Imaging inks YES→ installed NO→ After you have finished installing a new ink cartridge, you are asked to confirm that you have changed the type of ink cartridges from UV Pigmented to Imaging. Press ↑ to confirm that you have changed the ink cartridges from UV Pigmented to Imaging.
qrgbook.bk.fm Page 87 Tuesday, July 28, 1998 5:31 PM Message Explanations and Actions 0HVVDJH ([SODQDWLRQ DQG $FWLRQ Initializing new ink system In the ink system replacement process, you have swapped an Imaging ink system for a UV Pigmented ink system, or vice versa. The printer will reinitialize and prepare to print with the new ink system. (This message only applies to firmware revision levels A.02.08 or higher.) Ink cartridge removed ■■❏■→ Wait until the new ink system has been initialized.
qrgbook.bk.fm Page 88 Tuesday, July 28, 1998 5:31 PM 0HVVDJH ([SODQDWLRQV DQG $FWLRQV 0HVVDJH ([SODQDWLRQ DQG $FWLRQ Ink system at end of life ■■■❏→ The printer has found that an earlier “Out of ink” error has not been corrected. One or more components of the ink system, as indicated by flashing squares, have reached the end of their intended lives. You should now replace all three components of those ink systems affected (the printheads, the printhead cleaners and the ink cartridges).
qrgbook.bk.fm Page 89 Tuesday, July 28, 1998 5:31 PM Message Explanations and Actions 0HVVDJH ([SODQDWLRQ DQG $FWLRQ INK SYSTEM ERROR The printer has detected an error in the ink system, as shown in earlier messages. Printing will be disabled until the error has been corrected. If more than one error is pending, the one with the highest number, corresponding to the most severe error, will be displayed. Possible error codes (xxxxxx) are: xxxxxx • • • • • • • 58....
qrgbook.bk.fm Page 90 Tuesday, July 28, 1998 5:31 PM 0HVVDJH ([SODQDWLRQV DQG $FWLRQV 0HVVDJH ([SODQDWLRQ DQG $FWLRQ Lift lever to continue The media lever was lowered while the processor was busy. Load arrow edge print side down Load cancelled Remove media Load error Remove media Load media for calibration Load media to align printheads Load media to check printheads Load sheet for calibration Lower lever Lower lever Remove media 90 Lift the lever at the right edge of the paper path on the printer.
qrgbook.bk.fm Page 91 Tuesday, July 28, 1998 5:31 PM Message Explanations and Actions 0HVVDJH ([SODQDWLRQ DQG $FWLRQ Lower window to continue The window was opened while the printer was busy. Media too small Close the window to continue. You may have sent a print file that is too large for the media loaded; the print may be clipped. Media too small for calibration→ Press Cancel if the media is unsuitable, and reload with appropriate media.
qrgbook.bk.fm Page 92 Tuesday, July 28, 1998 5:31 PM 0HVVDJH ([SODQDWLRQV DQG $FWLRQV 0HVVDJH ([SODQDWLRQ DQG $FWLRQ MIO error handshake You configured the modular interface incorrectly. Mispositioned Reload roll Mispositioned Reload sheet MISSING INK SYSTEM Install→ Mixed ink system ❏■■■→ Press the Enter key to clear the message from the front panel.
qrgbook.bk.fm Page 93 Tuesday, July 28, 1998 5:31 PM Message Explanations and Actions 0HVVDJH ([SODQDWLRQ DQG $FWLRQ MIXED INK SYSTEM The printer has earlier detected components of different ink system types (for example, Imaging and UV Pigmented). Printing will be disabled until the ink systems are all of the same type. The error code “88xxxx” indicates a mixed ink system error. 88xxxx Press the Replace Ink System key to replace the erroneous ink systems in order to print with your printer again.
qrgbook.bk.fm Page 94 Tuesday, July 28, 1998 5:31 PM 0HVVDJH ([SODQDWLRQV DQG $FWLRQV 0HVVDJH ([SODQDWLRQ DQG $FWLRQ Open window to access printheads You are doing an ink system replacement. OUT OF INK ■■■❏ → Out of memory Data was lost Press ENTER when done 94 Open the window to access the printheads. The printer has detected that the amount of ink in the ink systems indicated by one or more flashing squares, is below acceptable limits for satisfactory printing.
qrgbook.bk.fm Page 95 Tuesday, July 28, 1998 5:31 PM Message Explanations and Actions 0HVVDJH ([SODQDWLRQ DQG $FWLRQ Printhead alignment cancelled→ The printhead alignment procedure has failed, or the printer has detected a fault that stops the procedure from completing. Subsequent messages will explain the error further: ■ “Replacement of lens cover recommended”—You should check the section on replacing lens covers on page 10-3, Lens Maintenance in the Users Guide.
qrgbook.bk.fm Page 96 Tuesday, July 28, 1998 5:31 PM 0HVVDJH ([SODQDWLRQV DQG $FWLRQV 0HVVDJH ([SODQDWLRQ DQG $FWLRQ Printhead check cancelled→ The printhead check procedure has failed, or the printer has detected a fault that stops the procedure from completing. Subsequent messages will explain the error further: ■ “Replacement of lens cover recommended”—You should check the section on replacing lens covers on page 10-3, Lens Maintenance in the Users Guide.
qrgbook.bk.fm Page 97 Tuesday, July 28, 1998 5:31 PM Message Explanations and Actions 0HVVDJH ([SODQDWLRQ DQG $FWLRQ Printhead check error ■■❏■→ or Printhead check error → The message “Printhead check error” may be displayed if: ■ You are using colored media. Either disable checking or use media that is clean, white, and opaque. See the remarks on 64, Media Problems. ■ There are dirty nozzles on the printhead. Replace your ink system (see page 74, If You Have Problems Reseating a Printhead).
qrgbook.bk.fm Page 98 Tuesday, July 28, 1998 5:31 PM 0HVVDJH ([SODQDWLRQV DQG $FWLRQV 0HVVDJH ([SODQDWLRQ DQG $FWLRQ Printhead contact error ■■❏■→ The printheads, indicated by flashing squares, have failed to function because of an unusual electrical signal from the printhead. The most likely cause of this message is that the electrical contacts on the printhead or printer carriage are dirty and need cleaning. Press the ↓ key to check the printheads.
qrgbook.bk.fm Page 99 Tuesday, July 28, 1998 5:31 PM Message Explanations and Actions 0HVVDJH ([SODQDWLRQ DQG $FWLRQ Printhead failure ■■❏■→ The printheads indicated by flashing squares have failed, either during printhead initialization or during printing. The printer may have detected an unusual electrical or thermal signal from the printhead that may require attention. The most likely causes of this message are: ■ The ink cartridge is empty.
qrgbook.bk.fm Page 100 Tuesday, July 28, 1998 5:31 PM 0HVVDJH ([SODQDWLRQV DQG $FWLRQV 0HVVDJH ([SODQDWLRQ DQG $FWLRQ Printing disabled→ The printer cannot print, because of errors previously notified. Pull ↓ Align ↔ edges to roll Reload media Press ↓ to continue. Then press the Replace Ink System key to replace the erroneous ink systems in order to print with your printer again. See 74, If You Have Problems Reseating a Printhead. You are aligning roll media.
qrgbook.bk.fm Page 101 Tuesday, July 28, 1998 5:31 PM Message Explanations and Actions 0HVVDJH ([SODQDWLRQ DQG $FWLRQ Remove head cleaners Close right door You have selected the option Utilities / Transport mode of the front-panel menu, and opened the right door when instructed. Remove media The printer is instructing you to remove all the printhead cleaners, and then close the right door. The ink is dry. Remove media Lift lever Remove the accuracy calibration print that has just been produced.
qrgbook.bk.fm Page 102 Tuesday, July 28, 1998 5:31 PM 0HVVDJH ([SODQDWLRQV DQG $FWLRQV 0HVVDJH ([SODQDWLRQ DQG $FWLRQ Replace printhead(s) ■■❏■ You are in the ink system replacement process, and lifted the window when instructed. Replace printhead(s) Close window The printer is waiting for you to replace the printheads indicated by flashing squares. (If you have persistent problems, see ,I
qrgbook.bk.fm Page 103 Tuesday, July 28, 1998 5:31 PM Message Explanations and Actions 0HVVDJH ([SODQDWLRQ DQG $FWLRQ Replacement of lens cover recommended→ The printhead alignment procedure, or the printhead check procedure, or a calibration check has failed because the lens cover is dirty and needs replacing. Printing may continue but the image quality is not assured. Resource area full Unable to save res.
qrgbook.bk.fm Page 104 Tuesday, July 28, 1998 5:31 PM 0HVVDJH ([SODQDWLRQV DQG $FWLRQV 0HVVDJH ([SODQDWLRQ DQG $FWLRQ Sheet misaligned Reload sheet Sheet media is skewed. Sheet required for calibration Sheet / Roll? Reload media Remove it and reload it so that the left and right edges being loaded into the printer are square. The leading edge must also be straight. You have started an accuracy calibration check but media is not present. Load media.
qrgbook.bk.fm Page 105 Tuesday, July 28, 1998 5:31 PM Message Explanations and Actions 0HVVDJH ([SODQDWLRQ DQG $FWLRQ System Error 060000 The ambient light level in the area of your printer is too bright and is causing the optical sensor in your printer to malfunction. System error Reduce the ambient light level or move the printer to a location where the light level is lower. An internal error has occurred and a system error number is displayed.
qrgbook.bk.fm Page 106 Tuesday, July 28, 1998 5:31 PM 0HVVDJH ([SODQDWLRQV DQG $FWLRQV 0HVVDJH ([SODQDWLRQ DQG $FWLRQ UV inks YES→ installed NO→ After you have finished installing a new ink cartridge, you are asked to confirm that you have changed the type of ink cartridges from Imaging to UV Pigmented. Press ↑ to confirm that you have changed the ink cartridges from Imaging to UV Pigmented.
qrgbook.bk.fm Page 107 Tuesday, July 28, 1998 5:31 PM Message Explanations and Actions 67$786 0HVVDJHV Message Explanation and Action STATUS Accessing head cleaners You have pressed the Replace Ink System key or there is an error in the head cleaners and you have pressed ↑ or ↓. The carriage is moving so that you can access the printhead cleaners. STATUS Accessing printheads Wait until the carriage is in position.
qrgbook.bk.fm Page 108 Tuesday, July 28, 1998 5:31 PM 0HVVDJH ([SODQDWLRQV DQG $FWLRQV Message Explanation and Action STATUS Check pending The right door has been opened while the printer was busy (for example, printing) and the printer is waiting to check the ink system. You may have done something that will affect image print quality.
qrgbook.bk.fm Page 109 Tuesday, July 28, 1998 5:31 PM Message Explanations and Actions Message Explanation and Action STATUS Initializing The printer is doing an internal check on power-up. STATUS Ink drying (xx m xxs) STATUS Lens maintenance STATUS Loading roll STATUS Loading sheet STATUS Low on ink Wait until the printer has finished initializing. The ink on your print is drying. Wait before removing the print. If you remove it before the indicated time has passed, avoid smearing the ink.
qrgbook.bk.fm Page 110 Tuesday, July 28, 1998 5:31 PM 0HVVDJH ([SODQDWLRQV DQG $FWLRQV Message Explanation and Action STATUS Maintenance advised The printer is being used more intensively than the recommended duty cycle. STATUS Measuring pattern STATUS Out of media You should contact your local HP dealer or HP service engineer to arrange a service. If you choose to ignore the message, you may continue to use the printer as normal, but may encounter a number of operational or print-quality problems.
qrgbook.bk.fm Page 111 Tuesday, July 28, 1998 5:31 PM Message Explanations and Actions Message Explanation and Action STATUS Processing The printer has received a file from your software and is processing it ready to print. STATUS Ready STATUS Ready for media STATUS Receiving STATUS Recovering printhds. Wait for the printing to complete. The printer is ready to print. Send a file to the printer. The printer is ready for you to load media. Load appropriate media. The printer has received data.
qrgbook.bk.fm Page 112 Tuesday, July 28, 1998 5:31 PM 0HVVDJH ([SODQDWLRQV DQG $FWLRQV Message Explanation and Action STATUS Roll feed edge trim The printer is trimming the edge of roll media. STATUS Waiting nest 112 Wait until the media has been trimmed. Nesting is turned on. The printer is waiting for another print to nest. Send the printer another file for printing.
qrgbook.bk.fm Page 113 Tuesday, July 28, 1998 5:31 PM Message Explanations and Actions To find how to … Go to … Install the printer ➧ The Setup Guide. Connect the printer ➧ The Setup Guide. Choose media ➧ Chapter 3, Working with Media, in the user’s guide. Load media ➧ Chapter 3, Working with Media, in the user’s guide or this guide. Replace ink system components ➧ Chapter 4, Working with the Ink System, in the user’s guide or this guide.
qrgbook.bk.