
HP Designjet 9000s Printing Guide [PosterShop 6.5 for HP] - Printing with the Contour Cutting [Windows]

Contour cutting allows you to print an image and then use a specialized device to cut portions of that
image. To do this, you prepare a file with a specialized spot color which acts as a cut path to
determine where the image needs to be cut. The RIP will recognize this spot color and will draw a
barcode and a number with instructions for the cutting device on how to cut it.
1. First, prepare your file by creating a cut path in a vector-base drawing program such as Adobe
Illustrator, Adobe InDesign, QuarkXpress, etc..., it may be as simple or as complex as you desire,
and you must assign a spot color to it, the name of this spot color must have a unique prefix
which matches the prefix assigned in the RIP-Queue, for example CutContour, that is the RIP’s
default. Then save your file in either .eps or .pdf format.
2. Launch PosterShop.
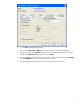
3. Configure the printer settings, highlight the printer and click Change... button (right hand).
• Page Size: Select the media size loaded on the printer.
• Setup... button:
o General tab: Set the top offset to 2 inches.
o Options tab: Select the desired type of cutter from the Contour Cutting drop-
dawn menu. If this menu does not list your specific cutter, select Generic Cutter.
• Click OK until the RIP-Queue window
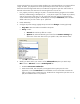
4. Modify your Quick Set for your contour cut files, Edit Quick Set (select your Quick Set) >
Edit... button > Advance... button > PostScript File tab:
• Enable the Use Cutter Path Prefix.
• Within the text field, enter the prefix you assigned to the cut path spot color in the
application, it can be CutContour that is the default one. If this field does not match the
prefix you assign to the cut path spot color, the RIP will not recognize the spot color as a cut
path, be careful because it is key sensitive.
2