
Ignite-UX Administration Guide for HP-UX 11i (B3921-90080, November 2013)
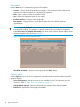

• Move to History... - Saves critical files for the client, adds them to the history file, and removes
the client. The client installation must successfully complete for the configuration to be moved
to the history file.
• Remove Client... - Deletes the selected client configuration. All client data, except for the
recovery image, is removed. Recovery information in the client’s directories will be removed.
• View Hardware... - Lists the hardware associated with the selected client.
• View/Print Manifest... - Allows you to view and print the manifest for the selected client. The
manifest file details the client’s installation and is available on the client and Ignite-UX server
after the installation. For more information, see “Viewing and Printing a Manifest ” (page 150).
• Change Icon Name... - Launches a dialog box for renaming the selected icon.
How Ignite Works
When deciding the best way to use Ignite in your data center, it might be useful to understand the
structure of Ignite – how it gets started on the client and the functional steps it performs. This section
describes the major components of Ignite and where they come from. Ignite installation and recovery
is described in terms of phases, with each phase described in detail.
The Ignite-UX Install Environment
HP-UX installation and recovery is accomplished using the Ignite-UX install environment.
The Ignite install environment is a small subset of the HP-UX operating system that allows HP-UX to
install itself onto a system. During the initial phases of installation and recovery, the install
environment runs in client memory without any disk-based storage. A memory-based RAM disk
holds the initial root file system needed for HP-UX operation. While operating with a memory-based
root disk file system, file system space is very limited. On smaller memory systems, memory for the
HP-UX kernel and processes might also be limited. Command libraries and other files must be
loaded and removed as needed. (Increasing the size of the memory-based root disk to make more
space would result in insufficient memory being available for the processes that accomplish
installation and recovery.) Once the correct disks are identified, volumes and file systems are
created. The install environment then switches to a disk-based file system. When that is completed,
some of the RAM disk space is freed.
The Ignite install environment consists of:
• [W|V|I]INSTALL – The HP-UX install kernel, which is statically linked and includes a wide
variety of I/O and other modules so it is able to run on all supported systems.
• [W|V|I]INSTALLFS – The initial HP-UX install file system, which is copied into the root RAM
disk during boot. The first 8 KB can contain Ignite-UX configuration content.
• INSTCMDS or INSTCMDSIA, SYSCMDS or SYSCMDSIA, and RECCMDS or RECCMDSIA –
Archives of commands, libraries, and other files needed to accomplish installation and recovery,
but are not needed to initially get the install environment running. These are loaded as needed
during installation and recovery.
The Ignite-UX install kernel and install file system are loaded into system memory by the standard
HP-UX boot loader or virtual system boot loader software. Note that there are a number of boot
sources where the Ignite install environment may reside. Also, the details of booting vary according
to your Ignite data center configuration.
Boot Sources
Ignite always retrieves the install kernel and install file system from the boot source. By default,
Ignite retrieves INSTCMDS[IA], SYSCMDS[IA], and RECCMDS[IA] from that same boot source,
but can get these command archives from a different source if requested to. Ignite can determine
the boot source by querying the HP-UX kernel.
18 Ignite-UX Overview