s520 Digital Camera User Manual
Preface About this Manual • The contents of this manual and the bundled Basic Reference are subject to change without notice. • Note that the example screens and product illustrations shown in this User’s Guide may differ somewhat from the screens and configuration of the actual camera. Copyright • This manual contains proprietary information protected by copyright. All rights are reserved.
READ THIS FIRST Trademark Information Microsoft® and Windows® are U.S. registered trademarks of Microsoft Corporation. Pentium® is a registered trademark of Intel Corporation. Macintosh is a trademark of Apple Inc. SD™ is a trademark. SDHC™ is a trademark. Other names and products may be trademarks or registered trademarks of their respective owners. Product Information Product design and specifications are subject to change without notice.
SAFETY INSTRUCTIONS Read and understand all Warnings and Cautions before using this product. Warnings If foreign objects or water have entered the camera, turn the power off and remove the battery. Continued use might cause fire or electric shock. Consult the store of purchase. If the camera has fallen or its case has been damaged, turn the power off and remove the battery. Continued use might cause fire or electric shock. Consult the store of purchase. Do not disassemble, change or repair the camera.
Cautions Insert the battery paying careful attention to the polarity (+ or –) of the terminals. Inserting the battery with its polarities inverted might cause fire and injury, or damage to the surrounding areas due to the battery rupturing or leaking. Do not fire the flash close to anyone’s eyes. This might cause damage to the person’s eyesight. Do not subject the LCD monitor to impact. This might damage the glass on the screen or cause the internal fluid to leak.
Notes on Battery Usage When you use the battery, carefully read and strictly observe the Safety Instructions and the notes described below: Use only the specified battery (3.7V). Avoid extremely cold environments as low temperatures can shorten the battery life and reduce camera performance.
CONTENTS 7 INTRODUCTION 8 GETTING TO KNOW YOUR CAMERA 7 7 8 8 9 Overview Package Contents Front View Rear View LCD Monitor Display 11 GETTING STARTED 25 26 27 28 Attaching Voice Memos Protecting Photos and Videos DPOF Settings Erasing Images 29 MENU OPTIONS 29 32 33 35 Capture Menu Video Menu Playback Menu Setup Menu 11 Preparation 12 Power the Camera On by Pressing Playback Button 12 Charging the Battery 13 Initial Settings 37 TRANSFERRING FILES TO YOUR COMPUTER 15 CAPTURE MODE 40 Possible
INTRODUCTION Overview Congratulations on your purchase of the new HP digital camera. Capturing high-quality digital images is fast and easy with this state-of-the-art smart camera. Equipped with a 16.0-megapixel CCD, this camera is capable of capturing photos with a resolution of up to 4608 x 3456 pixels.
GETTING TO KNOW YOUR CAMERA Front View 12 34 5 1. Shutter button 2. Flash 3. ON/OFF Power button 4. Self-timer LED 5. Microphone 6. Lens 6 Rear View A. LCD monitor 1 A B. Status LED B C. USB and AV OUT terminal 2 3 D. Strap holder 4 C D 5 7 9 6 8 10 E 1. 2. 3. 4. 5. 6. 7. 8. 9. EN-8 F Shutter button : Zooms out : Zooms in Playback mode Switches to: Video mode > Capture mode Focus Compensation s>P Flash Self-timer H.
LCD Monitor Display Capture mode 1. Zoom status 2. Available number of photos 3. Storage media [r] Internal memory (no card) [ ] SD/SDHC memory card 4. Battery condition [l] Full battery power [o] Medium battery power [n] Low battery power [m] No battery power 5. Focus setting [K] Auto [ ] AF Tracking [ ] Face Detect [ ] Macro [Q] Infinity 6. Flash mode [b] Auto [a] Flash On [d] Flash Off [c] Red-eye [`] Slow Sync 7.
Video mode 1. Zoom status 2. Storage media 3. Battery condition 4. Focus setting 5. Self-timer icon 6. Video resolution 7. Elapsed time / Available recording time 8. Main focus area 9. Date and time 10. Video quality 11. Audio off 12. Mode icon 1 4 11 5 6 00:00:00 / 02:28:49 2012.03.01 13:15 8 9 1 2 15 EN-10 7 4 3 5 6 110-0201 2 14 13 12 11 F2.8 1/3 10 7 SET 2012.03.01 13:15 9 8 Playback mode - Video playback 1. Protect icon 2. Folder / File number 3. Storage media 4.
GETTING STARTED Preparation 1. 2. 3. 4. Attach the camera strap. Open the battery/memory card cover. Insert the supplied battery with correct orientation as shown (label side front). Insert an SD/SDHC memory card (Optional). The camera has 32MB internal memory(23MB available for image storage), but you can load an SD/SDHC memory card to expand the camera’s memory capacity. Be sure to format the memory card with this camera before its initial usage. 5.
Power the Camera On by Pressing Playback Button 1. Press the 7 button for about 3 seconds to turn the camera on and begin playback. Lens do not zooms out/in in this playback preview. The camera will turn off automatically if no operations are performed for the length of time selected in the Auto off menu. 2. Press the 7 button again or press the ON/OFF button to power the camera off, or press the shutter button to enter the capture mode.
Initial Settings The language & date/time needs to be set if and when: 1. 2. 3. 4. 5. The camera is turned on for the first time. The camera is turned on after leaving the camera without the battery for an extended period of time. Press the ON/OFF button to turn the power on. Press any button to enter language setup. Select the displayed language with the 4-way navigation control and press the SET button.
Choosing the Language Specify in which language menus and messages are to be displayed on the LCD monitor. 1. Press the MODE button, and set the camera mode to [ ] or [ ]; or press the button. 2. Press the MENU button. 3. Select the [Setup] at the end of the Menu with the up or down side of the 4-way navigation control, and press the SET button. 4. Select [Language] with the up or down side of the 4-way navigation control and press the SET button. MENU ; SET ; 5.
CAPTURE MODE Capturing Photos Your camera is equipped with a 3.0” full color TFT LCD monitor to help you compose photos, playback recorded photos/video clips or adjust menu settings. 1. Press the ON/OFF button to turn the power on. 2. Press the MODE button, and set the camera mode to [ ]. 3. Compose your photo in the LCD monitor. Pressing the button zooms in on the subject, and enlarges the subject on the LCD monitor. Pressing the button zooms out on the subject, and provides a wider angle photo. 4.
Setting the Scene Mode By simply selecting one of the available scene modes, you can capture the photo with the most appropriate settings. 1. Press the MODE button, and set the camera mode to [ ], and press the SET button. 2. Select the desired scene mode with the 4-way navigation control, and press the SET button. 3. Compose the photo and press the shutter button.
Scene mode Description Beauty Enhancer Select this mode when you want the camera to enhance the tone of skin so that the facial skin appears smooth. Portrait Select this mode when you want the camera to make the subject stand out with smooth and natural looking skin tones. Night Scene Select this mode when you want to capture dark scenes such as night views. Night Portrait Select this mode when you want to capture people with an evening or night scene background.
Taking 3KRWRs with Intelligent Scene mode In this Intelligent Scene mode, the camera can sense the ambient conditions and automatically select the ideal shooting mode. 1. Press the MODE button, and set the camera mode to [ ], and press the SET button. 2. Select [Intelligent Scene] with the 4-way navigation control, and press the SET button. The camera can automatically select best mode for the shooting scene from [Auto] / [Landscape] / [Backlight] / [Portrait] / [Night] / [Night Portrait] / [Macro]. 3.
Taking a Panoramic Pictures Pictures are manually shot, and the camera automatically combines pictures in the camera. 1. Press the MODE button, and set the camera 00214 mode to [ ], and press the SET button. 2. Select [Panorama Video] with the 4-way navigation control, and press the SET button. 3. Press the shutter button down fully. 4. Horizontally move your camera to select the photographic direction, meanwhile the camera begins to recording. SCN 5.
Find Blur Function With the camera’s new “Find Blur” function, this camera finds the blurry photo when capture under Continuous. 1. Press the MODE button, and set the camera mode to [ ]. 2. Press the MENU button, and select [Find Blur] icon with the up or down side of the 4-way navigation control. Set “Find Blur” on. 3. Press the shutter button to return to preview display. 4. Press the shutter button down fully to capture your photo. ; 5. Press the SET button to save the best photo.
Self-portrait Function Use this function to take pictures of yourself or include yourself in pictures. ]. 1. Press the MODE button, and set the camera mode to [ 2. Press the e button, and select [ ] icon with the left or right side of the 4-way navigation control. Press the SET button. 3. Press the shutter button. 4. If the camera detect and track any faces, after twice blinking of the self-timer LED, one photo will be captured. Press the shutter button to exit.
VIDEO MODE Recording Video Clips This mode allows you to record video clips at a resolution of 320 x 240 / 640 x 480 / 720p pixels. 1. Press the MODE button, and set the camera mode to [ ]. 2. Compose the subject. 3. Press the shutter button. The recording of the video clip will start. Pressing the shutter button one more time will end the recording of the video clip. The recording time depends on the storage size and the subject of the video to be recorded.
PLAYBACK MODE Playing Back 3KRWRs You can play back the photos on the LCD monitor. 1. Press the button. The last photo or video appears on the screen. 2. The images can be displayed in forward or reverse sequence with the left or right side of the 4-way navigation control. To view the previous photo or video, press the left side of the 4-way navigation control To view the next photo or video, press the right of the 4-way navigationcontrol Pressing the button enlarges the photo.
Removing Red-eye You can use this function to remove the red-eye effect after a photo is taken. 1. Press the 7 button. The last photo or video appears on the screen. 2. Select the photo or video that you want to edit with the left or right side of the 4-way navigation control. 3. Press the MENU button. 4. Select [Fix Red Eyes] with the up or down side of the 4-way navigation control, and press the SET button. 5.
Attaching Voice Memos A maximum of 30 seconds of audio can be recorded as a memo for captured photos. 1. Press the 7 button. The last photo or video appears on the screen. 2. Select the photo to which you want to attach the voice memo with the left or right side of the 4-way navigation control. 3. Press the MENU button. 4. Select [Voice Memo] with the up or down side of the 4-way navigation controlbuttons, and press the SET button. 5. Press the SET button.
Protecting 3KRWRV DQG 9LGHRV Set the data to read-only to prevent photos or videos from being erased by mistake. 1. Press the 7 button. Setup The last photo or video appears on the screen. 2. Select the photo or video that you want to protect Date/Time with the left or right side of the 4-way navigation 2010.01.01 control. Language 3. Press the MENU button. English 4. Select [Protect] with the up or down side of the Auto Off Off 4-way navigation control, and press the SET button. MENU ; SET ; 5.
DPOF Settings DPOF is the abbreviation for Digital Print Order Format, which allows you to embed printing information on your memory card. You can select the photos to be printed and how many prints to make with the DPOF menu in the camera and insert the memory card to the card compatible printer. When the printer starts printing, it will read the embedded information on the memory card and print the specified photos. 1. Press the button. The last photo or video appears on the screen. 2.
Erasing Images Erasing a single image / Erasing all images 1. Press the 7 button. The last photo or video appears on the screen. 2. Select the photo or video you want to erase with the left side of the 4-way navigation control. 3. Press the MENU button. 4. Select [Delete] with the up or down side of the 4-way navigation control, and press the SET button. 5. Select [Single] or [All] with the left or right side of the 4-way navigation controlbuttons,and press the SET button.
MENU OPTIONS Capture Menu This menu is for the basic settings to be used when capturing photos. 2 MP AUTO MENU ; SET ; MENU ; SET ; 1. 2. 3. 4. Press the ON/OFF button to turn the power on. Press the SET button, and set the camera mode to any scene mode. Press the MENU button to enter the [Capture] menu. Select the desired option item with the up or down side of the 4-way navigation control, and press the SET button to enter its respective menu.
Color This sets the color of the photo that will be captured. * Standard / Vivid / Sepia / B&W / Blue / Red / Green / Yellow / Purple Saturation This sets the saturation of the photo that will be captured. * High / Standard / Low Metering This sets the metering method for calculating the exposure. * Center: Averages the light metered from the entire frame, but gives greater weight to the subject matter at the center.
* On / Off Find Blur Refer to the section in this manual titled “Find Blur Function” for further details. * On / Off Preview This sets whether or not to display the captured photo on the screen immediately after the photo is captured. * On / Off Date Print The date of recording can be printed directly on the photos. This function must be activated before the photo is captured. * On / Off Setup Refer to the section in this manual titled “Setup Menu” for further details.
Video Menu This menu is for the basic settings to be used when recording video clips. MENU ; SET ; MENU ; SET ; 1. Press the MODE button, and set the camera mode to [ ]. 2. Press the MENU button to enter the [Video] menu. 3. Select the desired option item with the up or down side of the 4-way navigation control, and press the SET button to enter its respective menu. 4. Select the desired setting with the left or right side of the 4-way navigation control, and press the SET button. 5.
Playback Menu In the [7] mode, choose which settings are to be used for playback. MENU ; SET ; MENU ; SET ; 1. Press the 7 button. 2. Press the MENU button. 3. Select the desired option item with the up or down side of the 4-way navigation control, and press the SET button to enter its respective menu. 4. Select the desired setting with the left or right side of the 4-way navigation control, and press the SET button. 5. To exit from the menu, press the MENU button.
Voice Memo Refer to the section in this manual titled “Attaching Voice Memos” for further details. Resize Resizes a previously saved photo. Resizing replaces the original photo with the changed photo. It is only possible to resize to a smaller size. Qual. Change Changes the quality (compression) of a recorded photo. Compress photos down to half of their size or less, overwrite old size photos with newly compressed photos. It is only possible to reduce the photo quality/size, never to increase it.
Setup Menu Set your camera’s operating environment. MENU ; SET ; MENU ; SET ; 1. Press the MODE button, and set the camera mode to ;[ ] or [ ]; or press the 7 button. 2. Press the MENU button. 3. Select the [Setup] at the end of the Menu with the up or down side of the 4-way navigation control, and press the SET button. 4. Select the desired option item with the up or down side of the 4-way navigation control, and press the SET button to enter its respective menu. 5.
Video Out This sets your camera to match the system of the equipment that you are going to connect to the camera. * NTSC / PAL Fr. No. Reset This creates a new folder. The captured photos are recorded to the newly created folder from number 0001. * Execute / Cancel Light Freq. This camera supports different lighting frequencies: 50 Hz and 60 Hz. When photographing under fluorescent lighting, select the correct frequency setting depending in your local area's voltage. * 50 Hz / 60 Hz LCD Bright.
TRANSFERRING FILES TO YOUR COMPUTER Minimum System Requirements Windows Pentium III 1GHz or equivalent Windows 7/XP/Vista 2GB RAM 150MB available hard disk space CD-ROM drive Available USB port Macintosh PowerPC G3/G4/G5 OS 10.3.9 or later 256MB RAM (2GB recommended) 128MB available hard disk space CD-ROM drive Available USB port Downloading Your Files 1. Power on your camera. 2. Connect the camera to your computer with the USB cable. 3.
SPECIFICATIONS Item Description Image sensor 1/2.3” CCD sensor (16.0 megapixels) Image resolution Photo 16M (4608 x 3456), 12M(3968 x 2976), 8M (3264 x 2448), 2M(1600 x 1200), VGA(640 x 480) , 16:9(4608 x 2592) Video clip HD(720p), VGA(640x480), QVGA(320x240) LCD monitor 3.0” full color TFT LCD (460K pixels) Recording media 32MB internal memory (23MB available for photo or video storage) Supports SD/SDHC memory card (1 ~ 32GB) (optional) File format DCF, JPEG (EXIF 2.
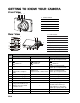
APPENDIX Possible Number of Shots Possible number of shots (SKRWRV) The table shows the approximate photos that you can capture at each setting based on the capacity of the internal memory and the SD/SDHC memory card.
Possible recording time / sec (video clip) Size HD 1280 x 720 VGA 640 x 480 320 x 240 Quality internal memory SD/SDHC memory card capacity 1GB 2GB 4GB SDHC 8GB SDHC 16GB SDHC 32GB SDHC 3:19:20 Fine 0:00:08 0:06:04 0:12:21 0:24:16 0:49:23 1:39:22 Standard 0:00:10 0:06:49 0:13:53 0:27:16 0:55:31 1:51:42 3:44:05 Fine 0:00:11 0:07:35 0:15:25 0:30:17 1:01:38 2:04:01 4:08:48 Standard 0:00:20 0:13:34 0:27:36 0:54:12 1:50:18 3:41:57 7:25:13 Fine 0:00:33 0:22:25 0:45:36 1:29:3
Cause Solutions / Corrective Actions The lens is dirty. Wipe clean with a soft, dry cloth or lens paper. The distance to the subject is smaller than the effective range. Get your subject within the effective focus range. The contents on the memory card cannot be played back. You played back a memory card that was not formatted by this camera. Insert a memory card that was formatted on this camera. The file is protected. Cancel protection. Files cannot be deleted.