
Installing and upgrading HP Insight Management 7.2 Update 2 on Windows Server 2012 Failover Clusters
Technical white paper | HP Insight Management 7.2
39
Final configuration steps
If the component listed below has been installed, complete the corresponding configuration steps.
HP Systems Insight Manager
1. On each node, log in to Windows using the SQL/IM Administrator account.
2. Delete the Systems Insight Manager icon on the Windows desktop. This icon was created by the installation of Systems
Insight Manager as a handy shortcut for a standalone server only. It is not applicable because Systems Insight Manager
is now clustered. It should be deleted from the desktop of each system to avoid future confusion.
3. If needed, modify the SNMP accepted community names on each system to reflect the local environment. (In the
Services Console, access the Security tab of the SNMP service.) Note that the settings entered here should be
consistent with those entered previously in Steps 15.I and 15.J.
HP System Management Homepage
1. On each node, log into Windows using the SQL/IM Administrator account.
2. Launch SMH through the icon left on the desktop from its installation or from Start All Programs HP Management
Agents HP System Management Homepage.
3. In SMH navigate to Settings Security Trust Mode and configure as appropriate for your local environment.
HP Version Control
1. Log in to Windows using the SQL/IM Administrator account on the node that currently owns the resources associated
with Systems Insight Manager.
2. Using Windows Explorer, navigate to the Insight Management shared disk, disk V: in this white paper.
Create a new folder on this disk to contain the Version Control Repository data (for example, V:\Program
Files\HP\Version Control Repository).
3. Use SMH to configure the Version Control Repository directory on both the primary and secondary systems. Follow
these steps to configure the primary system. Then use Failover Cluster Manager to move the Systems Insight Manager
Group to the secondary system. Next repeat these steps for the secondary system. Lastly move the Systems Insight
Manager Group back to the primary system.
A. Browse to VCRM using the Systems Insight Manager virtual network name and port 2381 (for example,
https://cms-hpsim.fqdn:2381). Log in with the same credentials used in Step 1.
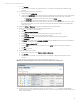
B. On the bottom of the SMH home page, click Version Control Repository Manager. The Version Control Repository
Manager home page appears.
C. On the right end of the gray navigation bar just below the Home tab, click Change repository & update settings.
D. Enter the path to the folder created in Step 2. Click Next.
E. Select Microsoft Windows Server 2012 for the operating system and click Next.
F. Set the automatic update settings as desired. Click Finish and Close.
Insight Control power management
For certain managed power devices, such as HP PDUs that communicate with Systems Insight Manager over SNMP and that
restrict access to specified hosts, their configuration should include the IP addresses of both the primary and secondary CMS
systems—as using the Systems Insight Manager virtual server IP address does not work with these devices.
HP Matrix infrastructure orchestration
1. Be sure both primary and secondary systems have the same users in the HP IO Windows user groups:
A. On the primary system, click Start Administrative Tools Computer Management. In the left pane expand
Local Users and Groups.
B. Take note of the users or user groups inside of the HPIO_Administrators, HPIO_Users, and HPIO_Architects
groups.
2. Go to the secondary system and ensure that the users listed in Step 1.B correctly appear in the HPIO_Administrators,
HPIO_Users, and HPIO_Architects groups.
3. Set the HPioCmsIP property to the fully qualified Systems Insight Manager virtual server name.
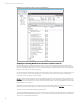
A. Click Start Programs Hewlett-Packard Operations Orchestration HP Operations Orchestration Studio
on the node that owns the Failover Cluster Systems Insight Manager group resources.
B. Enter valid user credentials. (Try user Admin with the domain password for the SQL/IM Administrator account.)
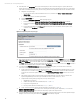
C. The Default Public Repository should be displayed. If the Default Public Repository is not shown, select Repository
Open Repository… Default Public Repository.
D. Expand the Configuration node.
E. Expand the System Properties node.