
Installing and upgrading HP Insight Management 7.2 Update 2 on Windows Server 2012 Failover Clusters


Technical white paper | HP Insight Management 7.2
15
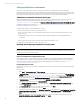
Step # Step Description Notes
5 Create a New
Failover Cluster:
http://blogs.msdn.co
m/b/clustering/archi
ve/2012/05/01/102
99698.aspx
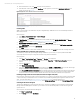
If you are creating a cluster using the client access points from a
previously “destroyed” cluster and receive errors while doing so, use
Active Directory (
Start
Administrative Tools
Active Directory
Users and Computers
) to delete the entries for these client access
points from the
Computers
folder. (Destroying a cluster does not
delete these entries from the
Computers
folder.)
In the wizard screen titled Access Point for Administering the Cluster,
enter the IP address and network name you have provisioned for the
Failover Cluster. This white paper uses 15.199.242.161 and CMS-C16-
CLUSTER.
The Quorum model for your two-node cluster is
Node and Disk
Majority
.
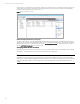
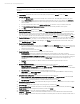
Upon completion of cluster creation you should see a screen similar to Figure 3.
Figure 3: Create Cluster Wizard Summary screen
After the cluster has been successfully formed, continue under the same account and with both cluster nodes online to
complete the following steps:
1. Click Start Administrative Tools Computer Management Disk Management. Select Online, then Initialize, and
finally create
New Simple Volumes… for the remaining three shared disks. The volume type for shared disks must be
Basic. MBR or GPT partitions may be used.
2. If all the disks were presented to the servers and initialized prior to the cluster creation and if you had selected the
check box for Add all eligible storage in the cluster in the Create Cluster Wizard, the disks will be automatically added
by the wizard as cluster storage after the cluster creation. If you did not select the checkbox, follow the next step.
Otherwise, Skip to step 4.
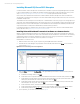
3. In Failover Cluster Manager, add the three disks just configured, one at a time in the following order: disk T:, disk S: and
disk V: (as used in this white paper; see Storage).
A. In the left pane, right-click Disks under Storage, and then click Add disk.
B. Check the box of the disk to be added and click OK. The disk is added as Cluster Disk n under Disks, located in the
middle pane.
C. Right-click the new cluster disk and then click Properties. Enter a new Resource Name that will more easily
identify the disk’s function (for example, DTC for disk T:), and then click OK. This will allow the proper disk to be
selected more easily in the sections that follow. Do the same for disk W:, disk T:, disk S:, and disk V:.
4. In the left pane of Failover Cluster Manager, expand Networks to enumerate the public and private networks. Check the
assigned names. Rename these resources to create descriptive names by right-clicking a network and changing its
Resource Name under Properties.
5. Validate the Failover Cluster configuration again. Repeat Step 4 in Table 2.