
Installing and upgrading HP Insight Management 7.3 on Windows Server 2012 Failover Clusters


Technical white paper | HP Insight Management 7.3
Note:
If you select Reporting Services or other additional features, there may be configuration screens in addition to the ones
described.
10. Feature Rules: Runs tests and produces a results display. Verify all tests are Passed and then click Next.
11. Instance Configuration:
A. Enter the Network Name provisioned for the SQL Server virtual server. This white paper uses cms-c17-sql.
B. Select Named instance and enter an instance name. This white paper uses cms_c17_instance. The Instance ID
suffix, used to identify installation directories and registry keys for the instance, will be the same as the instance
name by default.
C. You can customize the location of the Instance root directory. It should be on C:\ or another private disk.
D. The Detected SQL Server instances and features list shows items already installed on this system.
E. Click Next.
12. Disk Space Requirements: Review and click Next.
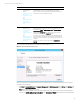
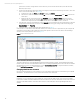
13. Cluster Resource Group: A cluster resource group under Roles in Failover Cluster Manager will be created and named
from the SQL Server cluster resource group name entry. Either keep the default name shown, select another name
from the drop-down (if another choice exists), or enter a name. This white paper kept the default selection, SQL Server
(cms_c17_instance). On the screen, the names with a red symbol in the
Qualified column are not eligible. Click Next.
14. Cluster Disk Selection: Select the box for each available shared disk you want SQL Server to use for data storage. In this
white paper one disk, c17_sql (S:\), is used. Note that the disk names shown are the cluster disk names. To identify
Windows drive letters, go to Failover Cluster Manager, click Storage and expand the disks shown in the center pane
under Available Storage. Click Next.
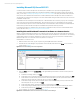
15. Cluster Network Configuration:
A. For IPv4, select the left check box to select, clear DHCP and enter the IP Address that has been provisioned for the
SQL Server virtual server. This white paper uses 15.199.192.146. Enter the Subnet Mask. The Network entry must
indicate the public network.
B. For IPv6, clear the left check box. Click Next.
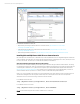
16. Server Configuration: Click each of the following tabs to make selections.
A. Service Accounts: [1] Specify credentials for the SQL Server services listed. You may enter a separate
account/password for each individual service. (To implement a best practice and provide the least privilege for
each account you will need separate accounts.) [2]
Startup Type is preset and cannot be changed during
installation.
B. Collation: Specify any desired non-default collations for the database engine and analysis services.
C. Click Next.
17. Database Engine Configuration: Click each of the following tabs to make selections.
A. Server Configuration: [1] In the Authentication Mode section, select Windows Authentication mode. [2] In the
Specify SQL Server administrators section, click Add Current User to add the SQL/IM Administrator account defined
by this white paper. Add other accounts if desired.
B. Data Directories: Specify any desired non-default installation directories.
C. FILESTREAM: Select Enable FILESTREAM for Transact-SQL access. Enabling FILESTREAM for file I/O streaming
access is not required. Click Next.
18. Analysis Services Configuration: Click each of the following tabs to make selections.
A. Server Configuration: Select Multidimensional and Data Mining Mode. Click Add Current User to add the SQL/IM
Administrator account defined by this white paper. Add other accounts if desired.
B. Data Directories: Specify any desired non-default installation directories. Click Next.
19. Reporting Services Configuration: If you selected the Reporting Services feature, make selections as done for Analysis
Services Configuration.
20. Error Reporting: Specify the preferred types of reporting services, and then click Next.
21. Cluster Installation Rules runs tests and produces a results display. Verify that no tests are failed, and then click Next.
22. Ready to Install: Verify the configuration presented, and then click Install.
23. Installation Progress monitors the steps of the installation. No input is needed.
24. Complete: The Complete screen provides the final installation status for each installed feature. Review the details
section. Click
Close to complete the SQL Server installation on the first system. If a reboot is needed, it will be noted on
this screen.
20