
HP Insight Online User's Guide


1. Select groups from Select device groups and click Next. The list shows only device groups that
contain direct connect devices that you have administrative privileges to modify:
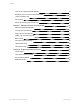
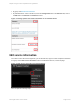
Figure 2.6 Edit service information
2. Select target devices whose information you want to change and click Next. Only direct connect
devices that you have administrative privileges to modify are listed.
3. Edit service information. Edit site, primary and secondary service information and support contact
information. Select an HP Authorized Channel partner. You can select HP or if you select a different
partner, provide that partner's location ID. Select to optimize your IT environment. That is, consent or
do not consent to having HP or an HP Authorized Channel Partner contact you about optimizing your
environment. Select this option if you plan to have an HP Authorized Channel Partner manage your
devices. See Enabling access to customer’s device information for details.
4. Validate and submit the new information.
The changes are applied to all the devices you selected. Changes are submitted by a batch process. The
name of the batch process is "DC_EDIT" plus the timestamp in Coordinated Universal Time (UTC). For
example:
DC_EDIT 2013–10–30 12:39:59:999 UTC
You are prompted to continue and to provide an optional email address to receive a notification when the
batch process has completed.
Devices included in a batch process submitted by you or by another user remain in the device list but are
grayed out. When you receive the email notification that your batch process is complete, you can click on
the refresh devices button (Refresh devices) to return the devices included in that process to their normal
state.
The email notifications contain summary status information and a link to your message log. Use the batch
process name to look up the status of the process in the message log.
For central connect devices, you must change this information in the Insight RS Hosting Device user
interface.
HP Insight Online:User's Guide Page 10 of 51
Chapter 2: Sign in and complete device registration