HP Superdome 2 Partitioning Administrator Guide HP-UX 11i v3 HP Part Number: 5900-2540 Published: December 2012 Edition: 5.
© Copyright 2010, 2012 Hewlett-Packard Development Company, L.P. Confidential computer software. Valid license from HP required for possession, use or copying. Consistent with FAR 12.211 and 12.212, Commercial Computer Software, Computer Software Documentation, and Technical Data for Commercial Items are licensed to the U.S. Government under vendor's standard commercial license. The information contained herein is subject to change without notice.
Contents 1 Introduction...............................................................................................7 Overview................................................................................................................................7 HP Superdome 2 terminology.....................................................................................................8 2 Partitioning in HP Superdome 2....................................................................
Planning nPartitions..................................................................................30 Recommended HP Superdome 2 nPartition configurations............................................................30 HP Superdome 2 Partitioning choices........................................................................................30 Superdome 2 CPU / CPU module support............................................................................33 CPU mixing support...............................
UPDATE SHOW NPARTITION..............................................................................................70 UPDATE FIRMWARE...........................................................................................................71 UPDATE SHOW FIRMWARE...............................................................................................72 HP Superdome 2 Boot Support.................................................................................................72 Local Boot.............
Adding cores to a running nPartition..................................................................................107 Deleting cores from a running nPartition..............................................................................111 Moving cores between partitions (vPars)..............................................................................115 Modifying the number of active cores in nPartition without vPars (iCAP only)............................
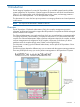
1 Introduction The HP Integrity Superdome 2 servers (HP Superdome 2) are scalable systems based on blade system architecture. HP Superdome 2 systems support HP nPartitions and HP-UX Virtual Partitions (vPars v5). This administrator guide describes the steps to plan, create, and manage partitions – nPartitions and virtual partitions – on an HP Superdome 2 system. This document is for users who have prior experience in managing nPartitions and virtual partitions on HP servers.
You can manage partitions on HP Superdome 2 systems using the following methods: • From the OA: The OA Graphical User Interface (GUI) and Command Line Interface (CLI) support partition management user interfaces. • From the partitions: The operating system based (Legacy) partition management command interfaces are supported from the partition OS instance, if these operations are targeted to that vPar instance.
2 Partitioning in HP Superdome 2 Onboard Administrator and Partition Management This chapter provides information on managing partitions – hard partitions (nPartitions) and virtual partitions (vPars v5) – using the Onboard Administrator. The OA supports both a GUI as well as a CLI. You can log in to the OA GUI by entering the appropriate URL in the web browser. The URL must include the hostname or IP address of the OA. Partitions on HP Superdome 2 systems support HP-UX 11i v3 operating environments.
Figure 1 OA GUI Login Screen 2. Enter the OA Administrator password. NOTE: The original Administrator password is available on a sticker on the OA module. Managing Partitions – basics The partition management architecture on HP Superdome 2 is designed to adapt to the new hardware and firmware architecture. This OA-based architecture supports integrated nPartition and virtual partitioning. nPartitions can be further subdivided using virtual partitions.
• Boot an existing nPartition. • Remove an nPartition. • Rename an nPartition. • Reset an nPartition. • Assign and unassign resources such as blades and I/O bays. You can define many possible configurations for an nPartition complex, and then control the configurations or partitions that can exist at any given point in time. This is possible by using partition specifications. You can use partition specification as a mechanism to store the definition of a partition.
NOTE: — Run the help command at the OA prompt, to view the current list of Partition Help pages. — The Partition Help pages are: ◦ nPartition Commands parcreate, parmodify, pardefault, parremove, parstatus, and parperm ◦ vPartition Commands vparcreate, vparmodify, vparreset, vparremove, vparstatus, vparresources, resourcepath and vecheck ◦ vparresources and resourcepath are not commands.
Cases where logging occurs Logging occurs when the commands either change or affect the state of partitions. The commands include parcreate, parmodify, parremove, vparboot, vparcreate, vparenv, vparremove, vparmodify, and vparreset. Constraints and restrictions to logging • The command line text will be logged on only the partition from which the command was executed. The logging of the command will not be duplicated to the target syslog file (the syslog file of the target partition.
Though vPars can be created from the OA without purchasing a vPar license, HP does not support such configurations. Attempting to boot HP-UX in a vPar without installing a licensed copy of vPars software can cause unpredictable behavior and must be avoided. Related software licensing Customers can purchase the HP-UX OS or the application software that runs within vPars, using the following options: 1.
The interfaces include the _CS_PARTITION_IDENT and _CS_MACHINE_IDENT parameters: • For a nPartition-specific or a virtual partition-specific unique ID, use this command: /usr/bin/getconf _CS_PARTITION_IDENT The unique partition identifier value for a virtual partition environment has virtual partition-specific data added that does not appear for an equivalent non-vPars environment. See the examples that follow.
3 Getting started with nPartitions HP Superdome 2 with sx3000 processors uses c-Class technology for the architecture of the system. The HP Superdome 2 is managed by an OA with enhanced firmware. The OA has partitioning capabilities, both for hard partitions (nPartition) and for virtual partitions (vPar). You can manage the nPartitions and vPars through the OA without installing the software on any disk. Partitions can also be managed from the OS's in the partitions (nPartition or vPar).
Table 2 nPartition Commands (continued) Command Description parmodify Modifies an existing nPartition. For more information, see help parmodify. parperm Configures partition configuration privilege for nPartitions and vPars . For more information, see help parperm. NOTE: The parperm command is available only from the onboard administrator. parremove Removes an existing nPartition. For more information, see help parremove.
[IOBay] Enclosure/ IOBay ========== 5/1 5/2 6/1 6/2 7/1 7/2 8/1 8/2 9/1 9/2 10/1 10/2 11/1 11/2 12/1 12/2 Usage/ Par Status* Num ====================== === Inactive /OK Inactive /OK Inactive /OK Inactive /OK Inactive /OK Inactive /OK Inactive /OK Inactive /OK Empty /INVALID Empty /INVALID Empty /INVALID Empty /INVALID Empty /INVALID Empty /INVALID Empty /INVALID Empty /INVALID - Pending Deletion ======== - * D-Deconfigured I-Indicted [Partition] Par State/ Num RunState Status* # of # of ILM/ Blades IOBa
NOTE: An I/O enclosure can be shared across nPartitions running either CB900s i2 blade or CB900s i4 blades by assigning each I/O bay independently to different partitions. NOTE: There are some I/O slots on the blade itself. These are two dual-port LAN on Motherboard modules (LoMs) and the iLO port of the blade. The LoMs are assigned slot numbers 4 and 5. The blade USB or VGA is assigned slot number 6. The iLO is assigned slot number 7.
NOTE: Hyperthreading was not enabled by default on legacy systems. Enabling or disabling Hyperthreading on HP Superdome 2 using the GUI To enable or disable hyperthreading on HP Superdome 2 using the GUI: 1. Log into the OA GUI. 2. Select the nPartition in the System and Devices tab. 3. Click Modify nPartition. 4. Click Advanced Settings. 5. Check or clear Enable Hyperthreading. 6. Click Apply. Hyperthreading is enabled or disabled depending on whether you check or clear the Enable Hyperthreading option.
• blade_path Specifies the blade resource path. It can be specified in short, medium, or long format. For example, the blade located in enclosure 1, slot 3 is identified in the short format as 1/3, in the medium format as blade:1/3, or in the long format as enclosure1/blade3. • blade_type Specifies the type of the blade. At initial release, the only valid blade_type value for blades is base. • use_on_next_boot Specifies whether the blade participates in the next reboot.
will be used as SLM. Consider that the user shuts down the nPartition, and adds 8 GB memory to that blade. When the nPartition is booted again, the blade will have 16 GB of memory, but the SLM will still be 4 GB. Example denoting the maximum SLM (each blade containing 16 GB of memory) being specified during parcreate, one as absolute value and the other as percentage: parcreate -p1 -a blade:1/5::::16GB -a blade:1/7::::100% Command Succeeded.
Enclosure/ Usage/ Par Pending IOBay Status* Num Deletion ========== ======================= === ======== * D-Deconfigured I-Indicted Example denoting a portion (10 GB from blade-1/5, 60% equals to 9.6 GB getting rounded to 10 GB from blade-1/7) of the total memory being specified for SLM, the rest gets applied to ILM: parcreate -p1 -a blade:1/5::::10GB -a blade:1/7::::60% Command Succeeded.
NOTE: On SD2, for an nPar in npar mode, nPars are created with a default ILM/SLM distribution of 1:7 when no value is specified for SLM. For an nPar created in vpar mode, the default value of SLM will be 0% and ILM will be 100%. For more information, see “Modes: Switching between nPars and vPars Modes ”.
Unknown An nPartition may report a Partition State of Unknown and RunState of DETACHED after an OA restart. This state is possible when the firmware is not able to identify the correct nPartition state due to internal firmware errors at OA startup. The state is persistent and can only be cleared by force powering off the nPartition from the OA. A partition in this state will not accept any partition operation for the nPartition or the virtual partitions, except parstatus, vparstatus and force poweroff.
RunStates The partition runstates displayed by the status commands and GUI display the actual state of the partition varying from a firmware boot state to a state where an operating system has successfully booted in a partition. Table 3 (page 26) lists the runstates for an nPartition. Table 3 RunStates for nPartition Runstate Description DOWN The partition is inactive and powered off. ACTIVATING A boot operation has been initiated for this partition.
NOTE: If the partition persists in the DETACHED state and manageability of the nPartition is needed immediately or if there are WSMAN alerts indicating permanent loss of firmware control (event number:10575), an outage of the nPartition needs to be planned and the partition must be forcibly powered off to recover it to the inactive state.
Creating a Partition specification You can create a parspec using the following command in the OA CLI: • parcreate -C PartitionSpec:[:create_partition_flag] Where PartitionSpec is the name of the parspec to be created. The create_partition_flag can take the following values: ◦ y – the corresponding nPartition is created. ◦ n – the corresponding nPartition does not get created. This is the default. NOTE: ◦ The -C option creates only a partition specification.
Identifying Partition specification using the OA GUI To view a partition's parspec name on the OA GUI: 1. Launch the OA GUI. 2. Select an nPartition. 3. Click Modify nPartition. Figure 3 (page 29) shows the window with the Partition Specification Name.
4 Planning nPartitions This chapter describes how to plan nPartition configurations. It also describes the nPartition configuration requirements and recommendations.
Figure 4 Partition Rules — 32s Details on possible uses of the alternative loading options: The alternative two cell blade partition with cell blades in slots 7 and 8 in enclosure 1 (shown in the light blue) is provided to allow 2 3-blade partition and 1 2-blade partition to co-exist in the same enclosure. The alternative two cell blade partition in slots 4 and 8 (bright green) is provided to support a two cell blade partition if two alternative three blade partitions are used.
Figure 5 Partition Rules — 16s Alternative options are provided in the event that a smaller partition is combined with a larger partition. For example, if a 3 blade partition is the only thing loaded, the blades are loaded in slots 1, 3 and 5. A second 3-blade partition is loaded in slots 2, 4 and 6. This is shown in the line 3P (preferred loading rules for 3 blade partitions).
Figure 6 Partition Rules — 8s NOTE: The loading rules for the SD2-8S are very similar to those for the SD2-16s except that no partitions larger than 4 blades are supported. This is a firmware limitation imposed on the SD2-8s. However, as seen from the loading options, all 8 blade slots can be populated in a SD2-8s. So you can have eight 1-blade partitions, four 2-blade partitions, two 4-blade partitions, or other combinations when a single partition is not larger than 4 blades.
Table 4 Processors supported on HP Superdome 2 (continued) Itanium Processor Family Core Frequency I/O Frequency Cache Number of Number of cores threads/core Poulson SKUA, 170W 2.53GHz P1, 2.67GHz Uncore F QPI: 6.4 GT/s SMI: 6.4 GT/s 32MB LLC 8 1-2 Poulson SKUB, 170W 2.13GHz P1, 2.4GHz Uncore F QPI: 4.8 GT/s SMI: 6.
Complex Capacity Compute Enclosure: 1 IO Enclosure: 8 Monarch OA Location: 1 Model: N/A Original Serial Number: Unset Current Product Order Number: AH337A OEM Manufacturer: N/A Total number of partitions present: 0 [Enclosure] Enclosure Num ========= 1 5 6 7 8 9 10 11 12 Enclosure Type ========= Compute IO IO IO IO IO IO IO IO Num Blades ====== 8 0 0 0 0 0 0 0 0 Num IOBays ====== 0 2 2 2 2 2 2 2 2 Bay Slots ===== 8 2 2 2 2 2 2 2 2 Enclosure Name ========= stanley - [Blade] Enclosure/ Usage/ Blade Stat
12/1 12/2 Empty /Invalid Empty /Invalid * D-Deconfigured - - I-Indicted [Partition] Par State/ Num RunState Status* # of # of ILM/ Partition Name Blades IOBays SLM (first 15 (GB)** characters) === ======================= ======= ====== ====== ============= =============== * D-Degraded ** Actual allocated for Active and User requested for Inactive partitions 2.
5 Creating and configuring nPartitions This chapter describes the procedure to create, configure, and manage nPartitions on the HP Superdome 2 server.
Task summaries for creating and configuring nPartitions Table 5 nPartition Boot and Reset Task Summaries Task Summary Partition Default Attributes See (page 38). Create new nPartition See (page 39). Verifying the nPartitions using CLI See (page 40) Verifying the nPartitions using GUI See (page 41). Deleting an nPartition See (page 42). Renaming an nPartition See (page 42). Assigning blades and I/O bays to an nPartition See (page 43).
Creating a new nPartition This section describes the procedure to create an nPartition using the OA CLI and the GUI. Creating a new nPartition using the OA CLI Use the parcreate command to create a new nPartition on HP Superdome 2. The command takes the specified blades and I/O bays and assigns them to the new nPartition. If an nPartition number is not specified, the command finds an available nPartition number and assigns it to the new nPartition.
Figure 7 Modify nPartition Window Verifying newly created nPartitions using the CLI To verify that the partitions are defined as desired, perform either of the following steps: • The parstatus –P command displays the summary data, as shown: parstatus -P [Partition] Par State/ Num RunState Status* # of # of ILM/ Blades IOBays SLM (GB)** === ======================= ======= ====== ====== ============= 1 Inactive /DOWN OK 2 0 32.0/224.0 2 Inactive /DOWN OK 1 1 16.0/112.0 3 Inactive /DOWN OK 1 1 16.0/112.
Active ILO Firmware Revision Total Good Memory Size Total Memory Available Total Interleave Memory Total SLM SLM at next boot ILM granule size ILM granule size at next boot SLM granule size SLM granule size at next boot Max number of ILM granules possible Max number of SLM granules possible User Specified Max number of blades Max number of blades at next boot User Specified Max number of vpars Max number of vpars at next boot Current boot mode Next boot mode Core Intended Active Parspec Change Policy VGA VG
Figure 8 nPartition Status Information Removing an nPartition This section describes the procedure to remove an nPartition using both the OA interfaces. Removing an nPartition using the OA CLI The parremove command removes an existing nPartition by unassigning all blades and I/O bays from the nPartition. The target nPartition must be inactive unless the -F option is used. By default, the current partition specification (parspec) associated with the nPartition is not removed when the nPartition is removed.
The parmodify command provides a new name for the nPartition that is being modified. That is, after all modifications are successfully applied to nPartition_id, it is renamed if a partition with the same name does not exist. An nPartition name must have one of the following non-numeric characters: a-z, A-Z, dash (-), underscore (_), and period (.). No other non-numeric characters are allowed in an nPartition name. An nPartition name must not start with a dash (-).
Figure 9 Blade Resources Option 3. 4. Select the blade resources that you want to assign to the nPartition. Expand the IOX Resources option. Figure 10 (page 45) shows the IOX Resources screen.
Figure 10 IOX Resources Option 5. 6. Select the I/O bay. Click Apply to commit your configuration changes. To cancel an operation, navigate away from the Modify nPartition screen. The blades and I/O bay are assigned to the nPartition. Removing blades and I/O bays from an nPartition This section describes the procedure to unassign or remove blades and I/O bays from an nPartition.
Removing blades and I/O bays from an nPartition using the OA GUI To unassign blades and I/O bays from an nPartition using the OA GUI: 1. Select the nPartition from the left navigation pane, and then click modify nPartition. 2. Expand the Blade Resources option. Figure 9 (page 44) shows the blade resource screen. Figure 11 Blade Resources Option 3. 4. Clear the blade resources that you want to unassign from the nPartition. Expand the IOX Resources option. Figure 10 (page 45) shows the IOX Resources screen.
Figure 12 IOX Resources Option 5. 6. Clear the I/O bay(s) that you want to unassign. Click Apply. The blades and I/O resources are unassigned from the nPartition. Renaming a server complex To rename a server complex using the CLI, run the following command from the OA: set complex name To rename a server complex using the GUI: 1. Select the Complex Information link in the left navigation pane. 2. On the Complex Information screen, click the Information tab. 3.
Setting blade attributes using the OA CLI You can set the blade attributes using the parcreate or parmodify commands. For more information about the parcreate command, see help parcreate. For more information about the parmodify command, see help parmodify. For example: To add the blade in enclosure 1 slot 5 with non-default attributes to the existing nPartition nPar0001: parmodify -p nPar0001 -a blade:1/5:base:n:ri:50% The example overrides the default value for use_on_next_boot to n.
5. 6. Select the appropriate attributes. Click Apply. The blade attributes are set.
6 Booting and resetting Partitions (nPartitions and vPars) This chapter introduces Partition system boot and reset concepts, configuration options, and procedures for booting and resetting Partitions. This chapter covers boot details for HP-UX 11i v3 operating system and the OA CLI and GUI.
Booting from the CLI To activate a partition from the command line, you can either use the poweron partition {identifier} command, the bo command, or the pe command. poweron partition 2 Poweron request sent to partition 2. Operation initiated successfully. Please run PARSTATUS/VPARSTATUS or SHOW SYSLOG OA to determine the completion status of the operation.
----------------1 nPar0001 1:1 nPar0001:vPar1 1:2 nPar0001:vPar0002 1:3 nPar0001:we 1:5 nPar0001:vPar0005 1:21 nPar0001:vPar0021 2 nPar0002 2:1 nPar0002:vPar0001 3 hard_partition 4 nPar0004 5 nPar0005 Q) Quit Select partition number: 2:1 The power state is OFF for partition 2:1. In what state do you want the power? (ON/OFF) on Booting from the GUI You can go to the individual partition screens from the left navigation pane regardless of whether the partition is an nPartition or a vPar. 1.
Figure 16 vPar Status information 2. Select the Virtual Devices tab, and then click on the Momentary Press button. Figure 17 nPartition Virtual Devices tab Figure 18 vPar Virtual Devices tab 3. Navigate to the status tab to see the run state of the partition.
Figure 19 Active/vPars Mode State of an nPartition Figure 20 Active/EFI prompt State of vPar Getting a Console using the CLI To access the system console of a partition using the command line, run the CO command.
1 nPar0001 2 nPar0002 2:1 nPar0002:vPar0001 Q) Quit Select partition number: 2:1 ----Log Snippet------------Log Snippet--------Welcome to the Superdome 2 console
from all assigned I/O devices in the lowest numbered device bay (blade) and lowest numbered I/O bay (IOX) for the partition. To reduce boot time, I/O devices from other bays are not connected. This occurs before displaying the UEFI Front Page. For example, a partition (vPar) is created by assigning processors and memory from blade1/1, and I/O is assigned from blades 1/2 and 1/3, and I/O bays 5/1 and 5/2.
The minimal policy specifies the list of devices that are guaranteed to be connected at boot. Changes to the minimal policy might be needed only for unusual OS configurations that use UEFI to access one or more extra devices besides the boot device. In general, it is not required to change the minimal policy because it is related to device connection before the UEFI Front Page. Also, it increases the boot time for the typical OS boot using a boot option.
1/2/4 1/2/5 1/2/6 1/2/7 0/0 0/2 2/2 2/3 04/00/00 04/00/02 00/08/02 00/08/03 x8 x8 x1 x1 8.00 8.00 500 500 GB/s GB/s MB/s MB/s Active Active Active Active 11/2/1 11/2/2 11/2/3 11/2/4 11/2/5 11/2/6 2/0 2/2 0/2 0/0 1/0 1/2 8A/00/00 8A/00/02 88/00/02 88/00/00 89/00/00 89/00/02 x4 x4 x8 x8 x8 x8 2.00 2.00 8.00 8.00 8.00 8.
Getting MAC Addresses for Ignite-UX The UEFI Shell command lanaddress can be used to list the MAC addresses of every network interface in a partition: Shell> lanaddress LAN Address Information M 001 002 M 003 004 LAN Address ----------------Mac(002655A9CA2A) Mac(002655A9CA2E) Mac(002655A9CA32) Mac(002655A9CA36) Path ---------------------------------------PcieRoot(0x3)/Pci(0x0,0x0)/Pci(0x0,0x0)/MAC(002655A9CA2A,0x0) PcieRoot(0x3)/Pci(0x0,0x0)/Pci(0x0,0x1)/MAC(002655A9CA2E,0x0) PcieRoot(0x3)/Pci(0x2,0x0)/P
1 When any of the 2-letter equivalents for POWERON/POWEROFF/TOC/REBOOT (namely, pe, tc, and rs respectively) are executed without any arguments, a list of available partitions on which the command may be excercised are displayed. POWEROFF PARTITION From the CLI • Command: POWEROFF PARTITION {{nPartition number or name} [:vPartition number or name] [FORCE] [OVERRIDE] | ALL [FORCE]} • Description: Gracefully shuts down any OS running on the specified nPartition or vPar and brings it to an inactive state.
From the GUI To poweroff from GUI: 1. Select an active partition. Figure 24 Status Information of an nPartition Figure 25 Status Information of a vPar 2. Select the Virtual Devices tab. • For force poweroff, click the Press and Hold button. • For graceful poweroff, click the Momentary Press button.
Figure 26 Graceful and Force Poweroff (nPartition) Figure 27 Graceful and Force Poweroff (vPar) • Navigate to the status tab to see the run state of the partition. NOTE: When an nPartition is active in vPars mode, the power operations require the OVERRIDE option to change the mode.
POWERON PARTITION From the CLI • Command: POWERON PARTITION {{nPartition number or name} [:vPartition number or name][OVERRIDE]} • Description: If an nPartition is specified, this command powers on the blades and IO interconnects in the nPartition and boots the nPartition to EFI. If the nPartition is in vPars mode and has vPars defined, then all the defined vPars in the nPartition are booted to EFI. If an individual vPar is specified, it is booted to EFI.
From the GUI For information on rebooting the partition, see “From the GUI”. NOTE: • The Partitioning firmware subsystem might internally translate a reboot or a reset into deactivation of the partition followed by an activation without user's intervention to enable user intent during the following scenarios: ◦ When there are Resource-deconfigurations in an nPar whose Parspec change policy is disabled.
• Access level/Bay level: OA Administrator, OA Operator • Restriction: You must be connected to the monarch OA. From the GUI The Virtual Media (vMedia) feature provides a virtual floppy disk, USB Key, or DVD. This allows an HP Superdome 2 partition to boot and use standard media on the network to which the iLO on a blade is connected. vMedia is also the mechanism used to give partitions access to the enclosure DVD drive. To connect to the enclosure DVD drive, the partition must be active.
Figure 29 Connecting an enclosure DVD to a vPar NOTE: A vPar can make a DVD/vmedia connection only if it owns the I/O slot 7 of a server blade (an assigned resource of the containing nPar). When you want to connect or disconnect DVD to a vpar, make sure that you have assigned I/O slot 7 (iLO slot) of a blade. After you insert the DVD, the Connect to Enclosure DVD button is enabled. Or Select Launch Virtual Media. Figure 30 (page 66) shows the Launch Virtual Media button and the Virtual Media screen.
NOTE: Each nPar or vPar has its own Virtual media applet window, servicing the virtual media connection. When there are multiple applet windows opened, switching back and forth between the partition pages and applet windows, the virtual media connection may get disconnected. You must reconnect the partition to the virtual media if you encounter this problem.
Figure 32 SHOW Partition DVD for vPar For information about DVD connection to a nPar, see “From the GUI” SHOW PARTITION INFO • Command: SHOW PARTITION INFO {{nPartition number or name} [:vPartition name or number]|ALL} • Description: Displays information about the specified partitions. • Access level/Bay level: OA Administrator, OA Operator • Restriction: You must be connected to the monarch OA.
• Access level/Bay level: OA Administrator, OA Operator • Restriction: You must be connected to the monarch OA. From the GUI On the partition's page, select the Virtual Devices tab, and then click Reset with Crash Dump.
UPDATE NPARTITION IMPORTANT: This command is not available if you are using complex firmware that is earlier than the Online Firmware Update release. To update firmware for all partitions, see “UPDATE FIRMWARE” (page 71).
• Access level/Bay level: All • Restriction: None GUI To view Firmware Summary information, click the Firmware Summary link. Figure 35 Firmware Summary Information UPDATE FIRMWARE CLI • Command: UPDATE FIRMWARE { } [ FORCE ] [ REINSTALL ] [ ALL ][ NOEXECUTE ] • Description: Updates the Superdome system's firmware (except I/O firmware) • Access level/Bay level: OA Administrator, OA Operator • Restriction: You must be connected to the monarch OA.
UPDATE SHOW FIRMWARE CLI • Command: UPDATE SHOW { FIRMWARE | NPARTITION { nPar name or number | ALL } } • Description: Displays the configured Superdome firmware version. The following Superdome 2 devices are listed whose installed firmware version differs from the system's configured firmware version: blade, XFM, SIOX, OA, GPSM. • Access level/Bay level: OA Administrator, OA Operator • Restriction: You must be connected to the monarch OA.
• Up to 512 LUNs supported per P2000 FC G3 array • P2000 FC G3 product options, HDD and RAID details in P2000 Fc G3 QuickSpec are available at: http://h18004.www1.hp.com/products/quickspecs/13551_div/13551_div.HTML Each partition (nPartition or vPar) requires dedicated boot paths and dedicated HBAs.
– Dual path connectivity allows the switch or array firmware updates without bringing SD2 down – For more redundancy or >16 partitions a second P2000 can be used Boot from External SAN An unlimited number of LUNs might be presented by an external SAN.
parstatus NOTE: No action specified. Default behavior is display all.
Viewing Partition and Resource Health Status Using the OA GUI To view the partition and resource health status using the OA GUI, select the nPartition from the left navigation pane. In the Status tab, the health status is shown as displayed in Figure 37 (page 76). Figure 37 nPartition Health Status Resource health policy The following are the resource health policies: 1. Partitionable resources a. Blades and Iobays are the nPar assignable resources.
a. b. Indicted resources are considered as healthy resources for activation. However, an nPar can be marked “degraded” if it owns any indicted resources apart from the deconfigured resources. 6. Deconfig failure usage policy a. If a blade or iobay is deconfigured, then that blade or iobay is not activated. b. By default, if a blade or iobay has some child resources that are deconfigured, then blade or iobay is activated and all the healthy sub-blade or iobay resources are activated. c.
7 Planning Your System for Virtual Partitions Planning Your Virtual Partitions A virtual partition is created by specifying the resources needed for the vPar. The resources that can be assigned to a vPar are: 1. CPU-cores - You must either specify the number of CPU-cores that are part of the vPar, or specify the resource paths of individual CPU-cores, or specify the socket resource paths and quantity from where the CPUs are to be assigned.
Minimal Hardware Configuration Every bootable virtual partition must have at least: • 1 CPU-core On HP Integrity Superdome 2, by default, a vPar is created with zero CPU-cores. Such a vPar cannot boot. • System memory (sufficient for HP-UX and the applications in that partition) • A boot disk (when using a mass storage unit, check your hardware manual to verify that it can support a boot disk) Although it is not required for booting a virtual partition, you can add a LAN card for networking.
NOTE: On an HP Integrity Superdome 2 system, a vPar is created with zero CPUs by default. Therefore, the default cpu:::[min] value is zero. The default cpu::::[max] value is the total number of CPUs in the nPartition. The virtual partition must be in the "Down" state to set the minimum or maximum value. Now the firmware allows you to create vPars irrespective of the min or max count, but upon poweron, it fails with the appropriate error message if it is not in the range of minimum or maximum count.
NOTE: • -d cpu::num syntax (deletion by total), or • -d socket:{socket_path}:cpu::num syntax (deletion by total in a specific socket), or • -d cpu:hw_path syntax (deletion by resource path) Any CPU can be deleted by-path, regardless of how it was assigned. If you delete by-path a CPU that was assigned by-count, the count of system assigned CPUs will be reduced. If you delete by-path a CPU that was assigned by-socket, the SLP count for that socket will be reduced.
nl vparstatus -vp 1:1 [CPU Details] Min/Max: 4/50 User assigned [Path]: 2/8/1/1 2/8/1/3 Boot processor [Path]: 1/1/0/0 System assigned [Path]: 1/1/0/0 1/1/1/0 1/1/1/1 2/8/0/0 2/8/0/2 2/8/0/3 2/8/1/0 Non-socket-specific: User assigned [Count]: 2 System assigned [Count]: 5 Socket-specific [Count]: Socket-ID/Count 2/8/0 2 The core 2/8/0/1 is removed. This core was assigned by-socket, the SLP count for socket 2/8/0 is decremented. Now delete core 1/1/1/0, by-path.
vparmodify -p 1:1 -d socket:2/8/0:cpu::3 vparmodify: Operation initiated successfully. Please run vparstatus with -v option to determine the completion status of the operation. vparstatus -vp 1:1 [CPU Details] min/Max: 4/50 User assigned [Path]: 2/8/1/1 2/8/1/3 Boot processor [Path]: 1/1/0/0 1/1/1/1 2/8/1/0 Non-socket-specific: User assigned [Count]: 2 System assigned [Count]: 3 Socket-specific [Count]: Socket-ID/Count The total number of cores in the vPar increases when the -a option is used.
vparmodify -N nPar0001 -p vPar0001 -m cpu::2 • If you want to add 1 CPU—core to an existing partition, regardless of its current CPU—core count, you can add 1 CPU—core by using the -a option and setting num to 1: vparmodify -N nPar0001 -p vPar0001 -a cpu::1 To remove the added CPU—core from the partition, use the -d option and set num to 1: vparmodify -N nPar0001 -p vPar0001 -d cpu::1 CPU-core: Adding or Deleting by Socket Local Processor (SLP) NOTE: If you start with all SLP assignments, but use gWLM, ov
Example • To add the CPU at 1/1/0/0 (enclosure 1, blade1, socket 0, core 0) and 1/1/0/1 to vPar0001: vparmodify -N -p -a cpu:1/1/0/0 -a cpu:1/1/0/1 CPU: Summary Information Impact on vPars Commands: Specifying CPU Table 7 (page 85) lists the CPU resource paths in the following four ways: Table 7 CPU-core Allocation Allocating By Forms Resource Path Example CPU resource path cpu:cpu_path enclosure#/blade#/ cpusocket#/cpucore# vparcreate -p Oslo -N Norway -a cpu:1/1/0/0 CPU c
or, for this example, run the following command. # # ioscan -m resourcepath | grep 48/0/0/2/0 48/0/0/2/0 48/0/0/2/0/0 0x900010002ffff8e 0x90001000203ff85 iorp-9/1/0/0/2 ioslot-9/1/3 Memory There are two major types of memory addressing, Socket Local Memory (SLM), and InterLeaved Memory (ILM). With SLM, entire memory address ranges are from a single socket. For best performance, memory and CPU-cores from the same sockets must be assigned to a vPar.
NOTE: Either 1 Gb or 2 Gb of ILM is reserved by System Firmware for boot and run-time needs of the nPartition. For example, consider an nPar configured in nPars mode and 100% SLM. After poweron, parstatus would report 2 Gb of memory in ILM. Before poweron: [Partition] Par State/ Status* # of Num RunState # of ILM/ Blades IOBays SLM (GB)** Partition Name (first 15 characters) === ======================= ======= ====== ====== ============= =============== 3 Inactive /DOWN OK 1 0 0.0/32.
Vparstatus –N4 –A reports 1 Gb of ILM as vPar assignable memory. So, the remaining 1 Gb of ILM is reserved for the nPartition needs.
[Available CPUs]: [CPUs (path)]: 8 1/7/0/0 1/7/0/1 1/7/0/2 1/7/0/3 1/7/1/0 1/7/1/1 1/7/1/2 1/7/1/3 [Socket CPU (Socket-ID Count)]: 1/7/0 4 1/7/1 4 [Available I/O devices (path)]: [Root Port] [Slot] 1/7/0/0/0 1/7/4 1/7/0/0/2 1/7/5 1/7/0/1/0 1/7/1 1/7/0/1/2 1/7/2 1/7/0/2/0 1/7/3 1/7/0/2/2 1/7/6 1/7/0/2/3 1/7/7 [Available ILM (MB)]: 14336 [Available SLM (Socket-ID MB)]: 1/7/0 8192 1/7/1 8192 Note that specifying the max_vpars value helps the system reserve only the needed amount of memory to manage
provides the rootport to ioslot mapping for the I/O resources in an I/O bay. Rootports and ioslots have a one-to-one mapping and either of them can be used to assign I/O to a vPar. The rootport (RP) or ioslot is specified in the resource path format. Typically disk devices or LAN devices get attached to a rootport. On blades, iLO is also off a rootport.
Table 8 Assigning I/O Resources I/O Short Form Resources Resource Path Rootport Blade I/O Slot Medium Form Long Form blade_enclosure/blade/ iohub/rootcomplex/rootport 3/6/0/1/2 iorp3 - /6/0/1/2 enclosure3/blade6/iohub0/iorc1/iorp2 I/O Bay io_enclosure/iobay/ iohub/rootcomplex/rootport 7/1/0/1/2 iorp7 - /1/0/1/2 enclosure7/iobay1/iohub0/iorc1/iorp2 Blade blade_enclosure#/blade#/ioslot# 3/6/5 ioslot-3/6/5 enclosure3/blade6/ioslot5 I/O Bay IO_enclosure#/iobay#/ioslot# 7/1/4 ioslot-7/1/4 enclos
Table 10 Resource syntax summary (continued) Resource I/O Memory Forms Options # times/command core:::{min}:{max} -m Once socket:socket_id:core::num -a, -d, -m Once per socket_id io:io_path -a, -d, -m Multiple ioslot:ioslot_path -a, -d, -m Multiple mem::ilm_size -a, -d, -m Once socket:socket_id:mem::slm_size -a, -d, -m Once per socket_id Counts Summary • At all times, the rule of min<=total<=max is enforced.
by resource path. To correct this, you can remove the CPU specified by resource path using vparmodify -d cpu:resourcepath to allow the deconfigured or deactivated CPU to be decommissioned. Add a different CPU to vPar using vparmodify if needed. • There is a deconfigured CPU which has been reserved for the partition as part of a SLP request (socket id:cpu::num) and there are no free SLPs in that socket.
8 Managing and Booting Virtual Partitions This chapter addresses the following topics: • “Modes: Switching between nPars and vPars Modes ” (page 94) • “Managing: Creating a Virtual Partition” (page 98) ◦ “Booting a Virtual Partition” (page 98) ◦ “Managing: Modifying attributes of a Virtual Partition” (page 99) ◦ “Commands: Displaying vPars Resource Information (vparstatus)” (page 100) ◦ “Shutting Down or Rebooting a Virtual Partition” (page 104) ◦ “Shutting down all Virtual Partitions” (page 10
5. 6. Expand the Boot Options row to select the boot option. Click Apply. The mode is set for the next boot of the nPartition.
Setting the mode using the OA CLI • parmodify -p [-N] next_boot_mode where: next_boot_mode has the value of either vPars or nPars Specifies whether the nPartition has to be booted as a single partition (nPars mode) capable of running only a single operating system (OS) instance or as one or more virtual partitions (vPars mode) as defined in the virtual partition database in the partition specification, each capable of running its own OS instance.
Figure 39 Booting vPar from the GUI Getting the vPar Console You can use either the command line or the GUI to access the system console of the virtual partition. From the CLI Use the co command with or without the partition ID. Example 5 Example co Partition Partition Number Name ----------------1 nPar0001 2 nPar0002 2:1 nPar0002:vPar0001 Q) Quit Select partition number: 2:1 ----Log Snippet------------Log Snippet--------Welcome to the Superdome 2 console
Figure 40 Remote Console NOTE: On HP Integrity Superdome 2, vpmon is not supported. If you attempt booting vpmon from the ISL prompt the following error message is displayed: ERROR: Unsupported boot environment for vpar monitor! Booting vpmon not supported on this platform Resetting the system! Managing: Creating a Virtual Partition You can create a virtual partition using the vparcreate command.
Booting from the CLI To set the vPars environment, you must set the nPartition into vPars mode so that the next nPartition boot allows you to boot into vPars mode. To set the nPartition mode: 1. Set the nPartition in vPar mode. # parmodify –p -N vpars 2. Do one of the following: a. poweron partition {nPartition identifier}[:{vPar identifier}] (Not specifying a vPar will result in all of the vPars in the nPartition to be booted.) b.
• To delete 1 GB of Socket Local Memory on enclosure 1, blade 2, socket 0 from the same virtual partition: vparmodify -N nPar0001 -p vPar0001 -d socket:1/2/0:mem::1024 • To add the I/O card in IOX 6, I/O bay 2, slot 3 to the virtual partition (io and ioslot syntax): vparmodify -N nPar0001 -p vPar0001 -a io:6/2/0/0/2 or vparmodify -N nPar0001 -p vPar0001 -a ioslot:6/2/3 Commands: Displaying vPars Resource Information (vparstatus) On HP Integrity Superdome 2, the Partition Controller running on the OA mai
Table 12 RunStates of an active Virtual Partition (continued) State Description DEACTIVATING This run-state is displayed while a shutdown/reboot of a virtual partition is being processed. RESETTING This run-state is displayed while a reset of a virtual partition is being processed. MCA An MCA occurred in the virtual partition and is being processed. INIT This run-state is displayed when an INIT of a virtual partition is being processed.
SLM (Socket-ID MB): SLM Granularity (MB): [OL* Details] Sequence ID: N/A Operation: None Status: None 1024 [Containing nPartition Details] nPartition number: 1 nPartition name: nPar0001 Current boot mode: vpars Next boot mode: vpars • To display the detailed attributes and resources of vpar1 in machine-readable format: vparstatus -M -p1:1 vPar0001;1:DOWN;Inactive::::0/8;;;;;0;6;:6/2/0/0/2;6/2/3:;4096;;;4096;1024;;;;1024:N/A;N/A;N/A:N:1;nPar0001;vpars;vpars • To display the CPU-core configuration infor
2/5/0 4 2/5/1 4 [Available CPUs]: 2 [Available I/O devices (path)]: [Available ILM (MB)]: 124912 [Available SLM (Socket-ID MB)]: • [Root Port] [Slot] 1/2/0/0/0 1/2/4 1/2/0/0/2 1/2/5 1/2/0/1/0 1/2/1 1/2/0/1/2 1/2/2 1/2/0/2/0 1/2/3 1/2/0/2/2 1/2/6 6/2/0/0/0 6/2/4 6/2/0/1/0 6/2/5 6/2/0/1/2 6/2/6 6/2/0/2/0 6/2/1 6/2/0/2/2 6/2/2 1/2/0 0 1/2/1 0 To display the revisions of partition management tools: vparstatus -r Partition Management Software Revision: 1.
NOTE: The information about the configured vPars in the SD2 complex can be obtained from the OA irrespective of the runstate of the nPartition or the vPars. You can use the vparstatus -N or parstatus -P [-v|-M] to list all vPars available in the SD2 complex.
To poweroff a virtual partition from the OA prompt, do one of the following: ◦ For graceful shutdown type: poweroff partition 1:1 ◦ For ungraceful shutdown (required whenever the partition is at the UEFI prompt) type: poweroff partition 1:1 force • To reset a virtual partition invoked from the OA: reboot partition force 1:1 • To simulate a hard-reset, use the -h option: vparreset -f -p 1:1 -h or poweroff partition 1:1 force • To simulate a TOC reset, use the -t option: vparreset -f -p 1:1 -t or vp
# vparstatus -N 1 # shutdown -h 3. After the virtual partition is in the down state, remove the virtual partition vPar0001: vparremove -N nPar0001 -p vPar0001 -f CAUTION: Involuntary use of this command leads to unforeseen consequences. Therefore, you must confirm the operation with the -f (force) option. Managing: Modifying Virtual Partitions online With the update of Dynamic Cores, the Superdome 2 supports the resizing of both vPars v5 and nPars without rebooting the system.
2/5/1/1 2/5/1/2 2/5/1/3 [Socket CPU (Socket-ID Count)]: 1/5/0 1/5/1 2/5/0 2/5/1 3 4 4 4 [Available I/O devices (path)]: [Root Port] [Slot] 1/1/0/0/2 1/1/5 1/1/0/1/0 1/1/1 1/1/0/1/2 1/1/2 1/1/0/2/0 1/1/3 1/1/0/2/2 1/1/6 1/1/0/2/3 1/1/7 1/3/0/0/0 1/3/4 1/3/0/0/2 1/3/5 1/3/0/1/0 1/3/1 1/3/0/1/2 1/3/2 1/3/0/2/0 1/3/3 1/3/0/2/2 1/3/6 1/3/0/2/3 1/3/7 1/5/0/0/0 1/5/4 1/5/0/0/2 1/5/5 1/5/0/1/0 1/5/1 1/5/0/1/2 1/5/2 1/5/0/2/0 1/5/3 1/5/0/2/2 1/5/6 1/5/0/2/3 1/5/7 2/5/0/0/2 2/5/5 2/5/0/1/0 2/5/1 2/5/0/2/0 2/5/3 2/5
For example, vparstatus -p 1:1 -v [Virtual Partition Details] Number: 1 Name: vPar0001 RunState: UP State: Active [CPU Details] Min/Max: 0/64 User assigned [Path]: Boot processor [Path]: 1/1/0/0 System assigned [Path]: 1/1/0/0 1/1/0/1 1/1/0/2 Non-socket-specific: User assigned [Count]: 0 System assigned [Count]: 3 Socket-specific [Count]: Socket-ID/Count [IO Details} [Root Port] [Slot] 10/1/0/2/0 10/1/1 [Memory Details] ILM Total (MB): 8192 ILM Granularity (MB): 512 SLM (Socket-ID MB): SLM Granularit
Non-socket-specific: User assigned [Count]: 0 System assigned [Count]: 4 Socket-specific [Count]: Socket-ID/Count [IO Details] [Root Port] [Slot] 10/1/0/2/0 10/1/1 [Memory Details] ILM Total (MB): 8192 ILM Granularity (MB): 512 SLM (Socket-ID MB): SLM Granularity (MB): 1024 [OL* Details] Sequence ID: 1 Operation: CPU Addition Status: PASS [Containing nPartition Details] nPartition number: 1 nPartition name: nPar0001 Current boot mode: vpars Next boot mode: vpars NOTE: ◦ The following error message
or # vparmodify —p {vpar_id} —m cpu::{total number of cores to be set} When you add cores by count, the partitioning firmware selects the best fit from the available cores on a LORA enabled system. The firmware finds the cores on the same socket or on the socket that is closest to the memory that is already in the vPar.
5/1/0/1/0 5/1/0/1/2 5/1/0/2/0 5/1/0/2/2 5/1/5 5/1/6 5/1/1 5/1/2 [Memory Details] ILM Total (MB): 2048 ILM Granularity (MB): 1024 SLM (Socket-ID MB): SLM Granularity (MB): 1024 [OL* Details] Sequence ID: 12 Operation: CPU Addition Status: PASS [Containing nPartition Details] nPartition number: 1 nParitiion name: nPar0001 Current boot mode: vpars Next boot mode: vpars or My Complex> vparmodify —N {npar_id} —p {vpar_id} —m socket:{socket_id}:cpu::{total number of cores to be set} • By individual core hardw
The following are the three ways of deleting cores: • By count: You must have at least one more core than the count, as used in either of the following commands: MyComplex> vparmodify —N {npar_id} —p {vpar_id} —d cpu::{count} For example, vparstatus -p 1:1 -v [Virtual Partition Details] Number: 1 Name: vPar0001 RunState: UP State: Active [CPU Details] Min/Max: 0/64 User assigned [Path]: Boot processor [Path]: 1/1/0/0 System assigned [Path]: 1/1/0/0 1/1/0/1 1/1/0/2 1/1/1/2 Non-socket-specific: User assigned
Non-socket-specific: User assigned [Count]: 0 System assigned [Count]: 3 Socket-specific [Count]: Socket-ID/Count [IO Details] [Root Port] [Slot] 10/1/0/2/0 10/1/1 [Memory Details] ILM Total (MB): 8192 ILM Granularity (MB): 512 SLM (Socket-ID MB): SLM Granularity (MB): 1024 [OL* Details] Sequence ID: 2 Operation: CPU Deletion Status: PASS [Containing nPartition Details] nPartition number: 1 nPartition name: nPar0001 Current boot mode: vpars Next boot mode: vpars or MyComplex> icapmodify —p {npar_id
vparmodify command removes the last core from that socket, or removes more cores than the cores available in vPar on that socket. The format for deletion of cores is: MyComplex> vparmodify —N {npar_id} —p {vpar_id} —d socket:{socket_id}:cpu::{count} For example, vparmodify -N1 -p1 -d socket:1/3/1:cpu::1 vparmodify: Operation initiated successfully. Please run vparstatus with -v option to determine the completion status of the operation.
[Containing nPartition Details] nPartition number: 1 nPartition name: nPar0001 Current boot mode: vpars Next boot mode: vpars or MyComplex> vparmodify —N {npar_id} —p {vpar_id} —m socket:{socket_is}:cpu::{count} NOTE: The system deletes any core from that socket irrespective of the method in which the core from that socket is added to the vPar (by count, by socket specified count, or by path). • By individual core hardware path: This method is similar to addition.
Boot options management for partitions On HP Superdome 2 servers, each virtual partition has its own instance of UEFI. This means that an OS in a virtual partition can be booted from the UEFI, just like an nPartition. Standard UEFI/loader/OS mechanisms can be used to set boot disks, specify kernel paths and kernel boot options for a vPar. NOTE: Consequently, there is no support for specifying boot disk, kernel boot path or kernel boot options in the vPar commands.
9 Installing or Removing the vPars product from the OS This chapter addresses the following topics: • Before You Install the vPars Software • “Installing vPars” (page 117) • “Bundle Names” (page 119) • “Ignite-UX Cookbook” (page 119) • “Removing the vPars Product” (page 119) Before You Install the vPars Software You must have a complete understanding of vPars before attempting installation. For more information, see the “Planning Your System for Virtual Partitions” (page 78).
Installing through a Network with non-directed LAN boot (using an Ignite server). Requires boot server to respond to client request. a. b. c. Enter lanboot select at the UEFI shell. Select the desired LAN, for example, 01. Wait for the boot server to reply, and load the boot file (For Example: nbp.efi), then choose the operating system you want to install. Installing through a Network with directed LAN boot (using an Ignite server), using static client configuration. a.
6. Installing a vPar is similar to installing an nPar. For the next steps on vPars product installation on HP-UX, see the HP-UX Installation and Update Guide at: http://www.hp.com/go/hpux-core-docs. 7. To disconnect the DVD drive, use the set partition dvd disconnect npar:vpar command. IMPORTANT: This is a mandatory step to enable the DVD drive for future installations.
10 Support and other resources Contacting HP Before you contact HP Be sure to have the following information available before you call contact HP: • Technical support registration number (if applicable) • Product serial number • Product model name and number • Product identification number • Applicable error message • Add-on boards or hardware • Third-party hardware or software • Operating system type and revision level HP contact information For the name of the nearest HP authorized reselle
Table 13 Documentation and its location Documents Website HP Superdome 2 Onboard Administrator User Guide http://h20000.www2.hp.com/bizsupport/TechSupport/Product.jsp? lang=en&cc=us&prodTypeId=15351&prodCatId=321933 HP Superdome 2 Onboard Administrator Command Line Interface User Guide Virtual Partition documentation www.hp.com/go/hpux-vpars-docs HP-UX System documentation http://www.hp.com/go/hpux-core-docs Partition commands http://www.hp.
IMPORTANT This alert provides essential information to explain a concept or to complete a task NOTE A note contains additional information to emphasize or supplement important points of the main text.
A Partition commands This appendix contains a summary of the Partition commands and descriptions of their use. Table 14 Partition Commands Descriptions Command Description parcreate Creates a new nPartition. pardefault Displays or changes default values of certain nPartition attributes. parmodify Modifies an existing nPartition. parperm Configure partition configuration privilege for nPartitions and vPars. NOTE: This command is available only from the OA.
Glossary assignable resource The resources that a customer can designate to be assigned to a partition. Blade A board that contains CPUs, memory, slots for C-class mezzanine cards, and onboard NICs. A blade is the equivalent of a cell in terms of being the unit of assignment for defining nPartitions. complex A collection of blade enclosures and IOXs cabled together and under the control of a single active, monarch OA (ignoring OA failures).
Index A adding cpu to a partition, 79 attributes, 99 B boot processor, 79 booting one partition, 98 rebooting a partition, 104 C commands HP-UX shell commands setboot, 116 shutdown, 104 vparenv, 94 vparmodify, 99 vparstatus, 100, 104 CPU, 79 adding and removing, 79 boot processor, 79 resource path, 84 socket local processor, 84 creating a partition, 98 D creating, 98 example plan, 78 I/O, 89 minimal hardware configuration, 79 modifying attributes of, 99 names of, 78 obtaining information about, 100 remo
vparenv, 94 vparmodify cpu, 79, 80, 84 vparstatus, 100 126 Index