HP StorageWorks P4000 VSA Installation and Configuration Guide This guide provides information about installing and configuring the VSA for ESX Server and the VSA for Hyper-V. Included are network configuration best practices to ensure the best performance for the SAN using the VSAs. The intended audience is system administrators responsible for managing P4000 SAN Solutions using VSAs.
Legal and notice information © Copyright 2010 Hewlett-Packard Development Company, L.P. Confidential computer software. Valid license from HP required for possession, use or copying. Consistent with FAR 12.211 and 12.212, Commercial Computer Software, Computer Software Documentation, and Technical Data for Commercial Items are licensed to the U.S. Government under vendor's standard commercial license. The information contained herein is subject to change without notice.
Contents 1 Planning for the VSA .......................................................................... 7 Planning the virtual network configuration ...................................................................................... 7 Planning the clustered storage configuration ................................................................................... 7 2 Installing the VSA for ESX Server .......................................................... 9 Prerequisites ............................
Changing the disk size on the SAN ...................................................................................... Sample configurations ............................................................................................................... Single system configuration .................................................................................................. Two-system configuration .....................................................................................................
Figures 1 Logging in to the Configuration Interface .................................................................... 11 2 Editing Find Systems to control the systems displayed ................................................... 18 3 Configuring the hardware ........................................................................................ 19 4 Adding additional disks to RAID in the VSA for Hyper-V ............................................... 20 5 Example of a virtual SAN using the VSA .........
Tables 1 Reserve physical memory for VSA for ESX disks ............................................................ 9 2 Relationship of disk size to datastore block size ........................................................... 10 3 Memory requirements for Hyper-V VSA disks .............................................................. 14 4 Configuring the VSA for Hyper-V using the installer wizard ........................................... 15 5 Troubleshooting the Hyper-V VSA installation ..............
1 Planning for the VSA Careful planning of the virtual network configuration, the VSA configuration, and the configuration of the clusters and volumes for data storage ensures that you can take full advantage of the features and benefits of the HP P4000 SAN Solution. Planning the virtual network configuration Before you install the VSA on the network, plan the virtual network configuration, including the following areas: • Design and configuration of the virtual switches and network adapters.
Planning for the VSA
2 Installing the VSA for ESX Server The HP StorageWorks P4000 VSA is pre-formatted for use with VMware ESX Server. If you are using an evaluation copy, to continue using the VSA after the trial period has ended you must purchase a license key. After you apply the license key, your configuration can be used as is in a production environment, or reconfigured if necessary. Prerequisites • VMware ESX Server version 3.x or greater. • Have available drive space of up to 10 TB for ESX Server.
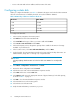
• Power on the VSA and set the IP address and host name of the VSA. Configuring a data disk When you configure the data disk, use Table 2 to determine the proper size for the disk. The maximum disk size on the ESX Server is limited by the block size used to format the datastore. Table 2 Relationship of disk size to datastore block size Block Size Max VMDK 1 MB 256 GB 2 MB 512 GB 4 MB 1024 GB 8 MB 2048 GB To configure the data disk: 1. In the VI Client, navigate to the Inventory Panel. 2.
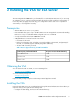
Powering on the VSA and setting IP address and hostname 1. In the inventory panel, select the new VSA and power it on. 2. Select the Console tab and wait for the VSA to boot. Figure 1 Logging in to the Configuration Interface . 3. When the VSA finishes booting, type Start and press Enter to log in to the Configuration Interface. 4. On the Configuration Interface main menu, tab to Network TCP/IP Settings and press Enter. 5.
2. In the General section on the Summary tab, verify that the IP address and host name are correct, and that VMware Tools are running. NOTE: If VMware Tools show out of date or not installed, then they are running correctly. These statuses are not a problem, because the tools are there and running. VMware tools are updated with each SAN/iQ software upgrade. 3.
3 Installing the P4000 VSA for Hyper-V The HP StorageWorks P4000 VSA for Hyper-V is pre-formatted for use with Microsoft® Windows® Server 2008 R2 Hyper-V™. Install the VSA for Hyper-V on a Windows Server 2008 configured with redundant RAID. If you are using an evaluation copy, to continue using the VSA after the trial period has ended you must purchase a license key. After you apply the license key, your configuration can be used as is in a production environment, or reconfigured if necessary.
• If using physical disks, they must be connected, but offline in Windows Disk Manager before starting the installer. Table 3 Memory requirements for Hyper-V VSA disks Total capacity of all installed disks Requires at least this much memory • ≤ 500 GB up to, but less than 4.5 TB • 1 GB • 4.
finishing the installation, install the CMC and find the VSAs as storage systems in the CMC. You can then set up the clustered storage for the SAN, as described in Chapter 4. NOTE: One or more Microsoft hotfixes may be required on your system before you can install the VSA for Hyper-V. If this is the case, before the installer actually begins, a window opens that notifies you of the required hotfixes and provides links to the appropriate site to download the hotfix.
4. Finish the installation, reviewing the configuration summary. When the installer is finished, the VSA is ready to be used in the P4000 SAN Solution. 5. Next, install the CMC, described in Chapter 4. Then follow the steps in “Getting started with the CMC” on page 17. The installer may take a few minutes to complete, depending upon the underlying hardware.
4 Getting started with the P4000 SAN Installing the CMC Install the CMC on the computer or virtual machine that you use to administer the P4000 SAN Solution. You administer the entire network of VSAs from this CMC. To obtain the CMC, you must download the HP StorageWorks P4000 Management Software for Microsoft Windows. Find the DVD image at www.hp.com/go/p4000downloads. Prerequisite For the Central Management Console complete installation, 35 MB disk space and 50 MB RAM during runtime.
If you want to control which systems appear in the CMC, you can change the configuration using the following steps. 1. Open the CMC. 2. Click Find Systems on the Getting Started Launch Pad. In the Find Systems window, use these features to control the list of systems: • Clear Auto Discover by Broadcast to prevent the entire subnet of systems from appearing in the navigation pane. • Add individual IP addresses of systems that you want to appear in the navigation pane.
1. Configure monitoring , RAID, and network from these categories Figure 3 Configuring the hardware . Configuring RAID Configure RAID after powering on the VSA. If you power off the VSA and add disks, you must re-configure RAID when you power on the VSA. RAID and the VSA for Hyper-V If you create the VSA for Hyper-V with one disk, RAID will be automatically configured. If you create the VSA for Hyper-V with more than one disk, you must manually add the remaining disks to RAID using the CMC. 1.
Figure 4 Adding additional disks to RAID in the VSA for Hyper-V . RAID and the VSA for ESX Server If you have trouble configuring RAID now, you may have made a mistake when configuring a virtual disk earlier. On the ESX Server, verify that the VSA has at least one virtual disk. The first virtual disk must be configured on SCSI 1:0. Additional disks must be configured sequentially on SCSI 1:1 through 1:4.
Best Practice Summary Use the Best Practice Summary in the CMC to review your SAN configuration and to ensure you are following best practices for the disk RAID and Network RAID configurations, as well as network configurations and the overall SAN configuration. The Best Practice Summary provides an easy-to-use reference about best practices that can increase the reliability and performance of your SAN configurations. You can see the Best Practice Summary on the Configuration Summary window in the CMC.
Problem You want to see your VSA, but the window is black. Solution • You are in the console view of the guest window. Change to the Summary view. • Your console window has timed out. Click in the window with the mouse and then press Backspace. Table 7 Troubleshooting installation — Hyper-V version Problem Solution Using the Hyper-V Manager: You want to reinstall the VSA You cannot find the VSA with the CMC, and cannot recall its IP address. 1. Close your CMC session. 2.
5 Designing a virtual SAN The HP P4000 VSA enables full featured use of the SAN/iQ software in a virtualized environment. When deployed correctly, HP StorageWorks P4000 virtual SANs are scalable, highly available, and fully redundant. Figure 5 Example of a virtual SAN using the VSA . Designing your virtual SAN The design of your virtual SAN affects both its performance and its reliability for production use.
• Reserved memory based on total disk capacity, as listed in Table 8 on page 24. Table 8 Memory requirements for VSA disks Total capacity of all installed disks Requires at least this much memory ESX Server • ≤ 500 GB • 384 MB • 500 GB to 4.5 TB • 1 GB • 4.5 TB to 9 TB • 2 GB • 9 TB to 10 TB • 3 GB Hyper-V • ≤ 500 GB up to, but less than 4.5 TB • 1 GB • 4.5 TB up to, but less than 9 TB • 2 GB • 9 TB up to, but less than 10 TB • 3 GB • A single virtual CPU with at least 2000 MHz reserved.
• Be configured to start automatically and first, and before any other virtual machines, when the ESX Server on which it resides is started. This ensures that the VSA is brought back online as soon as possible to automatically re-join its cluster. The default installation configuration for the HyperV VSA is set to automatically start if it was running when the server shut down.
CPU Because the CPU of the VSA must be reserved, platforms that will host a VSA and other VMs should be built with more processor cores to accommodate the additional VMs. Multi-core processors with at least 2 GHz per core should be used so that a single core with at least 2 GHz can be reserved for the VSA. All additional cores are then available for use with other VMs, thereby avoiding resource contention with the virtual SAN.
• Cloning VSAs To clone a VSA, you must do so while the VSA is still in the Available Systems pool, before you add it to a management group. Cloning a VSA after it is in a management group is not supported. NOTE: Configure the first VSA for RAID and Networking. Then create your clone with the hardware settings already configured.
• Hyper-V — Add up to four additional disks to SCSI Controller 0, location 1 through 4. This assumes that the first disk has already been created in SCSI Controller 0, location 0. Table 9 Memory requirements for VSA disks Total capacity of all installed disks Requires at least this much memory ESX Server • ≤ 500 GB • 384 MB • 500 GB to 4.5 TB • 1 GB • 4.5 TB to 9 TB • 2 GB • 9 TB to 10 TB • 3 GB Hyper-V • ≤ 500 GB up to, but less than 4.5 TB • 1 GB • 4.
You must follow these steps in the sequence listed or the VSA will be unable to participate in a management group. 1. Remove the VSA from the management group. 2. Power off the VSA. In ESX Server a. b. c. In VI Client, select the VSA and select Edit Settings to open the Virtual Machine Properties window. Select the hard disk that is on the port SCSI 1:0 and click Remove. Click Add and use the Add Hardware Wizard to add a new hard disk of the desired size to port SCSI 1:0 (ESX Server).
Two-system configuration A two-system configuration is the smallest possible redundant configuration. Automatic failover between systems requires a failover manager. A two-system configuration includes the elements listed.
Figure 8 Three-system-plus configuration .
Designing a virtual SAN
A Using the VMware VSA laptop demo The VMware VSA laptop demo is the smallest and most portable version of the SAN/iQ software virtual appliance. Use this demo to create an HP StorageWorks SAN Solution, complete with storage clusters. NOTE: There is not a separate demo version of the VSA for Hyper-V. The VSA can be used for free indefinitely as a single system iSCSI target with snapshots. If a configuration is deleted and recreated, the trial period of licensed features starts again.
Installing the VSA When you start the VSA for the first time with a VMware console, you will: • Unzip to the prepared directory and start the virtual machine. • Direct the Ethernet port to NAT (default), Host-only, or bridged. • Set the IP address and host name of the VSA. You only need to configure each virtual machine once. 1. Copy or download the VSA zip file. 2. Copy or unzip the VSA files to the virtual machine directory.
6 Support and other resources Contacting HP For worldwide technical support information, see the HP support website: http://www.hp.
To download the software, go to Software Depot: https://h20392.www2.hp.com/portal/swdepot/index.do. Select Insight Remote Support from the menu on the right.